Installing a new dryer might seem like a straightforward weekend project—until you uncover a tangled mess of outdated wiring or realize your connection doesn’t match modern electrical codes. The difference between a quick, successful installation and a frustrating, potentially dangerous ordeal often comes down to one critical decision: choosing the right electrical connection kit. Code compliance isn’t just about passing inspection; it’s about protecting your home and family from electrical hazards that can lead to fires, shocks, or costly damage.
The good news? Today’s electrical connection kits have evolved to make compliant installations faster and more foolproof than ever before. Whether you’re a seasoned DIY enthusiast or a homeowner determined to understand what your contractor is installing, knowing what separates a subpar kit from a professional-grade solution will save you time, money, and peace of mind. Let’s dive into everything you need to know to make your dryer installation both code-compliant and efficient.
Top 10 Electrical Connection Kits for Dryer Installs
Detailed Product Reviews
1. Senshare Dryer Vent Connector Kit, Dryer Vent Wall Plate with Quick Connect & Disconnect, Twist Lock Dryer Duct Connector Kit Fits 4 Inch Tubes, Covers Area 7 Inch x 7 Inch, for Dryer Washer Bathroom

Overview:
The Senshare Dryer Vent Connector Kit delivers a clever twist-lock solution for managing dryer vent connections. Designed for 4-inch tubes with a 7x7 inch wall plate, this kit prioritizes convenience for users who frequently access their dryer vent for cleaning or maintenance. The innovative mechanism allows tool-free connection and disconnection, making it particularly appealing for renters or those with limited DIY experience who need reliable performance without permanent installation headaches.
What Makes It Stand Out:
The twist-lock mechanism is the star feature, eliminating the frustration of traditional clamp-based systems that often slip off. The secure seal prevents air leaks while remaining easily accessible when you need to clean out lint buildup. Its versatility extends beyond dryers to bathroom vents, laundry closets, and even workshop dust collection, making it a multi-purpose solution that justifies its place in any home improvement toolkit.
Value for Money:
At $13.99, this connector kit sits in the budget-friendly category, costing about the same as a few basic clamps but offering significantly more convenience. For anyone who’s wrestled with slipping vent hoses, the time and hassle saved justify every penny. The enhanced locking mechanism prevents costly energy loss from disconnected ducts, potentially paying for itself through improved efficiency.
Strengths and Weaknesses:
Pros include the innovative quick-connect system, secure airtight seal, straightforward installation, and broad application range. The 7x7 inch plate provides adequate coverage for standard installations. Cons are the limited 4-inch compatibility, lack of included hose or clamps in some packages, and the wall plate may not cover oversized or irregular holes from previous installations. The twist mechanism could wear with excessive use.
Bottom Line:
This connector kit is a smart upgrade for anyone tired of dealing with loose dryer vent hoses. While it won’t replace a complete venting system, it excels at its primary function—providing a secure, easily detachable connection that makes maintenance a breeze. Perfect for renters and homeowners alike who prioritize convenience and reliability.
2. Steam Dryer Hose Install Kit (6 FT) - 3-Layer PVC Coated Stainless Steel - Burst Proof - Universal Fit to All Steam Dryer Brands - Includes 90 Degree Elbow, 1 Foot Inlet and Y Connector

Overview:
The Steam Dryer Hose Install Kit is a specialized solution for steam dryers requiring water supply connections. This 6-foot stainless steel braided hose features a 90-degree elbow design and includes a Y-connector and 1-foot inlet adapter, providing everything needed for steam dryer installation in one comprehensive package. Note this serves as a water supply line, not an exhaust vent.
What Makes It Stand Out:
The burst-proof rating up to 1500psi offers exceptional peace of mind, far exceeding standard hose capabilities. The color-coded PVC coating adds an extra protection layer while simplifying identification during installation. The kit’s universal compatibility ensures it works with all major washer and dryer brands, eliminating guesswork and potential returns due to fit issues.
Value for Money:
Priced at $24.97, this kit delivers premium features at a mid-range price point. The 5-year written warranty and UPC certification add significant value, especially considering the potential water damage from hose failures. It’s priced competitively with lower-quality alternatives while offering superior protection and includes brass hardware for corrosion resistance, making it a prudent long-term investment.
Strengths and Weaknesses:
Strengths include the impressive pressure rating, durable 304 stainless steel construction, complete installation package, and generous warranty. The color-coded design prevents installation errors. Weaknesses are its specific purpose—this is for steam dryer water supply, not exhaust venting, which may confuse buyers. The robust construction might be overkill for basic installations, and the included Y-connector may be unnecessary for single-dryer setups.
Bottom Line:
If you own a steam dryer, this kit is essential insurance against water damage. The burst-proof construction and comprehensive warranty make it a worthwhile investment. However, standard dryer owners should look elsewhere, as this serves a completely different function than venting kits. Read product descriptions carefully to ensure it matches your needs.
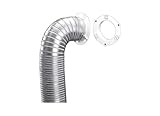
3. Dryer Vent Kit Through Wall with Hose/Duct Connector/Plate,4 Inch Stainless Steel Dryer Vent Hose Connector Wall Ducting Kit for Bathroom Exhaust Fans AC Ventilation,Ceiling Washer Air Circulation
Overview:
This comprehensive Dryer Vent Kit Through Wall provides a complete stainless steel solution for permanent venting installations. Designed for 4-inch systems, it includes a flexible hose extending to nearly 5 feet, a louvered vent cover, metal duct connector, wall plate, clamps, and sealing tape—everything required for a professional through-wall setup for dryers, bathroom fans, or other ventilation needs.
What Makes It Stand Out:
The all-in-one package eliminates multiple shopping trips, while the stainless steel construction ensures durability against weather and corrosion. The kit’s thoughtful design includes a foam adapter for 3-4 inch transitions and foil tape for gap-free sealing, addressing common installation challenges. Its compatibility with Broan-Nutone fans expands its utility beyond just dryers to comprehensive home ventilation projects.
Value for Money:
At $29.99, this kit represents solid mid-range value. The stainless steel components justify the price premium over plastic alternatives, offering longevity that cheaper kits can’t match. When factoring in the included accessories, it saves both money and time compared to piecing together components separately, potentially reducing installation time by hours.
Strengths and Weaknesses:
Pros include the complete component set, durable stainless steel build, excellent sealing accessories, and flexible hose for awkward spaces. The louvered cover promotes optimal airflow. Cons are the hose’s 4.92-foot maximum length, which may be insufficient for some installations, and the higher price point compared to basic kits. Some users might prefer longer screws for thicker walls, and the metal components are heavier than plastic alternatives.
Bottom Line:
This kit is ideal for homeowners undertaking permanent through-wall vent installations. The quality materials and comprehensive inclusion of necessary parts make it a convenient, reliable choice. Just verify your required hose length before purchasing, as you may need extensions for longer runs. The stainless steel construction ensures this investment will last for years.
4. Dryer Connection Kit,90 Degree Dryer Vent Elbow,Dryer Vent Connector Kit,Dryer Vent Duct, Snap to Vent Dryer Kit,Dryer Vent Hose Connector,Dryer Vent Plug for Tight Space Saving

Overview:
The Dryer Connection Kit with 90-degree elbow addresses a common problem in modern laundry rooms: tight spaces. This connector kit allows flush wall placement without crushing the vent hose, making it perfect for closets and compact installations. The snap-to-vent design works with both semi-rigid and flexible 4-inch hoses, creating a professional appearance while solving spatial constraints.
What Makes It Stand Out:
The space-saving 90-degree elbow is the primary innovation, reclaiming valuable inches in cramped laundry areas. The tool-free installation takes under five minutes, while the included silicone gasket creates a superior airtight seal compared to traditional clamp systems. The snap mechanism accommodates various hose types, adding versatility that magnetic or periscope alternatives lack.
Value for Money:
At $13.99, this specialty connector offers excellent value for space-constrained installations. It’s priced competitively with standard connectors while solving a specific problem that could otherwise require expensive periscope vents or professional installation. For tight spaces, it’s a small investment with big returns in both functionality and safety.
Strengths and Weaknesses:
Strengths include the clever space-saving design, rapid tool-free installation, excellent sealing gasket, and compatibility with multiple hose types. It makes laundry rooms look tidy and professional. Weaknesses are that it’s only the connector—no hose, clamps, or wall plate included. The silicone gasket’s long-term durability is unproven, and the snap mechanism may wear with frequent disconnections. It’s a component, not a complete system.
Bottom Line:
For anyone struggling to fit a dryer into a tight space, this 90-degree elbow is a game-changer. It solves the crushed hose problem elegantly and affordably. However, recognize that you’ll need to purchase additional venting components separately. This is a specialized piece that excels at its intended purpose but isn’t a standalone solution. Perfect for stackable units and closet installations.
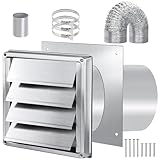
5. 4 Inch Dryer Vent Kit Through Wall with Hose/Duct Connector/Wall Plate, Dryer Vent Hose Connector Wall Ducting Kit for Bathroom Ventilation Fans Exhaust,Ceiling Washer Air Circulation Coldairsoap

Overview:
The Coldairsoap Dryer Vent Kit Through Wall offers a complete venting solution with an emphasis on energy efficiency and durability. This 4-inch kit features a 63-inch flexible duct, louvered vent cover, metal connector, wall plate, and all necessary mounting hardware, designed for multiple venting scenarios from dryers to bathroom fans in residential or RV applications.
What Makes It Stand Out:
The built-in UV inhibitors and impact-resistant materials promise extended lifespan, particularly for exterior installations exposed to harsh weather. The energy-efficient design promotes better airflow, potentially reducing drying times and utility costs. The generous 63-inch hose length accommodates more installation configurations than competitors, providing flexibility for challenging routing situations.
Value for Money:
At $24.99, this kit strikes a balance between premium features and affordability. The weather-resistant construction and extended hose length add value without reaching the price point of high-end professional kits. It’s a practical choice for DIYers wanting durability without overspending, offering professional-grade materials at a consumer-friendly price.
Strengths and Weaknesses:
Pros include the durable weather-resistant materials, longer flexible hose, energy-efficient design, complete component set, and versatile applications. The louvered cover optimizes exhaust flow. Cons include the smaller 6x6 inch cover (versus 7x7 alternatives), and the protective film removal requirement which some users might miss, potentially affecting appearance. The white wall plate may discolor over time with UV exposure despite inhibitors.
Bottom Line:
This kit is a reliable, well-rounded choice for through-wall vent installations where durability matters. The longer hose and weather-resistant features make it particularly suitable for challenging installations. While the protective film is a minor annoyance, the overall value and performance make it a solid recommendation for most homeowners undertaking dryer or bathroom fan venting projects. Ensure you remove the blue film before installation for optimal appearance.
6. 4 Sets Strain Relief Clamp for Dryer Cord Heavy Duty Strain Relief Cords Connector 2-Piece Clamp Kit Secure Electrical Connection Against Cord Damages Caused by Pulling for Dryer Machine

Overview: This strain relief clamp kit provides a simple yet effective solution for securing dryer power cords and preventing damage from tension and pulling. The package includes four complete two-piece clamp sets with matching screws, offering exceptional value for multi-appliance installations or future replacements across your laundry room or workshop.
What Makes It Stand Out: The galvanized iron construction delivers durability and rust resistance that plastic alternatives can’t match. The clever two-piece interlocking design creates a robust protective barrier that significantly reduces wire slippage and prevents cord damage at connection points. With a 0.51-inch width, these clamps accommodate various wire diameters beyond just dryer applications, extending to automotive and household appliances.
Value for Money: At $8.59 for four complete sets, this represents remarkable value—less than $2.15 per installation. Compared to single clamps selling for $4-6 each at hardware stores, you’re getting wholesale pricing with comparable commercial-grade quality. For homeowners managing multiple appliances or property maintenance, the four-pack eliminates repeat purchases and provides spares for future needs.
Strengths and Weaknesses: Strengths include exceptional durability from galvanized iron, versatile multi-appliance applications, straightforward installation with included hardware, and unbeatable per-unit cost. Weaknesses involve requiring precise installation for optimal effectiveness, limited to strain relief (not a complete venting solution), and the basic industrial design lacks aesthetic refinement for visible installations.
Bottom Line: This is an essential hardware kit for DIY enthusiasts and property managers. While it won’t solve all dryer venting challenges, it excels at its specific purpose—preventing cord damage. Buy this if you need reliable, affordable strain relief for multiple appliances. For complete vent system upgrades, pair it with a dedicated vent kit.
7. VIWINVELA Dryer Vent Hose Connector Kit - Dryer Vent Wall Plate - Dryer Duct Connector Wall Vent with Quick Connect & Disconnect Dryer Dock Connector (Dryer Vent Connector)

Overview: This innovative wall plate connector transforms dryer maintenance from a chore into a simple task. The VIWINVELA kit provides a quick-release solution that attaches to your existing vent system, enabling tool-free disconnection for cleaning and service. It’s designed for homeowners prioritizing safety and convenience without undertaking a full vent replacement.
What Makes It Stand Out: The snap-on/quick-release mechanism is the star feature, allowing one-handed operation for routine lint removal. Unlike permanent installations, this connector prioritizes accessibility without sacrificing seal quality. The comprehensive package includes the wall plate, snap connector, stainless steel hose clamp, and mounting screws—everything needed for a secure installation in one box.
Value for Money: At $14.99, this mid-range solution offers excellent value by focusing on what matters most: easy maintenance. While complete kits with hoses cost more, this targeted product solves the primary pain point—difficult cleaning access. It prevents costly dryer fires and improves efficiency, potentially saving hundreds in energy costs and damage prevention over its lifespan.
Strengths and Weaknesses: Strengths include effortless quick-connect/disconnect functionality, high-quality materials ensuring durability, effective pest intrusion prevention, and straightforward installation requiring minimal tools. Weaknesses are the lack of included vent hose (requires separate purchase), single-plate design limits multi-location use, and it’s less comprehensive than all-in-one kits for new installations.
Bottom Line: Perfect for renters and homeowners wanting safer, cleaner dryer operation without replacing their entire vent system. The quick-release feature justifies every penny. Purchase this if your existing hose is functional but cleaning access is difficult. For new installations, consider a complete kit instead.
8. Dryer Vent Kit with Hose/Duct Connector/Wall Plate, COITEK 4 Inch Stainless Steel Through Wall Dryer Vent Hose Connector Wall Plate Ducting Kit for Bathroom Exhaust Fans AC Ventilation Air Circulation

Overview: COITEK delivers a comprehensive ventilation solution that extends far beyond typical dryer installations. This 16-piece kit includes a 63-inch flexible hose, stainless steel louvered vent cover, wall plate, connectors, clamps, foil tape, and all necessary mounting hardware—providing professional-grade components for multiple venting scenarios throughout your home.
What Makes It Stand Out: The stainless steel vent cover sets this apart from plastic alternatives that crack in extreme weather. The inclusion of both foam and foil tape adapters ensures leak-proof installations, while the 3"-4" foam adapter adds versatility for bathroom fans, range hoods, and AC units. This universal approach makes it a multi-room solution rather than a single-purpose product.
Value for Money: At $23.99, this kit represents outstanding value. Purchasing components separately would cost $35-50, and the stainless steel cover alone justifies the premium over basic kits. For those needing full vent replacement or new installations, it eliminates multiple store trips and compatibility guesswork while ensuring all components work together seamlessly.
Strengths and Weaknesses: Strengths include complete all-in-one packaging, superior stainless steel durability, excellent leak-proofing with multiple sealing options, universal 4-inch compatibility, and versatility across applications. Weaknesses involve potential overkill for simple dryer reconnections, the flexible hose may not suit all building codes requiring rigid ducting, and installation requires more time and planning than basic connectors.
Bottom Line: This is the ideal choice for new installations, renovations, or complete vent system replacements. The quality components and comprehensive packaging justify the price premium. Choose COITEK if you want a durable, versatile solution that handles multiple ventilation needs beyond just your dryer, delivering long-term reliability.
9. LOVIGA 90 Degree Dryer Vent Elbow with Dryer Vent Wall Plate & Hose, Space Saving 4 Inch Dryer Vent Connector Kit, Easy Install Snap-on Dryer Vent Kit for Tight Space

Overview: LOVIGA’s innovative elbow design solves the most common laundry room space constraint—crushed dryer hoses. This all-in-one kit includes a 90-degree elbow connector, vent hose, wall plate, silicone sealing rings, couplers, tape, clamps, and screws, providing a space-saving solution that maintains optimal airflow in tight installations where every inch matters.
What Makes It Stand Out: The articulated elbow design prevents hose kinking and crushing when dryers must sit close to walls. This preservation of airflow directly impacts drying efficiency and fire safety. The transparent silicone sealing rings and adjustable clamps create an exceptionally tight seal, while the ABS construction withstands high temperatures without warping, ensuring consistent performance.
Value for Money: Priced at $34.99, this premium kit commands a higher investment but solves specific problems that basic kits cannot. For apartments, closets, or stacked installations where space is premium, preventing just one service call or replacing a crushed hose twice recoups the cost. The 6-month warranty and 24/7 customer support add purchase confidence and long-term value.
Strengths and Weaknesses: Strengths include space-saving elbow design, comprehensive component inclusion, superior sealing system, heat-resistant ABS construction, and responsive customer support with warranty coverage. Weaknesses are the premium price point, specific use case may not suit standard installations, and ABS plastic may not appeal to those preferring metal components for maximum durability.
Bottom Line: Essential for tight-space laundry configurations where traditional straight-run kits fail. The elbow design’s airflow preservation and space efficiency justify the premium investment. Purchase if your dryer sits within 6 inches of the wall. For standard-depth installations, more economical options suffice without compromising performance.
10. Dryer Dock The Original Dryer Vent Quick Release - Two-Piece Dryer Hose Quick-Connect, Twist & Lock Tight, Fits 4 Inch Tubes
Overview: The patented Dryer Dock pioneered the quick-release vent category, offering a simple twist-and-lock solution that has protected over 500,000 installations. This two-piece ABS plastic connector replaces traditional clamp-based connections, enabling instant access for cleaning while maintaining an airtight seal during operation, making maintenance nearly effortless.
What Makes It Stand Out: As the original patented design (USP #6,131,958), this Made-in-USA product established the industry standard. The rigid ABS construction eliminates the crushing and disconnection issues common with flexible hose clamps. Its twist-lock mechanism provides tactile confirmation of secure connection, while the 6-inch flange accommodates standard dryer hoses and ensures compatibility across brands.
Value for Money: At $9.98, this offers exceptional value for a proven, patented solution. Generic knockoffs may cost slightly less but lack the track record and quality control. Considering that dryer vent fires cause $236 million in annual damages according to NFPA data, this sub-$10 investment in fire prevention is negligible. The durability ensures years of reliable service and energy savings.
Strengths and Weaknesses: Strengths include proven patented design, effortless twist-lock operation, USA manufacturing quality, effective pest and draft elimination, and strong brand reputation with widespread adoption. Weaknesses are that it’s only a connector (no hose or wall plate included), ABS plastic may crack under severe impact, and installation requires precise alignment for optimal sealing performance.
Bottom Line: The gold standard for quick-release dryer vent connections. Its proven reliability and fire safety benefits make it a must-have for any homeowner. Choose the Dryer Dock if you value American-made quality and a track record of success. Pair it with a quality hose for the ultimate maintenance-friendly setup that prioritizes safety.
Why Code Compliance Matters for Dryer Installations
Electrical codes exist for one primary reason: safety. The National Electrical Code (NEC) establishes minimum standards that prevent the estimated 2,900 dryer-related fires that occur annually in the United States. A code-compliant installation ensures proper grounding, adequate wire gauge, and secure connections that can handle the substantial electrical load modern dryers demand. Skimping on these requirements might save a few dollars upfront, but it exposes you to risks that far outweigh any initial savings.
Beyond safety, compliance affects your home insurance, warranty coverage, and resale value. Many insurance policies contain clauses that deny claims for damage resulting from non-compliant electrical work. Similarly, dryer manufacturers often void warranties if installation doesn’t meet NEC standards. When you eventually sell your home, a permitted, code-compliant installation prevents last-minute headaches during the inspection process.
Understanding Electrical Connection Kits: The Basics
An electrical connection kit serves as the bridge between your dryer’s internal wiring and your home’s electrical supply. These kits typically include a power cord, strain relief clamp, and necessary hardware for secure attachment. While they might appear similar at first glance, the differences in materials, construction, and included components significantly impact both installation speed and long-term safety.
The best kits eliminate guesswork by providing everything needed for a complete, compliant installation in one package. This approach prevents the common scenario of discovering you’re missing a critical component halfway through the job. Quality kits also include clear, detailed instructions that guide you through code requirements specific to your installation type.
What Makes a Kit Code-Compliant?
Code compliance hinges on several non-negotiable factors. First, the wire gauge must match or exceed the amperage rating of your dryer circuit—typically 30 amps for standard residential dryers. Second, the configuration must match your outlet type (3-prong or 4-prong) and include proper grounding methodology. Third, every component must carry independent safety certifications from recognized testing laboratories like UL or ETL.
Additionally, compliant kits include a proper strain relief device that secures the cord where it enters the dryer cabinet. This prevents wire fatigue and maintains connection integrity over thousands of drying cycles. The terminal block design must provide secure, reliable connections that resist loosening from vibration, and all hardware should be corrosion-resistant to ensure longevity.
The Evolution of Dryer Connection Standards
The NEC has progressively tightened dryer connection requirements over the past three decades. Before 1996, 3-prong connections were standard, using a combined neutral/ground wire that we now recognize as less safe. The 1996 NEC update mandated separate neutral and ground conductors, leading to the modern 4-prong standard.
This evolution means many older homes still have 3-prong outlets, while all new constructions require 4-prong configurations. Understanding this history is crucial because it directly impacts whether you can simply plug in a dryer or need to upgrade your entire circuit. The code also grandfathered existing installations but requires upgrades during major renovations or when replacing a failed outlet.
Key Components Every Kit Should Include
A comprehensive dryer connection kit contains more than just a power cord. Look for kits that include a heavy-duty strain relief clamp specifically designed for dryer applications, not a generic cord grip. The strain relief should match your dryer’s cabinet thickness and cord diameter perfectly.
Quality kits also provide corrosion-resistant terminal screws, often with captive washers that prevent them from falling out during installation. Some premium options include a small packet of antioxidant compound for aluminum wiring connections—a critical addition in older homes. The best kits even contain a voltage tester or continuity checker to verify your work before energizing the circuit.
3-Prong vs. 4-Prong: Which Configuration Do You Need?
Your home’s existing outlet dictates which kit you need, but understanding the difference is essential. A 3-prong configuration uses two hot wires and one combined neutral/ground wire, while a 4-prong setup separates the neutral and ground into distinct conductors. This separation provides a dedicated path for fault current, significantly improving safety.
If your home has a 3-prong outlet, you must use a 3-prong kit unless you’re prepared to upgrade the entire circuit. Conversely, never attempt to force a 4-prong cord into a 3-prong outlet using an adapter—these adapters violate code and create serious shock hazards. The rule is simple: match the outlet, or upgrade the circuit properly.
Decoding the National Electrical Code (NEC) Requirements
The NEC’s Article 250 specifically addresses grounding and bonding requirements for appliances like dryers. For new installations, Section 250.140 requires a separate equipment grounding conductor, mandating 4-prong connections. However, the code provides an exception for existing 3-prong installations that meet specific conditions: the circuit must be 120/240V single-phase, the dryer must be grounded through the neutral, and the circuit must originate in the main service panel.
Understanding these nuances helps you determine whether your current setup is legally compliant or needs immediate upgrading. The code also specifies that dryer receptacles must be within 6 feet of the intended dryer location and installed in a readily accessible position—not behind the appliance where it’s difficult to reach.
Hardwired vs. Cord-and-Plug: Installation Types Explained
While most residential dryers use cord-and-plug connections, some commercial or built-in installations require hardwiring. Hardwired connections eliminate the receptacle and plug, connecting the dryer directly to the branch circuit wiring. This method offers a slightly more secure connection but sacrifices the convenience of easy disconnection for maintenance or replacement.
Cord-and-plug installations dominate residential settings because they simplify replacement and allow you to move the dryer for cleaning or service. The NEC permits both methods, but cord-and-plug installations must use listed kits specifically designed for the purpose. Never create a DIY cord set using bulk cable and separate plugs—this violates listing requirements and voids insurance coverage.
Essential Features to Look for in Quality Kits
When evaluating connection kits, several features separate premium options from budget choices that compromise safety. Start with the cord jacket material—heavy-duty PVC or rubber provides better abrasion resistance than thin vinyl. The plug prongs should be solid brass or copper with nickel plating, not thin metal that can bend or break.
Internal wire stranding matters too. Finer strands with higher counts provide better flexibility and resist fatigue from movement. Look for cords rated for 60°C or higher temperature operation, as dryer cabinets can become warm during operation. The terminal block should feature clearly marked terminals with color-coded or lettered identifiers that match standard wiring conventions.
Gauge and Wire Rating Considerations
Wire gauge directly impacts safety and performance. For 30-amp dryer circuits, 10 AWG copper wire is the minimum acceptable size. Some heavy-duty kits use 8 AWG wire, which provides additional safety margin for longer runs or high-ambient-temperature installations. Never use 12 AWG wire, even for short distances—it violates code and creates fire hazards.
Pay attention to the wire insulation rating as well. THHN/THWN insulation is standard, but some premium cords use XHHW insulation for better moisture resistance. The voltage rating must be at least 300V for the insulation and 240V for the overall cord rating. These specifications are typically printed on the cord jacket—always verify them before purchase.
Strain Relief and Cable Management
The strain relief clamp prevents mechanical stress from pulling on electrical connections inside the dryer. A proper strain relief uses a two-piece design with a threaded nut that compresses a rubber grommet around the cord. This creates a watertight seal and prevents cord movement that could loosen terminals.
Avoid kits with simple plastic cord grips that tighten with a single screw—these don’t provide adequate strain relief for heavy dryer cords. The strain relief should be UL-listed specifically for dryer applications, not a generic cord connector. Proper installation requires tightening the strain relief nut firmly but not over-tightening, which can damage the cord jacket.
Terminal Quality and Design
The terminal block is where your kit’s wires connect to the dryer’s internal wiring. Quality kits feature solid brass terminals with captive screws that won’t fall out when loosened. The terminal block should have a clear, durable marking system that identifies L1, L2, neutral, and ground connections.
Some advanced kits include torque-specified screws that help you achieve the proper tightness without guessing. Under-tightened terminals create resistance and heat, while over-tightened screws can strip the terminal block. The best terminal designs also include a barrier between the neutral and ground terminals to prevent accidental bridging.
Safety Certifications That Matter
Never install a connection kit lacking independent safety certification. Underwriters Laboratories (UL) listing is the gold standard in North America, indicating the product has been tested to rigorous safety standards. ETL certification from Intertek is equally valid and acceptable to inspectors.
These certifications ensure the kit can handle its rated current without overheating, that insulation meets fire-resistance standards, and that components won’t fail under normal use conditions. Be wary of generic kits from online marketplaces that claim to “meet UL standards” without actual listing—these are often counterfeit or substandard products that create serious risks.
Installation Tools You’ll Need
A successful installation requires more than just the connection kit. Essential tools include a non-contact voltage tester to verify power is off, a multimeter for testing connections, and a torque screwdriver to ensure proper terminal tightness. You’ll also need needle-nose pliers for shaping wire ends and a utility knife for stripping the cord jacket.
Don’t forget a flashlight or headlamp to illuminate the dark interior of the dryer cabinet, and a magnetic parts tray to keep screws from disappearing. A nut driver set speeds up strain relief installation, and a wire brush cleans oxidation from older terminals. Investing in these tools pays dividends across multiple electrical projects.
Step-by-Step: Preparing for Your Dryer Installation
Preparation determines whether your installation takes 30 minutes or three hours. Start by locating your circuit breaker and verifying it controls only the dryer receptacle. Test every outlet in the laundry area with a voltage tester to ensure no unexpected live circuits exist nearby.
Measure the distance from your dryer location to the receptacle, adding 6 feet to ensure adequate cord length. Check your dryer’s installation manual for specific clearance requirements around the electrical connection point. Clear the work area of laundry supplies and create a clean, well-lit workspace with enough room to move around the appliance.
Assessing Your Existing Setup
Before purchasing any kit, thoroughly examine your current electrical setup. Remove the receptacle cover plate and inspect the wiring configuration—are there three or four wires in the box? What color are they? Is the ground wire actually connected or just cut off? Take clear photos with your phone for reference.
Check the receptacle itself for signs of heat damage, cracking, or loose connections. If you see any discoloration or melting, the receptacle must be replaced regardless of its configuration. Verify the circuit breaker size—dryers require a dedicated 30-amp double-pole breaker. A 40-amp or 50-amp breaker indicates an improperly sized circuit that needs correction.
Shutting Off Power Safely
Never trust a circuit breaker label. After turning off the designated breaker, test the receptacle with a non-contact voltage tester, then confirm with a multimeter. Test both hot slots and each hot to neutral and hot to ground. Only proceed when you read zero volts on all measurements.
For additional safety, place a piece of tape over the breaker handle with a note reading “DO NOT TURN ON—WORK IN PROGRESS.” This prevents someone from accidentally restoring power while you’re working. If you live with others, inform them of your project and consider locking the electrical panel if possible.
Common Installation Mistakes That Violate Code
One frequent error is failing to remove the ground strap or wire when converting between 3-prong and 4-prong configurations. This creates a dangerous parallel ground path that can energize the dryer’s metal cabinet. Always follow the manufacturer’s bonding diagram precisely, and never assume the previous installation was correct.
Another violation involves improper strain relief installation. Simply feeding the cord through a knockout without a proper clamp allows the cord to move and chafe against sharp metal edges. This eventually leads to short circuits or ground faults. The strain relief must be the correct size for both the cord and the knockout, and it must be tightened according to manufacturer specifications.
When to Upgrade from 3-Prong to 4-Prong
If your home still uses a 3-prong outlet, consider upgrading to 4-prong during any major renovation or when replacing the dryer. The upgrade requires running a new 10/3 cable with ground from the electrical panel to the laundry area—a project that typically costs $200-400 but dramatically improves safety.
The NEC doesn’t require upgrading grandfathered 3-prong installations unless the circuit is modified. However, insurance companies increasingly deny claims involving older 3-prong connections, viewing them as known safety hazards. Upgrading also future-proofs your laundry room for your next appliance purchase, as all new dryers ship configured for 4-prong connections.
Cost vs. Value: Investing in the Right Kit
Budget kits priced under $15 might seem appealing, but they often use thinner wire, inferior insulation, and flimsy strain relief clamps. Mid-range kits ($20-35) typically offer the best value, providing UL-listed components, proper gauge wire, and durable hardware. Premium kits ($40+) add features like pre-shaped wire ends, torque-limited screws, and extended warranties.
Consider the total cost of ownership. A failed cheap kit can destroy a $800 dryer or cause thousands in fire damage. Spending an extra $15-20 on a quality kit is inexpensive insurance. Factor in your time as well—a kit with poor instructions or missing components can turn a 30-minute job into a multi-hour frustration.
Professional Installation vs. DIY: Making the Smart Choice
While many homeowners successfully install dryer connections, certain situations demand professional expertise. If your existing wiring shows signs of damage, if you need to upgrade from 3-prong to 4-prong, or if the circuit breaker panel is difficult to access, hiring a licensed electrician is the wisest choice. Professional installation typically costs $100-200 but guarantees code compliance and often includes a warranty.
DIY installation makes sense when you’re simply replacing an existing cord with a like-for-like configuration and your wiring is in good condition. The key is honest self-assessment—if you’re uncomfortable working with 240V electricity or don’t own a multimeter, the risk outweighs any potential savings. Remember, electricians complete hundreds of these installations annually and can spot problems amateurs might miss.
Situations That Require a Licensed Electrician
Any modification to the branch circuit wiring legally requires a permit and licensed electrician. This includes installing a new receptacle, upgrading wire gauge, or relocating the dryer connection point. If your home has aluminum wiring, professional installation is mandatory—the special connection methods and antioxidant compounds required for aluminum are not DIY-friendly.
Homes with fuse boxes instead of circuit breakers also need professional evaluation. Many older fuse panels can’t safely handle modern dryer loads, and replacing fuses with higher-amperage units to prevent blowing creates extreme fire hazards. An electrician can assess whether your entire electrical service needs upgrading.
Troubleshooting Common Connection Issues
If your dryer runs but doesn’t heat, first check that both hot wires are properly connected. A loose L1 or L2 connection delivers only 120V instead of the required 240V, running the motor but not the heating element. Use a multimeter to test voltage across the two hot terminals—you should read approximately 240V.
Intermittent operation often indicates a loose neutral connection. The neutral wire carries the imbalance between the two hot legs, and a poor connection causes voltage fluctuations that confuse the dryer’s control board. Tighten all terminal screws to the manufacturer’s specified torque, and check for corrosion on older connections.
Maintaining Your Dryer Connection for Long-Term Safety
Schedule annual inspections of your dryer connection. Unplug the dryer and remove the access panel to check for loose terminals, heat discoloration, or rodent damage. Wiggle the cord gently at the strain relief—any movement indicates the clamp needs tightening. Vacuum dust from the terminal block area, as lint accumulation can conduct electricity and create faults.
Replace the connection kit every 10 years or when you replace the dryer, whichever comes first. Wire insulation degrades over time, especially in the warm environment behind a dryer. If you notice any stiffness, cracking, or discoloration of the cord jacket, replace the entire kit immediately. Never use a damaged cord while waiting for a replacement.
Frequently Asked Questions
What is the difference between a 3-prong and 4-prong dryer cord?
A 3-prong cord combines the neutral and ground wires into a single conductor, while a 4-prong cord separates them into two distinct wires. The 4-prong configuration provides a dedicated ground path for fault current, significantly improving safety. All new installations require 4-prong cords under current NEC guidelines.
Can I use an adapter to connect a 4-prong dryer to a 3-prong outlet?
No, using adapters violates the National Electrical Code and creates serious shock hazards. Adapters defeat the separate grounding system that 4-prong configurations provide. You must either install a 3-prong cord on the dryer (if compatible) or upgrade the outlet and circuit to 4-prong.
How do I know if my dryer connection kit is UL listed?
Genuine UL-listed products display the UL mark on both the packaging and the product itself. The mark includes a control number you can verify on the UL database. Be suspicious of products claiming to “meet UL standards” without actual listing, as these haven’t undergone independent safety testing.
What wire gauge is required for a dryer connection?
Standard residential dryers require a minimum of 10 AWG copper wire for 30-amp circuits. Some heavy-duty or commercial dryers may need 8 AWG wire for 40-amp circuits. Using undersized wire violates code and creates fire hazards due to excessive heat generation.
Is it safe to install a dryer connection kit myself?
If you’re replacing an existing cord with a like-for-like configuration and have basic electrical knowledge, DIY installation is generally safe. However, you must verify power is off with a multimeter, follow manufacturer instructions precisely, and understand your local code requirements. When in doubt, hire a licensed electrician.
How often should I replace my dryer connection kit?
Replace the connection kit every 10 years or when purchasing a new dryer, whichever occurs first. Also replace it immediately if you notice any damage to the cord jacket, plug prongs, or if the dryer has been moved frequently, which can stress the connections.
What is strain relief and why is it important?
Strain relief is a clamping device that secures the power cord where it enters the dryer cabinet. It prevents mechanical stress from pulling on electrical terminals and protects the cord from sharp metal edges. Proper strain relief is required by code and is critical for preventing short circuits and fire hazards.
Can I use a 40-amp breaker for my 30-amp dryer circuit?
No, this violates code and creates a dangerous situation. The circuit breaker must match the dryer’s rating and the wire gauge. A 40-amp breaker won’t protect 10 AWG wire from overheating if a fault occurs. Always use a 30-amp double-pole breaker for standard dryers.
What tools are absolutely necessary for dryer cord installation?
Essential tools include a non-contact voltage tester, multimeter, Phillips and flat-head screwdrivers, and needle-nose pliers. A torque screwdriver is highly recommended for ensuring proper terminal tightness. While not absolutely necessary, a nut driver set and magnetic parts tray make the job significantly easier.
Why does my new dryer have a ground strap that needs to be removed?
The ground strap connects the neutral terminal to the dryer’s metal frame in 3-prong configurations. When using a 4-prong cord, you must remove this strap to separate the neutral and ground paths. Leaving it in place creates a dangerous parallel grounding path that can energize the dryer’s cabinet and violate code.