Let’s be honest—your ironing board has become a permanent fixture leaning against the laundry room wall, hasn’t it? It slides down at the worst moments, takes up precious floor space, and somehow always manages to look messy no matter how carefully you prop it up. You’re not alone in this domestic struggle. The good news? A quality wall-mounted hanger designed to store your ironing board flat against the wall can transform this chaotic scene into a model of organization in under an hour.
These ingenious devices do far more than just get your board off the floor. They protect your investment from dents and warping, eliminate tripping hazards, and reclaim square footage you didn’t know you had. But not all flat-wall hangers are created equal, and choosing the wrong one can lead to damaged walls, scratched boards, or even safety hazards. This comprehensive guide walks you through everything you need to know to select the perfect solution for your space, board type, and lifestyle—no product pitches, just pure expertise.
Top 10 Ironing Board Hangers for Wall Storage
Detailed Product Reviews
1. BiJun Ironing Board Holder Wall Mount, Ironing Board Hanger with 5 Inch Length, Iron Board Hook Wall Mount for Laundry Rooms (White)

Overview:
The BiJun Ironing Board Holder offers a no-frills approach to laundry room organization at an unbeatable price point. This wall-mounted solution focuses on simplicity and safety, providing a straightforward way to store standard T or Y-shaped ironing boards while claiming an impressive 6 square feet of space savings. Its minimalist white design blends into any utility space without drawing attention.
What Makes It Stand Out:
Its primary differentiator is the ultra-budget price combined with surprising versatility. The powder-coated steel construction with shatter-resistant ABS hooks is designed to withstand humid environments and daily use. The 5-inch length accommodates most standard boards while doubling as storage for towels, mops, or sports equipment, making it a true multi-tasker for tight quarters.
Value for Money:
At under $10, this represents exceptional value for renters and homeowners alike. While lacking premium features, it delivers core functionality that rivals basic hooks costing twice as much. The durability claims and multi-purpose design stretch your dollar further than single-purpose organizers, making it a smart entry-level investment.
Strengths and Weaknesses:
Pros include rock-bottom pricing, easy installation, humidity-resistant materials, and impressive versatility beyond just ironing boards. The space-saving vertical design is ideal for tiny homes and apartments. Cons are the basic aesthetic, limited weight capacity information, and potential size constraints for larger boards. The plastic hooks may not match metal durability long-term.
Bottom Line:
This is the ideal entry-level solution for budget-conscious shoppers prioritizing function over form. It safely gets your ironing board off the floor without breaking the bank, though those seeking premium materials or integrated storage should look elsewhere.
2. Siyzda Ironing Board Hanger, Metal Over The Door or Wall Mounted Ironing Board Caddy, Ironing Board Storage Shelf with Adjustable Hooks for Laundry Room, Living Room, Bathroom (Matte Black)

Overview:
The Siyzda Ironing Board Hanger elevates basic storage into a multi-functional organization station. This matte black unit combines a sturdy metal frame with a 30-pound capacity basket, offering both wall and over-door mounting options for maximum flexibility in small spaces. It transforms wasted vertical space into valuable storage real estate.
What Makes It Stand Out:
Versatility defines this product. Adjustable hooks accommodate most T or Y-shaped boards, while the integrated basket stores irons, sprays, and laundry supplies. The premium metal construction with high-temperature spray coating promises rust resistance and longevity. The ability to install without permanent mounting makes it uniquely renter-friendly.
Value for Money:
At $18.99, it sits in the sweet spot between basic hooks and premium models. The dual-mounting capability alone justifies the price premium over entry-level options, while the storage basket adds functionality typically found in $25+ units. It’s a smart investment for apartment dwellers needing flexible, commitment-free solutions.
Strengths and Weaknesses:
Pros include solid metal construction, adjustable hooks for board compatibility, generous basket capacity, and quick 5-minute installation. The over-door option is renter-friendly. Cons require a 0.09-inch door gap to prevent rubbing, and the spray coating’s long-term durability remains unproven. The all-metal design may scratch delicate door surfaces.
Bottom Line:
Perfect for renters and small-space residents wanting maximum flexibility without premium pricing. The combination of door/wall mounting and integrated storage makes this the most adaptable mid-range option available for dynamic living situations.
3. TJ.MOREE Ironing Board Hanger Metal Wall Mount Iron and Ironing Board Holder, Laundry Room Decor and Storage with Large Storage Black

Overview:
The TJ.MOREE Ironing Board Hanger merges rustic charm with modern functionality, targeting style-conscious homeowners. This wall-mounted system features a unique wooden-base basket that holds up to 30 pounds of ironing accessories while keeping T-shaped boards securely stored. It elevates utility storage into deliberate decor.
What Makes It Stand Out:
The natural wood accent elevates this beyond mere utility into deliberate laundry room decor. Unlike all-metal competitors, it creates a warm, modern farmhouse aesthetic while maintaining serious functionality. The spacious 12.2" x 5.7" basket accommodates irons, steamers, and supplies with room to spare, making it as practical as it is attractive.
Value for Money:
At $22.99, you’re paying a 30% premium over basic metal models for aesthetic appeal and material quality. The solid construction and pre-assembled design reduce installation headaches, while the wooden element justifies the cost for design-focused buyers. Comparable stylish organizers often exceed $30, making this relatively reasonable.
Strengths and Weaknesses:
Pros include attractive wood-steel combination, generous basket dimensions, sturdy 30-pound capacity, and true ready-to-hang assembly. The design works beyond laundry rooms. Cons are the wall-mount-only limitation and higher price point. The wood may require occasional maintenance in very humid environments, and T-shape-only compatibility excludes some board styles.
Bottom Line:
Ideal for homeowners prioritizing aesthetics alongside function. If your laundry room is visible or you’re curating a specific design theme, this justifies its premium price through thoughtful materials and polished execution that cheaper models can’t match.
4. Simple Houseware Wall Mount Ironing Board Holder with Hanger Storage Shelf, Black

Overview:
Simple Houseware delivers versatility through dual mounting options with this ironing board holder. The unit functions as either a wall-mounted organizer or freestanding shelf, featuring a rustic brown MDF surface complemented by black steel wire construction. This flexibility addresses the needs of renters and rearrangers alike.
What Makes It Stand Out:
The freestanding capability sets this apart in a field dominated by permanent mounts. This unique flexibility appeals to renters and those frequently rearranging spaces. Uniquely, it accommodates both T-leg and 4-leg ironing boards, solving compatibility issues that plague many competitors and eliminating guesswork about your board type.
Value for Money:
Priced at $15.87, it undercuts most basket-equipped models while offering mounting versatility. The hybrid design eliminates need for separate purchases if you move frequently. However, MDF construction may not match all-metal longevity, slightly tempering long-term value despite the attractive initial price point.
Strengths and Weaknesses:
Pros include unmatched mounting flexibility, 4-leg board compatibility, rustic aesthetic appeal, and included hardware for both options. The design integrates storage for irons and supplies. Cons involve MDF’s vulnerability to moisture damage, smaller basket capacity than premium models, and less sturdy feel compared to welded metal units. Freestanding mode may tip if overloaded.
Bottom Line:
Best choice for renters or commitment-phobic organizers who value flexibility. The ability to switch between wall and freestanding use compensates for material compromises, making it a practical compromise solution that adapts to changing living situations.
5. TJ.MOREE Ironing Board Holder Wall Mount - Laundry Room Iron and Ironing Board Hanger Laundry Room Decor Organization and Storage (T&V Shaped)

Overview:
The TJ.MOREE Ironing Board Holder Wall Mount represents an evolution of their popular design, specifically engineered for broader board compatibility. This premium model maintains the signature wooden-base basket while expanding hook versatility to accommodate both T and V-shaped leg configurations, addressing a common market gap.
What Makes It Stand Out:
Enhanced compatibility is the headline feature, addressing a common frustration with wall-mounted holders. The same attractive wood-and-metal aesthetic combines with serious functionality, supporting 30 pounds in its spacious basket while keeping boards of various styles securely stored. This inclusive design eliminates compatibility anxiety.
Value for Money:
At $23.99, it’s the priciest option reviewed, commanding a premium for its inclusive design and quality materials. For owners of V-shaped boards, this eliminates the need for custom solutions or replacement holders. The pre-assembled construction and robust materials justify the cost for those needing this specific compatibility, though others may find better value elsewhere.
Strengths and Weaknesses:
Pros include widest board compatibility (T&V shapes), stylish wood accent, sturdy 30-pound capacity, and true ready-to-hang design. The versatile basket works throughout the home. Cons are the highest price point and wall-mount-only limitation. The minimal price increase over the T-shape-only model makes this the better TJ.MOREE value if board compatibility is uncertain.
Bottom Line:
The definitive choice for owners of V-shaped ironing boards seeking style and function. If your board has non-standard legs, this premium holder solves a niche problem elegantly, though standard board owners can save money with simpler models without sacrificing quality.
6. Ironing Board Holder Wall Mount, Iron Board Wall Hanger, Sewing, Laundry Room Organization, Black, T&V Shaped Space Saving Iron Holder for Laundry Room Decor and Accessories, Organization and Storage
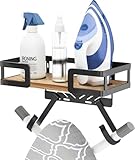
Overview: This PAROTO wall-mounted ironing board holder delivers a robust storage solution for laundry rooms and beyond. Measuring 12.4’’ x 6’’ x 2.5’’ with a 30-pound weight capacity, it accommodates both T and Y-shaped leg boards through adjustable metal hooks. The combination of iron and natural wood creates a rustic-modern aesthetic that elevates utilitarian spaces while keeping ironing essentials organized and accessible.
What Makes It Stand Out: The dual adjustable hooks set this apart from fixed-design competitors, ensuring compatibility with virtually any ironing board style. Two additional hooks beneath the main basket provide dedicated spots for spray bottles or accessories. The widened iron frame offers superior stability compared to standard models, while the natural wood element adds warmth to sterile laundry environments. Its versatility extends the utility beyond laundry rooms to bathrooms, sewing areas, and entryways.
Value for Money: At $23.99, this sits in the mid-to-premium range for wall-mounted organizers. The price is justified by the durable iron-wood construction, adjustable design, and multi-room versatility. Cheaper alternatives typically use pure plastic or thin metal that flexes under weight. For homeowners seeking a long-term solution that doubles as decor, this represents solid investment value over basic utility-grade options.
Strengths and Weaknesses: Pros: Exceptional 30-pound capacity; adjustable T/Y hooks ensure universal fit; attractive rustic-modern design; multi-functional storage basket; straightforward 5-minute installation. Cons: Higher price point than basic models; black finish may clash with bright white laundry rooms; 6-inch depth protrudes noticeably in narrow spaces.
Bottom Line: Ideal for design-conscious homeowners needing heavy-duty organization. The PAROTO holder justifies its premium price through superior materials, adjustability, and aesthetic appeal that transforms a mundane storage need into a design feature.
7. ORLESS Over The Door/Wall Mount Ironing Board Hanger, Laundry Room Iron and Ironing Caddy Board Storage Holder White

Overview: ORLESS offers a versatile dual-mounting solution that adapts to rental properties and permanent installations alike. This white powder-coated organizer measures 7.08L x 5.9H x 5.9W inches and accommodates both T-leg and V-leg ironing boards. The included hardware supports both over-door hanging and wall mounting, providing flexibility that most single-mount competitors cannot match.
What Makes It Stand Out: The reversible design philosophy stands out—renters can use the over-door option without violating lease agreements, while homeowners can permanently wall-mount for maximum stability. The 18.9-inch hook drop accommodates taller boards, and the integrated iron holder keeps the appliance secure. ORLESS backs this with responsive 24-hour customer service, a rarity in this category.
Value for Money: Priced at $16.99, this delivers excellent value for the mounting versatility alone. Comparable single-mount units cost $12-15, making the dual-option capability a modest $2-5 premium. The included hardware and pre-assembled design eliminate hidden costs. For apartment dwellers or those uncertain about permanent installation, this flexibility prevents future replacement expenses.
Strengths and Weaknesses: Pros: Dual mounting options; renter-friendly; included hardware; strong after-sales support; compact footprint. Cons: White finish shows scuffs easily; unspecified weight limit raises durability questions; plastic components feel less robust than all-metal alternatives; limited accessory storage compared to basket-style holders.
Bottom Line: Perfect for renters and commitment-phobes who want installation flexibility without sacrificing function. The ORLESS hanger excels as a transitional solution, though permanent homeowners might prefer heavier-duty dedicated wall mounts.
8. Ironing Board Hanger, Wall Mount Ironing Board Holder Organizer Wall Rack with Screws for Laundry Rooms Storage Rack Hanging Y-Leg or T-Leg Iron ing Boards Towels(Black)

Overview: This budget-conscious wall mount delivers essential ironing board storage without frills. Constructed from thickened iron with a minimalist black finish, the bracket supports both T-leg and Y-leg configurations while doubling as a multi-purpose hook for towels, tools, or cleaning supplies. At just $6.89, it strips away aesthetic considerations to focus purely on functional, space-saving utility.
What Makes It Stand Out: The ultra-low price point immediately distinguishes this from competitors costing 2-4 times more. Its utilitarian design philosophy embraces versatility—the same bracket can organize folding chairs, spray bottles, or power tools. The thickened iron construction promises multi-year durability despite the bargain price, and the included metal and plastic screws accommodate different wall types without additional hardware store runs.
Value for Money: Exceptional value defines this product. No other option under $7 provides comparable metal construction and dual-leg compatibility. While lacking decorative elements or accessory baskets, it accomplishes the core mission of wall-mounting an ironing board securely. The cost savings could fund other laundry room upgrades, making this ideal for budget renovations or secondary properties where aesthetics matter less.
Strengths and Weaknesses: Pros: Unbeatable price; sturdy thickened iron; versatile multi-use design; includes both screw types; simple installation. Cons: No dedicated iron storage; bare-bones appearance; limited weight capacity information; no adjustability for non-standard boards; basic hardware may corrode in humid laundry environments.
Bottom Line: A no-nonsense solution for cost-conscious buyers who prioritize function over form. This hanger reliably performs its singular task, making it perfect for garages, utility closets, or rental properties where minimal investment meets maximum practicality.
9. PAROTO Ironing Board Holder Wall Mount, Laundry Room Organization Storage, Black, T&V Shaped Space Saving Ironing Board Hanger for Laundry Room Decor and Accessories
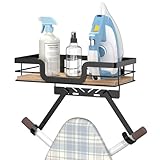
Overview: PAROTO’s slightly smaller sibling to model #6 offers the same core functionality with modest dimensional adjustments. Measuring 12.4’’ x 6.3’’ x 2.9’’, this black iron and natural wood holder maintains the 30-pound capacity and adjustable T/Y hooks that define the brand’s approach. Designed for laundry room optimization, it consolidates ironing boards, irons, and accessories into a single wall-mounted station with rustic-modern styling.
What Makes It Stand Out: The adjustable hook system remains the standout feature, accommodating board leg variations without tools. The widened frame design distributes weight more effectively than narrow-gauge competitors, preventing wall damage over time. Two under-basket hooks provide bonus storage for frequently used items like starch sprays or fabric refreshers. The wood accent softens the industrial metal aesthetic, allowing installation in living areas beyond utilitarian spaces.
Value for Money: At $20.37, this represents a $3.62 savings over the nearly identical #6 model, likely due to marginally smaller dimensions. The value proposition remains strong—you’re paying premium prices but receiving premium materials and genuine adjustability. Compared to $10-12 basic metal hooks, the extra cost buys aesthetic integration, accessory storage, and verified weight capacity that cheaper alternatives cannot guarantee.
Strengths and Weaknesses: Pros: Proven 30-pound capacity; tool-free hook adjustment; attractive mixed-material design; integrated storage basket; multi-room versatility. Cons: Still pricier than minimalist options; black color scheme limits decor matching; 6.3-inch width may not fit oversized ironing boards; installation requires stud finding for full weight capacity.
Bottom Line: Nearly identical to #6 but slightly more budget-friendly. Choose this PAROTO model if the minor size reduction works for your space, though either version delivers excellent organization with style-first sensibilities.
10. Ironing Board Hanger Wall Mount, Iron Hanger with Ironing Board Rack, Heat Resistant Iron Holder Wall Mount for Max 5 Inch Width (White)

Overview: This specialized hanger prioritizes safety and space efficiency with a unique heat-resistant design. Engineered with PBT anti-flame retardant material rated to 392°F, it addresses the common hazard of storing hot irons immediately after use. The unit measures 5" × 14.7" × 3.6" and supports up to 50 pounds while featuring a clever wire storage slot that folds away when not needed, maximizing narrow laundry room efficiency.
What Makes It Stand Out: The heat-resistant construction is genuinely distinctive—most holders require irons to cool completely before storage. The 50-pound capacity exceeds typical 30-pound limits, accommodating heavier commercial-style boards. The retractable wire slot demonstrates thoughtful engineering for space-constrained urban apartments. White color integrates seamlessly with standard appliances and cabinetry, creating a cohesive look that black alternatives cannot match.
Value for Money: At $16.99, this positions as a mid-tier option with premium safety features. The heat resistance alone justifies the cost compared to $10-12 basic models that could melt or deform. For households with children or safety-conscious users, the price premium is negligible insurance against fire hazards. The space-saving retracting mechanism adds value in small apartments where every inch matters.
Strengths and Weaknesses: Pros: Impressive 392°F heat resistance; industry-leading 50-pound capacity; space-saving retractable design; clean white aesthetic; reasonable mid-range price. Cons: 5-inch width limit excludes some irons; 392°F falls short of irons’ 401°F maximum; PBT material may yellow over time; limited accessory storage compared to basket designs.
Bottom Line: The safety-conscious choice for families and small-space dwellers. While the temperature rating has a narrow margin, the heat-resistant design and superior weight capacity make this a smart, practical investment for risk-averse households.
Why Flat Wall-Mounted Storage Transforms Your Laundry Space
The Space-Saving Revolution in Modern Homes
When you store an ironing board flat against the wall, you’re utilizing dead vertical space that would otherwise go to waste. Unlike leaning storage that still protrudes into the room, truly flat mounting reduces the board’s footprint to mere inches. This is particularly game-changing in compact urban apartments, narrow laundry closets, or multi-purpose rooms where every inch matters. The physics are simple: a standard ironing board leaned against a wall occupies roughly 4-5 square feet of floor space and creates a 15-18 inch protrusion. Mounted flat, that same board uses zero floor space and protrudes less than 4 inches—comparable to a picture frame.
Protecting Your Investment from Damage
Your ironing board isn’t cheap, and improper storage accelerates its demise. When leaned, the legs create pressure points on the board’s edge, eventually warping the metal mesh or perforated surface. The feet scratch walls and doors, while the hanging loop stresses the board’s hinge mechanism. Flat wall storage distributes weight evenly across the board’s frame, prevents leg deformation, and keeps the pad and cover from developing permanent creases or moisture damage from floor contact.
Understanding Different Mounting Mechanisms
Fixed Bracket Systems
Fixed brackets offer the most secure, no-fuss solution for permanent installation. These systems typically feature two parallel arms or a cradle design that holds the board at specific points along its frame. The key advantage? Zero moving parts mean nothing to break, loosen, or adjust over time. Once mounted, your board slides in and out with minimal effort. However, fixed systems demand precise measurement during installation—there’s no forgiveness if your studs don’t align perfectly with your board’s dimensions. They work best for homeowners who know they’ll keep the same board for years and want a set-it-and-forget-it solution.
Adjustable Sliding Rails
If flexibility is your priority, sliding rail systems provide customizable positioning. These feature horizontal tracks mounted to the wall, with adjustable brackets that slide and lock into place. This design accommodates different board lengths and allows you to fine-tune the mounting position after installation. The trade-off? More moving parts mean more potential points of failure. Look for systems with robust locking pins or clamp mechanisms that won’t gradually loosen from daily vibrations. Sliding rails shine in rental properties or households that upgrade boards periodically.
Magnetic Mounting Solutions
For lightweight, compact boards, magnetic systems offer tool-free installation and removal. These use powerful neodymium magnets embedded in wall plates that attract metal plates mounted to your board’s frame. While incredibly convenient for quick access, magnetic solutions typically support only 10-15 pounds maximum—insufficient for full-size boards with steel frames. They’re ideal for apartment dwellers who can’t drill into walls or for storing travel boards in closets. The catch? Your board must have a ferrous metal frame, and you’ll need to ensure the magnetic force won’t damage electronic components in nearby appliances.
Over-the-Door Conversion Kits
While technically not wall-mounted, over-the-door kits deserve mention because many can be modified for flat wall installation. These hybrid systems feature adjustable hooks that grip the top of a door, with arms that extend to hold the board flat. When mounted directly to a wall (using the included hardware or additional brackets), they provide excellent weight distribution and often include built-in iron storage. The versatility makes them popular, but verify the hook design won’t damage your wall’s surface over time.
Key Features That Define Quality Hangers
Weight Capacity and Load Distribution
A premium hanger lists its weight capacity clearly—typically ranging from 20 to 40 pounds for standard boards. But raw capacity tells only half the story. Examine how that weight distributes across contact points. Quality designs use padded cradles at multiple points along the board’s frame rather than a single central hook. This prevents stress concentration that can bend lightweight board frames. For T-leg boards, ensure the hanger supports both the board head and the leg crossbar independently. Y-leg designs require a wider cradle to prevent twisting.
Padding and Protection Elements
Bare metal-on-metal contact is a recipe for scratches and rust. Look for hangers with silicone, rubber, or foam padding at all touchpoints. The best systems use UV-resistant padding that won’t degrade or leave sticky residue on your board over time. Pay special attention to the leg cradle area—this experiences the most friction during removal and rehanging. Some advanced designs feature replaceable padding strips, extending the hanger’s lifespan indefinitely.
Locking Mechanisms for Safety
In households with children or in earthquake-prone regions, a passive holder isn’t enough. Active locking mechanisms secure the board even if the wall mount loosens. The most reliable systems use spring-loaded detents, twist-lock collars, or magnetic catches that require deliberate action to release. Test the mechanism’s tension—too loose and it’s useless; too tight and you’ll struggle with one-handed operation. The sweet spot allows smooth operation while resisting accidental release from bumps or vibrations.
Material Matters: What Your Hanger Should Be Made Of
Steel vs. Aluminum Construction
Steel hangers offer maximum strength and durability, with powder-coated versions resisting corrosion for decades. They handle heavy professional boards with ease but add significant weight to the installation—important if you’re mounting to drywall without stud support. Aluminum alternatives weigh 40-60% less while still supporting standard boards, making them ideal for tile or plaster walls where heavy anchors might crack the surface. However, lower-grade aluminum can bend under sustained load, so verify the gauge thickness. For most residential applications, 14-gauge steel or aircraft-grade aluminum provides the best balance.
Plastic Components: Where They Belong
High-quality hangers use minimal plastic, reserving it for protective padding, lock collars, or decorative end caps. Avoid systems where load-bearing arms or brackets are plastic—regardless of marketing claims, these degrade from UV exposure and temperature fluctuations in laundry rooms. If plastic is present, ensure it’s glass-filled nylon or ABS, not brittle polystyrene. The best designs use plastic only where it provides functional benefit: reducing noise, preventing scratches, or enabling smooth sliding adjustments.
Coating and Finish Options
Your hanger’s finish does more than look pretty—it prevents rust in humid laundry environments. Powder coating provides a thick, durable layer that resists chipping better than paint. For humid climates or unventilated laundry closets, consider stainless steel or galvanized options. Matte finishes hide fingerprints and water spots, while glossy surfaces wipe clean easily but show every smudge. Dark colors camouflage dust, while white or chrome brightens dim spaces. The choice depends on your room’s conditions and cleaning habits.
Wall Compatibility: What You Need to Know
Stud Finding and Installation Basics
Mounting into wall studs isn’t just recommended—it’s non-negotiable for safety. Standard drywall anchors can’t handle the dynamic load of a board being lifted and lowered repeatedly. Use a high-quality stud finder to locate solid wood framing, marking both edges of each stud to find the center. For standard 2x4 studs, you’ll have 1.5 inches of solid wood to work with. Position your hanger so at least two mounting screws penetrate the stud center. If your ideal placement falls between studs, you’ll need a horizontal mounting board anchored to multiple studs, then attach your hanger to that.
Drywall Anchors vs. Direct Stud Mounting
When studs simply don’t align with your desired location, heavy-duty toggle bolts or molly bolts become necessary. These distribute weight across a larger area of drywall, but they have limits. For boards over 15 pounds, use anchors rated for at least 75 pounds each—this provides a 4x safety margin for dynamic loading. Install them perfectly perpendicular to the wall; angled installation dramatically reduces their holding power. Never use plastic expansion anchors for ironing board hangers; they’re designed for static loads like picture frames, not cantilevered weight that pulls outward.
Tile and Brick Wall Considerations
Tile walls require diamond-tipped drill bits and patience. Drill through the grout lines when possible to avoid cracking tiles, using masking tape to prevent bit slippage. Anchor into the substrate behind the tile, not just the tile itself, using sleeve anchors or toggle bolts designed for hollow-wall applications. For solid brick or concrete walls, use masonry screws (Tapcon-style) with the correct diameter and length. Predrill holes slightly deeper than the screw length to allow for dust settlement, and blow out debris before inserting anchors.
Board Compatibility: One Size Doesn’t Fit All
Standard T-Leg Ironing Boards
T-leg boards represent the most common design, and most flat-wall hangers accommodate them readily. The key measurement is the distance between the leg pivot points—typically 12-15 inches. Your hanger’s cradle width must exceed this measurement to allow the board to nest flat. Also measure the board’s thickness at the hinge point; some T-leg designs have bulky hinges that won’t fit narrow cradles. The board’s length affects hanger placement more than its weight—longer boards require lower mounting to keep the center of gravity stable.
Wide-Top Professional Boards
Professional boards with 18-inch or wider tops present unique challenges. Their increased width means more torque on the wall mount when the board hangs vertically. You’ll need a hanger with a deeper cradle—at least 6 inches—to support the board’s frame securely. The weight distribution also shifts forward, so verify the hanger’s rated capacity accounts for this leverage effect. Some professional boards lack the traditional tapered nose, so measure your board’s exact profile before selecting a hanger designed for domestic boards.
Compact Travel Boards
Travel boards are lightweight and often lack the rigid frame structure of full-size models. Standard hangers can’t grip their narrow legs or thin frames securely. Look for systems with adjustable clamping width or padded vise-style holders that conform to irregular shapes. Magnetic systems work exceptionally well for travel boards if the frame contains ferrous metal. The advantage? You can mount them inside closet doors or in tight spaces where a full-size system wouldn’t fit.
Y-Leg and Four-Leg Designs
Y-leg boards require hangers with wider cradles—minimum 8 inches—to prevent the legs from slipping through. The angled leg design also means the board’s center of gravity sits lower, so mount the hanger 6-8 inches lower than you would for a T-leg board. Four-leg designs are the trickiest; they often need custom solutions or universal systems with independent arm adjustments. Some owners remove two legs for storage, but this defeats the purpose of quick-access hanging. Instead, look for rail systems where you can position separate cradles for the board head and leg assembly.
Space Planning and Placement Strategy
Ideal Height for Mounting
The perfect mounting height balances accessibility with stability. For most adults, positioning the hanger so the board’s top sits 60-66 inches from the floor allows comfortable one-handed removal without reaching or bending. However, consider your ceiling height—mounting too high on an 8-foot ceiling leaves insufficient clearance above the board, making removal awkward. In rooms with 9-foot or higher ceilings, you can mount higher to keep the board completely out of the way. Always account for the board’s full length; a 54-inch board mounted at 66 inches will extend to just 12 inches above the floor—fine for most spaces, but problematic if you store items below.
Proximity to Electrical Outlets
Convenience dictates mounting near your ironing station, but not at the expense of safety. Position the hanger at least 12 inches from outlets to prevent the board or its metal frame from contacting plugs. This distance also reduces the risk of water (from steam irons) reaching electrical connections. If your laundry area is compact, consider vertical orientation—mount the board on a wall adjacent to, not opposite, the outlet. This prevents the cord from draping across walking paths while keeping everything within arm’s reach.
Avoiding Moisture and Heat Sources
Laundry rooms are humid environments, and steam from irons creates localized moisture. Never mount your hanger directly above a dryer vent or water heater; the constant heat and humidity accelerate corrosion and can degrade padding adhesives. Similarly, avoid walls that share plumbing pipes—condensation can seep through and rust steel components from behind. The best location is an interior wall with stable temperature and low humidity, or at minimum, a wall section with good air circulation.
Safety Considerations You Can’t Ignore
Child-Proofing Your Installation
A 15-pound ironing board falling from wall height can seriously injure a child. Even if your hanger has a locking mechanism, add a secondary safety strap for households with curious toddlers. Mount the strap’s anchor point at least 48 inches high—out of reach of small hands—and use a child-resistant buckle. Consider mounting the board in a locked closet rather than an open laundry area if possible. The hanger’s release mechanism should require adult-level dexterity; test it yourself—if a 5-year-old could figure it out, it’s not safe enough.
Earthquake and Vibration Resistance
In seismic zones, standard mounting isn’t sufficient. Use seismic-rated anchors that expand in four directions, and consider adding a safety cable tethered to a separate anchor point. The board should hang with its length parallel to wall studs, not perpendicular, to reduce swaying. For upper-floor laundry rooms in older homes, be aware that floor vibrations from washers can gradually loosen mounts. Apply thread-locking compound to all screws during installation, and inspect quarterly for loosening. Some advanced systems include rubber isolation grommets that absorb vibrations before they reach the mounting hardware.
Weight Verification Before Installation
Never trust the manufacturer’s weight rating without verifying your board’s actual weight. Weigh your fully assembled board on a bathroom scale—many modern boards are heavier than their vintage counterparts due to thicker padding and reinforced frames. Add 5 pounds to this measurement to account for dynamic loading when you lift the board off the hanger. Your chosen system should be rated for at least double this total weight. This 2x safety margin accounts for material fatigue, anchor degradation, and the occasional accidental tug on the board.
Aesthetic Integration with Your Home Decor
Color Matching and Finish Selection
Your hanger doesn’t have to look like an afterthought. Most quality systems come in white, black, chrome, or brushed nickel. Match the hanger to your appliances for a cohesive look—chrome for modern stainless steel laundry sets, white for traditional appliances. In visible spaces like mudrooms, consider painting the hanger to match your wall color. Use appliance epoxy paint for durability, and mask off any padding or moving parts. Some premium systems offer custom powder-coating for a perfect match to designer paint colors.
Concealed vs. Exposed Hardware
Exposed mounting bolts create an industrial look that suits some spaces but appears unfinished in others. Concealed hardware designs hide fasteners behind decorative covers or within the hanger’s structure. The trade-off is installation complexity—concealed systems often require precise drilling and may need specialized tools. For a compromise, use decorative bolt caps that snap over standard hex heads. These come in metallic finishes and make exposed hardware look intentional rather than utilitarian.
Minimalist Design Trends
The latest hanger designs embrace minimalism, using as little material as possible to achieve the function. These feature thin profile arms that hug the board tightly, creating a shadow-like silhouette on the wall. While visually striking, ensure minimalist designs don’t compromise function—some ultra-thin models flex under load or lack adequate padding. The best minimalist hangers use high-strength materials like aircraft aluminum to maintain rigidity with less bulk. They typically cost 20-30% more but disappear visually when the board is removed.
Installation: DIY or Professional?
Tools You’ll Need for Proper Installation
Basic installation requires a stud finder, level, drill with appropriate bits, and a socket set. For tile or brick, add a hammer drill and masonry bits. A laser level proves invaluable for aligning multi-point hangers—trying to level by hand across 24 inches often results in subtle sagging. Have painter’s tape handy to mark stud locations without damaging paint. For heavy boards, a second pair of hands makes alignment much easier. Don’t forget safety glasses; drilling into walls creates dust and debris that can cause eye injuries.
Common DIY Mistakes That Compromise Safety
The number one error is undertightening mounting screws. A screw that feels “tight enough” by hand often has another quarter-turn of holding power. Use a torque wrench set to the anchor manufacturer’s specification—typically 15-20 Newton-meters for lag bolts into studs. Second mistake: failing to predrill pilot holes. Even with self-tapping screws, pilot holes prevent wood splitting and ensure the screw bites into solid wood, not just the stud’s surface. Third error: using the wrong anchor type for your wall material. Those plastic drywall anchors that came with the hanger? They’re likely insufficient. Upgrade to toggle bolts or molly bolts rated for the actual weight.
When to Call a Professional
If your walls are plaster and lath, call a professional unless you have experience with this finicky material. The brittle plaster cracks easily, and lath strips provide inconsistent anchoring. Similarly, if you need to mount into concrete block or solid brick without access to a hammer drill, a pro can complete the job in 30 minutes what might take you hours. Any installation that requires moving electrical outlets or plumbing to accommodate the hanger demands a licensed contractor. The cost—typically $75-150 for a simple wall mount—is cheap insurance against a failed DIY attempt that damages your wall or board.
Maintenance and Long-Term Care
Regular Inspection Checkpoints
Every six months, perform a safety check. Tug firmly on the mounted hanger to test for any wiggle or rotation. Check that all screws remain flush against the mounting plate—protruding screws indicate loosening. Inspect padding for compression or cracking; flattened padding loses its protective qualities. For sliding systems, verify locks engage fully and rails show no signs of bending. If your board has been hanging for years untouched, remove it and check for rust stains on the wall—a sign of moisture infiltration that needs addressing.
Cleaning Without Damaging Finishes
Dust your hanger monthly with a microfiber cloth; accumulated dust traps moisture against the finish. For stubborn grime, use a damp cloth with mild dish soap—never abrasive cleaners or scouring pads that scratch powder coating. Chrome finishes benefit from a light application of automotive wax twice a year; this fills micro-scratches and repels water. If rust spots appear on steel hangers, address them immediately: sand lightly with fine-grit paper, apply rust-inhibiting primer, and touch up with appliance paint. Ignoring rust allows it to spread behind the finish, compromising structural integrity.
When to Replace Your Hanger
Even quality hangers don’t last forever. Replace yours immediately if you notice any of these warning signs: visible bending or deformation of load-bearing arms, stripped screw holes that can’t be re-tapped, or padding that won’t stay adhered. If the locking mechanism fails to engage securely even after cleaning and adjustment, don’t risk it—replace the unit. A good rule of thumb: if your hanger is over 10 years old and shows any wear, proactive replacement prevents catastrophic failure. Newer designs incorporate safety features that didn’t exist a decade ago.
Cost vs. Value: Making a Smart Investment
Budget-Friendly Options and Their Limitations
Entry-level flat-wall hangers priced under $20 typically use thinner steel (18-gauge or higher) and minimal padding. They function adequately for lightweight boards in low-use households but expect a 3-5 year lifespan. These often lack locking mechanisms and may flex noticeably under load. The hidden cost? You’ll likely replace them sooner, and the minimal padding may scratch your board’s finish. For occasional ironers with basic boards, this tier offers acceptable value, but daily users will find the limitations frustrating.
Premium Features Worth Paying For
Moving into the $30-50 range unlocks meaningful improvements: 14-gauge steel construction, multi-point padding, and reliable locking systems. You’ll also find better finish quality and longer warranties—often 5-10 years instead of 1-2. The sweet spot for most households is the $40-60 tier, where you get aircraft-grade aluminum or powder-coated steel, replaceable padding, and seismic-rated mounting hardware. These hangers essentially last the lifetime of your board and protect it properly. For professional boards or daily use, this investment pays for itself by extending board life.
The Hidden Costs of Poor-Quality Hangers
A failed hanger can damage your board (costing $50-150 to replace), dent your drywall ($30-100 in repair materials), or injure someone (priceless). Cheap hangers often have sharp edges that scratch walls during installation or removal. Inferior padding adhesive can fail, leaving sticky residue that’s nearly impossible to remove from your board’s finish. Perhaps most costly: a wobbly hanger makes you less likely to use it, leading you to leave the board leaning anyway—defeating the entire purpose. Factor these potential costs into your budget decision.
Troubleshooting Common Issues
Squeaking and Noise Reduction
That annoying squeak when removing your board usually stems from metal-on-metal contact or dry pivot points. Apply a silicone lubricant (never oil-based, which attracts dust) to all moving parts and contact surfaces. For persistent noise, place a small piece of felt tape between metal components. If the squeak comes from the wall itself, your mount is loose—tighten all screws and consider adding additional anchors. Rubber isolation washers between the hanger and wall can dampen vibrations that cause noise.
Sagging or Loose Mounts
A hanger that gradually tilts forward indicates either undertightened screws or inadequate anchors for your wall type. Remove the board and check for screw loosening—this suggests the anchors are pulling out. If screws remain tight but the hanger still sags, the mounting plate may be flexing. This happens with low-quality steel or when the board’s weight exceeds design limits. The fix: add a reinforcing plate behind the hanger, distributing load across a larger wall area. Use a 1/8-inch steel plate, painted to match, secured with four anchors instead of two.
Board Slippage Solutions
If your board slides out of the hanger unexpectedly, first check that you’re inserting it correctly—most hangers have a specific orientation. If slippage persists, the cradle may be too wide for your board’s frame. Add adhesive-backed foam strips to narrow the gap, or wrap the board’s frame with silicone tape to increase friction. For rail systems, verify the locking mechanism engages fully; sometimes debris prevents proper locking. A temporary fix: place a rubber band around the hanger’s arms to create additional friction, but plan to replace the hanger soon as this indicates incompatibility.
Frequently Asked Questions
Will a wall-mounted hanger damage my ironing board’s padding or cover?
Quality hangers with adequate padding won’t damage your board. The key is ensuring the hanger’s contact points rest on the metal frame, not the padded surface. Look for systems with at least 1/4-inch of soft, non-marking foam or silicone padding. Avoid hangers with bare metal or hard plastic cradles, as these can compress the padding permanently. If your board has a particularly thick or delicate cover, consider wrapping the hanger’s arms with an old t-shirt or soft cloth for extra protection.
Can I install these hangers on drywall without finding studs?
Technically yes, but it’s not recommended for safety. Heavy-duty toggle bolts can support 30-50 pounds in 1/2-inch drywall, but dynamic loading from lifting the board repeatedly stresses anchors beyond static weight ratings. Over time, drywall can crumble around the anchor holes, leading to sudden failure. If studs are truly inaccessible, use a horizontal mounting board (a 1x4 pine board) anchored to studs at its ends, then mount your hanger to this board. This distributes load safely while giving you flexibility in hanger placement.
What’s the typical weight limit for flat-wall ironing board hangers?
Most residential-grade hangers support 20-30 pounds, which covers standard boards weighing 10-15 pounds plus a safety margin. Heavy-duty models handle 40-50 pounds, accommodating professional boards and the additional stress of dynamic loading. Always choose a hanger rated for at least double your board’s actual weight. Remember that weight ratings assume proper installation into studs or solid backing—mounting into drywall alone reduces effective capacity by 60-70%.
Will these hangers work with my extra-wide professional ironing board?
Many will, but you must verify dimensions. Professional boards typically have wider frames that require hangers with adjustable or extended cradles. Measure your board’s width at the hinge point and leg crossbar. The hanger’s cradle width should exceed these measurements by at least 1 inch on each side. Also check the board’s thickness—some professional models have reinforced frames that are too thick for standard cradles. Look for systems specifically marketed as “professional” or “wide-board compatible,” which feature deeper cradles and higher weight capacities.
How high should I mount my ironing board hanger for easiest access?
Mount the hanger so the board’s top sits between 60 and 66 inches from the floor—roughly eye level for most adults. This allows you to grasp the board’s narrow end comfortably without reaching up or bending down. In rooms with 8-foot ceilings, this positioning leaves adequate clearance above for removal. For households with significant height differences among users, prioritize the primary ironer’s comfort. Shorter individuals can use a step stool for occasional access, while excessively low mounting makes the board a head-bumping hazard.
Can I store my iron on the same hanger as my board?
Some all-in-one systems include an iron holder, but combining storage creates weight and balance issues. Irons add 3-5 pounds concentrated at one end, potentially exceeding the hanger’s capacity. The hot iron also poses a burn risk if stored immediately after use. A better solution: mount a separate iron holder 12-18 inches from the board hanger, positioned so the iron’s cord reaches the outlet without stretching. This keeps the board hanger dedicated to its primary job while providing safe, accessible iron storage.
What’s the difference between fixed and adjustable wall-mounted hangers?
Fixed hangers use permanent brackets at set positions, offering maximum stability with no moving parts to fail. They’re ideal for users who keep the same board long-term and want a simple, bulletproof solution. Adjustable systems feature sliding rails or movable arms, allowing you to reposition the board or accommodate different board sizes. These offer flexibility but have more potential failure points and typically cost 30-50% more. Choose fixed for simplicity and longevity; choose adjustable if you upgrade boards frequently or need to fine-tune positioning after installation.
Are wall-mounted ironing board hangers safe in homes with young children?
They can be, but require additional precautions. Even with locking mechanisms, add a safety strap that secures the board to the hanger with a child-resistant buckle. Mount the hanger high enough that children can’t reach the release mechanism—typically above 48 inches. Consider mounting inside a closet with a child-proof door lock rather than in an open room. The board itself presents a tipping hazard if children try to climb it, so ensure the hanger’s lock requires adult-level dexterity to operate.
How do I know if my wall can support the weight of a mounted ironing board?
First, identify your wall type: drywall, plaster, or masonry. Drywall requires stud mounting for safety—use a stud finder to confirm solid wood framing. For plaster, tap the wall; a solid sound indicates lath backing, while a hollow sound suggests inadequate support. Masonry walls (brick, concrete) support weight well but require proper anchors. When in doubt, drill a small test hole to examine the substrate. If you encounter insulation without solid backing, you cannot safely mount there. For questionable situations, consult a handyman or structural engineer before proceeding.
Can I use these hangers in a rental property without damaging the walls?
Yes, but choose removable solutions or get landlord permission. Magnetic hangers work on metal studs or if you can mount a steel plate using removable adhesive strips rated for the weight. For drilling, use the smallest possible holes with heavy-duty anchors that can be removed and patched. Document the installation with photos before and after, and patch holes with proper spackling compound when you move out. Some landlords permit wall mounting if you agree to leave the hanger as an improvement. Always get written permission before drilling in rental units to avoid losing your security deposit.