Nothing ruins laundry day faster than discovering a puddle beneath your washing machine. While tub seals are small components, they play a colossal role in keeping water where it belongs—inside your washer. The frustrating reality? Most leaks don’t stem from faulty seals themselves, but from improper installation. The right tools don’t just make the job easier; they create a watertight seal that lasts for years, not weeks.
Whether you’re a seasoned appliance technician or a determined DIY homeowner, understanding which installation tools prevent leaks from day one is your first line of defense. This comprehensive guide walks you through the essential equipment that transforms a potentially disastrous repair into a professional-quality, leak-free success story.
Top 10 Tub Seal Installation Tools for Washer Leaks
Detailed Product Reviews
1. 383EER4001A Washer Inner/Outer Tub Spring Expansion Tool by Beaquicy - Replacement for L-G Samsung Washing Machine - Solid Metal Washer Spring Expansion Tool can spread to a maximum of 4.3 inches
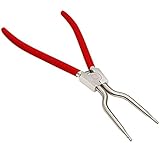
Overview: The Beaquicy 383EER4001A is a specialized spring expansion tool designed for LG and Samsung front-load washing machines. This solid metal tool helps remove and install outer retaining rings and door boot clamps, making washer maintenance significantly easier for DIY enthusiasts and technicians alike. It addresses common repair scenarios including water pump failures, boot replacements, spin issues, leaks, and clothes remaining wet after cycles.
What Makes It Stand Out: This tool features a robust carbon steel construction with a galvanized rust-resistant surface and ergonomic non-slip handle. Its one-piece molding eliminates weak solder joints, while the built-in spring mechanism provides flexibility. The impressive 4.3-inch maximum expansion handles most washer models effectively. The three-year guarantee demonstrates exceptional manufacturer confidence rarely seen in this price category.
Value for Money: At $9.90, this tool offers exceptional value compared to professional service calls costing hundreds. The three-year guarantee ensures long-term reliability, while the durable construction means it will outlast cheaper alternatives. It’s a one-time investment that pays for itself after a single successful repair, eliminating labor costs and extending appliance lifespan.
Strengths and Weaknesses: Strengths: Solid carbon steel build prevents deformation; Galvanized coating resists corrosion; Ergonomic handle ensures safe operation; Three-year warranty provides peace of mind; Excellent price point. Weaknesses: Limited to 4.3-inch maximum spread may not fit all washer models; Brand compatibility listing could be more comprehensive; Instructions not mentioned in features.
Bottom Line: For LG and Samsung owners facing boot seal replacements or pump issues, this Beaquicy tool is an indispensable, cost-effective solution. The three-year guarantee and solid construction make it a reliable choice for DIY repairs.
2. 383EER4004A/383EER4001A Washing Machine Inner/Outer Spring Expansion Tool Washer Door Boot Seal Clamp Ring Removal Tool For 4986ER0004F/B/G, LG, Samsung, Kenmore, Whirlpool
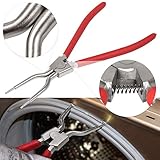
Overview: This versatile spring expansion tool tackles inner and outer tub seal clamps across multiple washing machine brands. Compatible with LG, Samsung, Whirlpool, and Kenmore front-loaders, it simplifies the removal and installation of door boot seals and retaining rings for common washer repairs. The tool addresses issues like water pump failures, boot replacements, spin problems, leaks, and poor water extraction.
What Makes It Stand Out: The tool expands from 1.90" to 4.65", offering broader compatibility than many competitors. Its CNC-machined carbon steel undergoes heat treatment for superior strength while remaining lightweight. The ergonomic handle features a comfortable, non-slip, and insulative cover for safe operation during electrical repairs. This dual protection is a standout safety feature.
Value for Money: Priced at $9.90, this represents outstanding value for a multi-brand tool. The 30-day refund policy plus 12-month warranty provides double protection. Considering professional repair costs, this tool pays for itself immediately. The premium materials and machining quality rival OEM parts at a fraction of dealer prices, making it a smart long-term investment.
Strengths and Weaknesses: Strengths: Wide brand compatibility; CNC-machined heat-treated steel; Expands to 4.65 inches; Insulative handle adds safety; Dual guarantee (30-day + 12-month). Weaknesses: Maximum spread still limited for some applications; May require practice for first-time users; No mention of included instructions.
Bottom Line: This is the go-to tool for homeowners with various washer brands. The combination of superior materials, wide compatibility, and strong warranty makes it an excellent investment for DIY repairs.
3. XiKe W10447783 Washer Tub Bearing Installation and Removal Tool, for W10435302 Up and Down Bearing, Replacement for Whirlpool and Maytag AP5325072, 2118925, W10435274, W10435285, W10447782 Etc.
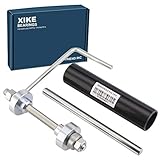
Overview: The XiKe W10447783 is a specialized bearing installation and removal tool designed specifically for Whirlpool and Maytag washers. This precision instrument addresses the notoriously difficult task of replacing tub bearings, particularly the W10435302 upper and lower bearing assemblies that commonly fail in these machines. It’s essential for advanced DIYers tackling bearing-related issues.
What Makes It Stand Out: Unlike generic pullers, this tool features a thrust bearing at the bottom that significantly reduces installation effort and ensures proper alignment. The CNC-grade construction provides the precise tolerances needed for bearing work, preventing damage to expensive washer components during the removal process. Its design specifically matches the bearing dimensions for a perfect fit, eliminating guesswork.
Value for Money: At $29.99, this tool costs more than spring pliers but delivers specialized value. Professional bearing replacement can exceed $400, making this a worthwhile investment for skilled DIYers. The one-year warranty provides assurance, though the higher price reflects its specialized nature and precision engineering compared to universal tools. It pays for itself with one successful repair.
Strengths and Weaknesses: Strengths: Purpose-built for Whirlpool/Maytag bearings; Thrust bearing eases installation; Prevents component damage; High-quality machined construction; One-year warranty. Weaknesses: Significantly more expensive than basic tools; Requires mechanical skill to use properly; Limited to specific bearing models; No instructions included (per “remind” note).
Bottom Line: For experienced DIYers tackling Whirlpool or Maytag bearing replacements, this XiKe tool is essential. It transforms a professional-level job into a manageable task, justifying its premium price through precision and damage prevention.
4. Front Load Washing Machine Seal Spring Expansion Tool - TSE-1/1383EER4004A/383EER4001A for LG, Samsung, Kenmore, Whirlpool Washer Door Boot Seal Clamp Ring Removal Tool

Overview: This premium spring expansion tool serves as a universal solution for front-load washing machine seal maintenance. Compatible with LG, Samsung, Kenmore, and Whirlpool models, it replaces multiple part numbers including 383EER4004A and TJTSE-1, making it a versatile addition to any DIY toolkit. It simplifies seal removal and replacement for various repair scenarios.
What Makes It Stand Out: The extraordinary 1.5" to 10" expansion range far exceeds competitors, handling virtually any front-load washer spring. High-quality materials combined with an ergonomic handle ensure comfortable, repeated use. The tool’s precision engineering prevents damage to delicate rubber seals and surrounding components during removal, ensuring clean repairs every time.
Value for Money: At $24.69, this tool sits at the higher end of the price spectrum but delivers unmatched versatility. The massive expansion range eliminates the need for multiple specialized tools. For households with different washer brands or professional technicians, the durability and universal fit justify the premium over cheaper, limited-range alternatives. It’s a lifetime tool for serious users.
Strengths and Weaknesses: Strengths: Unmatched 10-inch maximum spread; Universal brand compatibility; Protects seals from damage; Ergonomic handle design; Premium build quality. Weaknesses: Highest price among reviewed tools; May be overkill for single-brand owners; Larger size could be unwieldy in tight spaces; No warranty details mentioned.
Bottom Line: This is the ultimate universal spring tool for serious DIYers or professionals. If you service multiple washer brands or want one tool for life, the exceptional range and quality make it worth the investment despite the higher price.
5. 383EER4001A Washing Machine Outer Tub Spring Expansion Tool, Washer Spring Removal Tool for 4986ER0004F/B/G Door Boot, Compatible with LG and Ken-more 1268535, AH3569695, EA3569695, PS3569695

Overview: This 383EER4001A spring expansion tool focuses on LG, Samsung, and Kenmore front-load washers. Designed specifically for 4986ER0004F/B/G door boots, it stretches from 2" to 4.5", covering most standard applications for these popular brands. The tool enables DIY repair of common issues like leaks, pump failures, and seal replacements without professional help, saving both time and money.
What Makes It Stand Out: The safety-coated grip handle provides electrical insulation and comfort during use, a feature often overlooked in cheaper tools. A built-in spring mechanism ensures smooth operation and flexibility when manipulating stubborn clamps. The upgrade design emphasizes user safety without compromising on the 4.5-inch expansion capability needed for most repairs on targeted brands.
Value for Money: Priced at $12.99, this tool offers middle-ground value—more expensive than basic options but cheaper than premium universal tools. The 100% satisfaction guarantee provides purchase protection. For owners of compatible brands, it delivers targeted functionality without paying for unnecessary universal features, essentially paying for itself after one use while ensuring safety.
Strengths and Weaknesses: Strengths: Safety-coated insulated handle; 4.5-inch expansion range; Built-in spring mechanism; 100% satisfaction guarantee; Focused brand compatibility. Weaknesses: Limited brand range vs universal tools; No specified warranty period; Mid-range price may lack premium features; Maximum spread less than some competitors.
Bottom Line: A solid, safety-conscious choice for LG, Samsung, and Kenmore owners. The insulated handle adds peace of mind for DIYers, making it a practical middle-ground option between basic and premium tools.
6. AMI PARTS DC69-00804A Washer Tub Seal Gasket & Washing Machine Hex Bolt DC60-40137A(6 pcs)

Overview: The AMI PARTS DC69-00804A kit addresses common washing machine failures with a tub seal gasket and six hex bolts. Designed for DIY repairs, this package tackles leaks, spin malfunctions, and operational noise. The manufacturer emphasizes straightforward installation, making it accessible for homeowners comfortable with basic appliance maintenance.
What Makes It Stand Out: This kit bundles the critical seal with replacement bolts, recognizing that worn fasteners often accompany seal failure. The comprehensive approach prevents mid-repair discovery of stripped threads. The inclusion of six bolts ensures you have spares for future use or multiple repair points. The product description explicitly mentions safety precautions—disconnecting power and wearing gloves—demonstrating manufacturer responsibility.
Value for Money: At $11.99, this kit costs significantly less than a $150+ service call. Professional repairs typically exceed $200 when labor is included. The parts alone from OEM sources often cost $25-40. For a relatively simple fix, this represents substantial savings, though success depends on accurate diagnosis and installation skill.
Strengths and Weaknesses: Strengths include complete hardware set, clear safety guidance, and responsive customer support promising 24-hour resolution. The hex bolts address balance issues directly. Weaknesses involve lack of model-specific compatibility list in the description, requiring buyers to verify fitment independently. The seal material quality isn’t explicitly specified beyond functional claims.
Bottom Line: Ideal for confident DIYers with verified model compatibility. The bundled hardware and safety focus add value, but confirm your washer’s requirements before purchasing. For $12, it’s a low-risk alternative to professional service if you possess basic mechanical aptitude.
7. 30PCS Seal Ring Silicone Washer, Bathtub Overflow Gasket, Sink Drain Gasket, for 1 1/2 Inch Drain Pipe Sink Drains (Black)

Overview: This 30-pack of black silicone washers provides universal sealing solutions for 1 1/2-inch drain systems. With precise dimensions (43mm outer diameter, 38mm inner diameter, 5mm thickness), these gaskets address common leak points in household plumbing. The bulk packaging targets homeowners managing multiple fixtures or maintaining rental properties.
What Makes It Stand Out: The quantity-to-price ratio is exceptional—30 washers for $6.39 means each seal costs merely $0.21. The one-piece molded construction using NBR rubber ensures durability and aging resistance. Tool-free installation by hand press simplifies repairs for users lacking plumbing experience. Versatility across kitchen sinks, garden hoses, and outdoor applications maximizes utility.
Value for Money: Comparable single gaskets retail for $2-4 at hardware stores. This bulk pack delivers a 90% cost reduction per unit. For property managers or proactive homeowners, the value multiplies further through reduced emergency plumbing calls. Even using only a few washers, the pack pays for itself versus retail alternatives.
Strengths and Weaknesses: Strengths include exceptional bulk value, material durability, dimensional precision, and universal application range. The hand-press installation eliminates barrier to entry. Weaknesses involve limited size options—only 1 1/2-inch compatibility—and black color may not match all aesthetic preferences. No compatibility chart for specific brands could challenge novices.
Bottom Line: An essential stocking item for any household toolkit. The unbeatable per-unit cost and reliable performance make this bulk pack a no-brainer for DIY plumbers. Verify your drain size, then purchase without hesitation.
8. OCTOPUS W10435302 & 2119011 EA3503261 Washer Bearings, Shaft & Tool Kit Compatible Most Front Load Washers Tub Bearing & Seal Kit Washer Shaft & Bearing Kit W10435302 2119011 EA3503261 – 19Pc Kit

Overview: The OCTOPUS 19-piece kit delivers a complete solution for front-load washer bearing failure, encompassing bearings, seal, drive shaft, and specialized installation tools. Targeting advanced DIYers, it addresses noisy, leaking washers by replacing the entire bearing assembly in one comprehensive repair session.
What Makes It Stand Out: This all-in-one system eliminates the frustration of sourcing parts separately, preventing compatibility mismatches that often derail repairs. The inclusion of professional-grade installation tools—a metal push rod, driving rod, and spacer lever—elevates this beyond a simple parts purchase into a turnkey solution. Explicit specifications (13.45" shaft, 35.75mm diameter) and double-sided rubber wall bearings ensure precision and enhanced durability.
Value for Money: At $58.99, this kit costs 70-80% less than professional bearing replacement services ($300-500). OEM bearing kits alone run $80-120 without tools. While representing a substantial DIY investment, the comprehensive components and warranty coverage make it economically compelling for skilled homeowners willing to invest labor.
Strengths and Weaknesses: Strengths include the complete toolset, detailed specifications, 30-day money-back guarantee, and 90-day manufacturer warranty. Metal construction promises extended lifespan beyond OEM parts. Weaknesses center on very significant installation complexity requiring advanced mechanical skills, specialized knowledge, and several hours of dedicated labor. Compatibility verification remains essential despite provided lists.
Bottom Line: Best suited for experienced DIYers with compatible front-load washers. The tool inclusion and warranty mitigate purchase risk, but novices should opt for professional service. Meticulously verify compatibility before ordering.
9. HAÜS PARTS 383727 Washer TUB Seal Compatible with Top Brands Washer 383727, 21050, 62665, B00DM8KM5U, 96690, W10814296VP
Overview: The HAÜS PARTS 383727 washer tub seal offers a targeted solution for leaking top-load washers across multiple major brands. This single-component replacement addresses the common failure point where the tub meets the transmission, preventing water damage and restoring proper operation. Designed as a direct-fit replacement, it serves DIYers seeking an economical repair option for specific washer models.
What Makes It Stand Out: Extensive compatibility coverage sets this apart, replacing numerous part numbers including 383727, 21050, 62665, and W10814296VP. The manufacturer explicitly offers pre-purchase assistance, reducing buyer uncertainty significantly. The focus on premium materials and damage resistance suggests durability beyond basic aftermarket parts. The product description emphasizes complete satisfaction, indicating strong customer service commitment.
Value for Money: At $7.44, this seal costs a fraction of professional service calls ($100-150). OEM seals typically range $15-30, making this a 50-75% savings. For a straightforward tub seal replacement, the price point allows risk-averse buyers to attempt repair before resorting to expensive diagnostics. The low cost justifies keeping a spare for future preventive maintenance.
Strengths and Weaknesses: Strengths include broad compatibility, remarkably low price, quality material claims, and proactive customer support. The DIY-friendly nature suits moderately skilled homeowners. Weaknesses involve single-component focus—leaks may stem from other issues—and lack of installation instructions or hardware. Compatibility verification requires buyer diligence despite assistance offers.
Bottom Line: An excellent value for owners of compatible top-load washers experiencing tub leaks. Verify your model matches the extensive part number list before purchasing. For under $8, it’s a worthwhile first step before calling a technician, provided you have basic appliance repair skills and can diagnose the issue accurately.
10. The Original Red Disc Seal. Bathtub spout rear seal. Over 6000 installed. It slips over and seals 1/2" copper pipe. Avoid 2-piece designs. 2-piece design is not sealed between the two pieces.

Overview: The Original Red Disc Seal targets a specific plumbing challenge: sealing the gap behind bathtub spouts installed on 1/2-inch copper pipe. Unlike traditional two-piece designs that can leak between components, this single-piece seal slips directly over the pipe, creating a watertight barrier. With over 6,000 installations claimed, it addresses a niche but frustrating problem for homeowners and plumbers.
What Makes It Stand Out: The one-piece design eliminates the inherent flaw of two-piece seals where water infiltrates between sections. Its slip-on installation requires no special tools or complicated procedures. The bright red color aids visibility during installation and future inspections. The manufacturer specifically warns against two-piece alternatives, showing confidence in their engineering solution. The claimed installation volume suggests proven field reliability.
Value for Money: At $11.99, this specialized seal costs less than a plumber’s minimum service fee ($75-100). Traditional two-piece seals cost $5-8 but may cause callbacks due to leaks. The single-piece reliability prevents repeat work, making it economically superior despite a slightly higher initial price. For DIYers, it eliminates the need for multiple trips to the hardware store searching for the right solution.
Strengths and Weaknesses: Strengths include innovative one-piece design, proven installation track record, tool-free installation, and specific copper pipe sizing. The design eliminates common failure points. Weaknesses involve limited application—only 1/2-inch copper pipe—and lack of compatibility with other pipe materials. The specialized nature means it won’t solve broader plumbing issues.
Bottom Line: A must-have for anyone installing or replacing a tub spout on 1/2-inch copper pipe. The one-piece design justifies the modest premium over conventional seals. Verify your pipe material and size before ordering. For plumbers, it’s a reliable staple; for DIYers, it’s cheap insurance against callbacks.
Understanding Washer Tub Seal Failures
The Anatomy of a Washing Machine Tub Seal
Before diving into tools, you need to understand what you’re working with. A tub seal sits at the critical junction where the washer’s transmission shaft enters the outer tub. This dynamic seal must withstand constant rotation, water pressure, temperature fluctuations, and detergent exposure while maintaining a perfect barrier. The seal typically consists of a rubber boot, spring-loaded lip, and sometimes a secondary dust seal—all precision components that demand equally precise installation.
Common Causes of Premature Seal Failure
Installation errors account for over 60% of premature tub seal failures. Using flat-head screwdrivers to pry out old seals, installing with bare hands that leave skin oils, failing to properly seat the seal in its groove, or using mismatched tools that dent the seal surface—these mistakes create microscopic pathways for water. Even a hairline gap will eventually become a steady drip. Understanding these failure points highlights why specialized tools aren’t optional; they’re essential.
Why Proper Installation Tools Matter
The Difference Between Amateur and Professional Results
Professional appliance technicians don’t achieve leak-free installations through magic—they use tools engineered specifically for the task. The difference between a seal that fails in three months versus one that lasts a decade often comes down to three factors: even pressure distribution during installation, pristine surface preparation, and precise torque application. Generic tools simply cannot guarantee these outcomes. Purpose-built installation tools apply force exactly where needed, protect delicate seal surfaces, and ensure the component seats perfectly square in its housing.
Essential Tub Seal Installation Tool Categories
Precision Seal Drivers and Presses
Seal drivers are arguably the most critical tool in your arsenal. These cylindrical tools match the exact diameter of specific seal types, allowing you to press the seal into its bore with uniform pressure. Unlike improvised methods that create pressure points, a quality driver distributes force across the seal’s entire face, preventing the twisting and distortion that lead to immediate or delayed leaks.
Features to Look for in Seal Drivers
When evaluating seal drivers, prioritize tools with depth control features. A good driver includes a built-in stop or adjustable collar that prevents over-driving the seal past its intended seat. Look for machined aluminum or high-impact polymer construction—materials that won’t mar the seal surface or flake off debris. The best drivers have laser-etched size markings that won’t wear off and come with interchangeable inserts to handle multiple seal diameters from 1-inch transmission seals to 3-inch outer tub seals.
Tub Nut Wrenches and Spanner Tools
The tub nut secures the inner basket to the transmission shaft, and removing it is often the first step in accessing the seal. Standard wrenches won’t fit these specialized nuts, which feature rounded notches or holes rather than flat faces. A proper tub nut wrench engages these notches fully, preventing the rounding and deformation that makes reinstallation impossible.
Material Considerations for Durability
Spanner tools face tremendous torque loads, especially with corroded nuts. Opt for chrome-molybdenum steel construction rather than cheaper carbon steel. The investment pays dividends when you encounter a 10-year-old washer where the tub nut has essentially fused to the shaft. Thicker tool stock (at least 3/8-inch) prevents flexing that can cause the tool to slip and damage the washer’s finish or your knuckles.
Bearing Installation and Removal Kits
Many modern washers integrate bearings and seals into a single assembly. Attempting to remove bearings with punches and hammers inevitably damages the seal seat. Bearing pullers with slide hammers extract components straight out without side loading. Conversely, bearing presses use threaded rods and precision-machined cups to install new bearings perfectly perpendicular to the shaft. This perpendicularity is crucial—any angle during installation creates uneven wear patterns that quickly compromise the seal.
Sealant and Lubricant Application Tools
The right sealant applied the wrong way causes more problems than it solves. Precision applicator guns with fine-gauge tips allow you to apply continuous, uniform beads of sealant without over-application. Excess sealant squeezes into the tub, breaks off, and clogs pumps. For lubricants, microfiber applicator pads and disposable lint-free brushes ensure you coat seal lips with the manufacturer-specified grease without introducing contaminants. Never use your fingers—skin oils degrade rubber compounds over time.
Shaft Cleaning and Preparation Tools
A new seal installed on a damaged shaft is a leak waiting to happen. Polishing cloths impregnated with fine abrasive (600-grit or higher) remove minor scoring and corrosion without changing shaft diameter. For more significant damage, split-shaft repair sleeves provide a new sealing surface. The key is using tools that restore surface finish to 32 microinches or better—the smoothness standard manufacturers require for reliable sealing.
Leak Detection and Testing Equipment
How do you verify your installation before water goes everywhere? Professional technicians use pneumatic test plugs that seal the tub openings, allowing pressurization with low-pressure air (5-10 PSI). A simple soap solution brushed on the seal area reveals leaks through bubbling. This dry testing method prevents water damage if the installation has issues. Digital pressure gauges with bleed valves provide precise control during this critical validation step.
Torque Wrenches for Precision Fastening
The tub nut, mounting bolts, and often the seal retainer itself have specific torque values measured in inch-pounds, not foot-pounds. A quality inch-pound torque wrench with a range of 50-250 in-lbs is non-negotiable. Over-torquing compresses seal lips excessively, accelerating wear. Under-torquing allows movement that abrades the seal. Look for click-type wrenches with ±3% accuracy and a locking mechanism that prevents accidental adjustment during use.
Specialty Pliers for Retaining Rings
Many seals are held in place by internal or external snap rings that require special pliers to remove and install without distortion. Standard needle-nose pliers slip off and scratch the groove, creating leak paths. Retaining ring pliers with interchangeable straight, 45-degree, and 90-degree tips allow access to rings in deep bores or tight quarters. The best versions feature spring-loaded handles that return to open position, reducing hand fatigue during multiple installations.
Spanner Wrenches for Lock Nuts
Some washer designs use lock nuts with slots or holes that require a hook spanner. Adjustable hook spanners with multiple pin sizes accommodate various nut configurations. The critical feature is a secure locking mechanism—nothing’s worse than the wrench adjusting mid-turn and slipping. Look for tools with knurled adjustment knobs that lock positively and maintain setting even under heavy load.
Hub and Drum Alignment Tools
After seal installation, the inner basket must be perfectly aligned to prevent the spinning load from creating oscillation that stresses the seal. Alignment tools thread onto the transmission shaft and use dial indicators to measure basket runout. Keeping runout under 0.020 inches ensures the seal lip tracks true. While this tool represents a higher investment, it’s essential for front-load washers where the basket hangs from the rear bearing and seal assembly.
Protective Installation Accessories
Never underestimate the value of protection. Seal installation sleeves (thin, tapered plastic sheaths) slide over transmission shafts, preventing the sharp shaft keyway from cutting the seal’s inner lip during installation. O-ring picks with rounded tips help position seals without puncturing them. Magnetic pickup tools retrieve dropped hardware from the tub interior without scratching surfaces. These small accessories prevent the “oops” moments that turn into leaks.
Key Features to Evaluate Before Purchasing
Material Quality and Construction
Tool longevity directly impacts installation quality. Forged tools provide superior strength compared to cast or stamped alternatives. Check for full-polish chrome plating that resists rust in humid laundry room environments. For polymer tools, ensure they’re glass-filled nylon or acetal resin—materials that maintain dimensional stability under pressure and temperature extremes. Avoid tools with visible mold lines or flashing, which indicate poor quality control.
Ergonomic Design for Extended Use
A two-hour seal replacement job becomes miserable with poorly designed tools. Cushioned grips with textured surfaces prevent slippage even with wet hands. Tools with offset handles provide knuckle clearance in tight spaces. Weight matters too—heavier isn’t always better. A well-balanced seal driver feels substantial but doesn’t cause fatigue. Look for tools with hanging holes or storage cases that keep your workspace organized.
Compatibility Across Washer Models
The best tools offer adaptability. Interchangeable heads, adjustable sizing, and modular design let you tackle multiple washer brands without buying duplicate tools. Check whether the manufacturer provides compatibility charts or apps that cross-reference tool numbers with washer models. This future-proofs your investment as appliance designs evolve. Universal bearing pullers with multiple collet sizes exemplify this versatility.
Calibration and Measurement Accuracy
Torque wrenches and alignment tools require periodic calibration. Quality tools include certificates of calibration from the factory. Look for tools with user-adjustable calibration features and clear instructions for checking accuracy. Digital alignment tools should have replaceable batteries and auto-shutoff features to preserve power. Remember: an inaccurate measurement tool is worse than no tool at all—it gives false confidence in a faulty installation.
Professional Installation Techniques
Step-by-Step Seal Preparation
Professional results start before the seal touches the washer. Begin by inspecting the new seal under bright light for manufacturing defects. Next, clean it with isopropyl alcohol to remove mold release agents from manufacturing. Apply a thin film of manufacturer-specified lubricant to the sealing lip only—never the outer diameter that presses into the bore. This lubrication prevents dry-start friction that can tear the lip on first rotation.
Proper Lubrication Methods
Use a foam swab or lint-free cloth to apply lubricant in a continuous, uniform coating approximately 1/16-inch wide on the seal lip. Too much grease attracts lint and creates a path for water migration. Too little causes premature wear. The lubricant type matters: high-temperature lithium grease for most top-loaders, silicone-based grease for front-loaders with higher spin speeds. Never substitute automotive grease, which contains additives that attack rubber.
Torque Specifications and Patterns
Always look up the specific torque values for your washer model—never guess. Apply torque in three incremental stages: hand-tight, 50% of final torque, then 100% of final torque. For tub nuts with multiple notches, use a star pattern similar to lug nuts, rotating 180 degrees between stages. This ensures even seating and prevents cocking the seal. After final torque, mark the nut position with a paint pen to verify it hasn’t loosened after the first few cycles.
Common Installation Mistakes That Cause Leaks
Over-tightening and Seal Distortion
The most frequent error is treating the tub nut like a lug nut on a truck. Excessive torque compresses the seal’s spring-loaded lip, causing it to lose contact pressure with the shaft. The result: a seal that leaks immediately or fails within weeks. A torque wrench isn’t just recommended—it’s mandatory. The “feel” method fails because seal drag varies dramatically between new and old components.
Improper Seal Seating
A seal that isn’t bottomed completely in its bore creates a gap at the backside that leaks during the fill cycle. You must feel the seal “click” into its groove or bottom out against the shoulder. Seal drivers with depth stops prevent this error. After installation, visually inspect the seal face—it should be perfectly flush with the surrounding surface, not recessed or protruding. A small inspection mirror helps verify seating in deep bores.
Contamination During Installation
Installing a seal in a dusty laundry room environment invites failure. Even microscopic particles between the seal and bore create channels for water. Create a clean workspace by vacuuming the area first. Keep the new seal in its packaging until the moment of installation. Use nitrile gloves to handle all components. If you drop the seal on the floor, replace it—don’t risk a leak for a $20 part.
Cost-Benefit Analysis of Quality Tools
Long-Term Savings Perspective
A complete professional-grade tub seal installation kit represents a $200-400 investment. Compare that to a single service call at $150-200, and the math becomes compelling. Quality tools last decades with proper care, while cheap tools break or cause damage that costs far more to repair. Consider the cost of a second seal replacement because the first one leaked—now you’re paying for parts twice plus your time. Quality tools pay for themselves on the first successful installation.
When to Rent vs. Buy
For one-time repairs, tool rental makes sense. Many auto parts stores and equipment rental centers offer bearing pullers and torque wrenches for daily rates under $30. However, specialized seal drivers and tub nut wrenches are rarely available for rent. If you own rental properties or plan to help friends and family, buying becomes economical quickly. Track your tool usage—if you’ll use a tool three times or more, purchase outweighs rental costs.
Building Your Complete Installation Kit
Must-Have Tools for First-Time Installers
Start with the non-negotiables: a tub nut wrench matching your washer brand, a seal driver set covering common diameters (1.5, 2.0, and 2.5 inches), an inch-pound torque wrench, and snap ring pliers. Add a basic bearing puller for integrated bearing/seal units. This core set handles 80% of residential washers and costs under $250. Buy these tools before ordering the seal—having them on hand prevents improvisation that causes leaks.
Optional Tools for Advanced DIYers
Once you’ve mastered basic installations, expand your kit. A pneumatic test plug set enables pre-fill leak testing. A hub alignment tool ensures perfect basket positioning. A digital bore gauge measures shaft and bore diameters to identify wear that requires sleeve installation. These advanced tools reduce diagnostic time and increase success rates on challenging repairs, particularly with high-efficiency front-loaders.
Maintenance and Care of Your Tools
Cleaning and Storage Best Practices
After each use, clean tools with a degreaser to remove laundry detergent residue that causes corrosion. Dry thoroughly and apply a light coat of tool oil to metal surfaces. Store seal drivers in their original case or a dedicated drawer—dropping them can create burrs that damage seals. For torque wrenches, always return the setting to zero after use to relieve spring tension and maintain calibration. Keep desiccant packs in tool boxes to control humidity.
Calibration Schedules
Torque wrenches require annual calibration if used frequently, or every two years for occasional use. Alignment tools need calibration verification every six months. Create a simple logbook or digital spreadsheet tracking calibration dates. Many tool manufacturers offer free or low-cost calibration services. For bearing pullers and presses, inspect the threads regularly for wear or galling—damaged threads apply uneven force and can break under load.
When to Call a Professional
Recognizing Your Limits
Some washer designs require complete machine disassembly or specialized knowledge of electronic controls that must be reset after transmission work. If your washer uses a direct-drive motor integrated with the tub assembly, or if the seal replacement requires dropping the entire tub unit (common in many Samsung and LG models), professional expertise prevents costly mistakes. Also, if you lack the physical space to lay out components systematically, the risk of losing parts or installing them incorrectly skyrockets.
Complex Washer Models
Front-load washers with sealed outer tubs (where the bearings and seal are pressed into the tub halves) present unique challenges. These often require hydraulic presses and specialized fixtures to separate and rejoin tub sections. Attempting these repairs without the proper equipment frequently results in a destroyed tub assembly costing more than a new washer. Research your specific model’s repair complexity before starting—YouTube videos from certified technicians reveal whether you have the tools and skills required.
Frequently Asked Questions
What is the single most important tool for preventing tub seal leaks?
A properly sized seal driver that matches your specific seal diameter. While other tools are important, even pressure distribution during installation is the number one factor in preventing immediate leaks and ensuring long-term seal life.
Can I use a rubber mallet instead of a seal driver?
No. Rubber mallets create impact loading that can crack the seal’s metal case or distort the rubber lip. Seal drivers apply steady, controlled pressure that seats the seal without damage. The mallet method is a leading cause of installation failures.
How do I know what size seal driver I need?
Measure the outside diameter of the new seal’s metal case, not the rubber lip. Most quality driver sets include size ranges. Alternatively, check the washer’s technical documentation, which lists the required driver size or part number.
Why does my new seal leak immediately after installation?
Immediate leaks typically indicate improper seating, a damaged seal from installation, or contamination. Remove the seal and inspect the bore for scratches. Check that you used the correct driver and that the seal bottomed completely in its groove.
Is it worth buying a torque wrench for a single repair?
Yes. Over-torquing the tub nut is the fastest way to destroy a new seal. A basic inch-pound torque wrench costs less than replacing a second seal due to installation error. Many auto parts stores rent them if you’re absolutely set against purchasing.
What’s the difference between a bearing puller and a seal puller?
Bearing pullers grip from behind the component and extract it straight out. Seal pullers typically hook the seal lip and pry it out. Using a seal puller on an integrated bearing/seal unit often damages the bearing seat. Match the tool to your washer’s design.
Can I reuse the old tub nut?
Only if it’s in perfect condition with no corrosion or thread damage. Tub nuts are relatively inexpensive, and a damaged nut won’t maintain proper torque, allowing the inner basket to move and compromise the seal. When in doubt, replace it.
How tight should a tub seal feel when I install it?
You should feel smooth, consistent resistance as the seal presses into the bore. If it feels gritty or hangs up, stop and inspect for burrs or debris. The final position should be firm—you shouldn’t be able to rotate the seal by hand once seated.
Do I need special lubricant, or can I use whatever I have in my garage?
Use only the lubricant specified by the washer manufacturer or seal supplier. Automotive greases often contain additives that attack rubber. Dish soap might seem convenient but washes away and doesn’t protect during dry starts. The correct lubricant is formulated for compatibility and longevity.
What should I do if the seal bore is corroded?
Light corrosion can be cleaned with fine abrasive cloth and a bore brush. Severe pitting requires a repair sleeve or professional machining. Installing a seal into a damaged bore guarantees a leak. Take the time to restore the surface properly or replace the outer tub assembly.