Stacked laundry units have become the go-to solution for modern homeowners wrestling with limited square footage and endless chore lists. As we move into 2026, the evolution of compact living spaces has made vertical appliance configurations less of a compromise and more of a strategic design choice. But here’s what most people overlook: the sleek silhouette of a stacked washer and dryer is only as reliable as the brackets and hardware holding it all together. A improper mounting system doesn’t just create annoying vibrations—it can void warranties, cause thousands in water damage, or create genuine safety hazards in your home.
The mounting hardware industry has responded with increasingly sophisticated solutions that go far beyond the basic L-brackets of yesteryear. Today’s installation systems incorporate load-distributing engineering, anti-vibration technology, and even smart sensors that monitor stability over time. Whether you’re a contractor specifying equipment for a multi-unit development or a homeowner planning a laundry room renovation, understanding the nuances of modern mounting hardware will save you money, time, and potential headaches down the road.
Top 10 Installation Brackets for Stacked Units
Detailed Product Reviews
1. Mini Split Wall Mounting Bracket for 7000-18000 BTU Air Conditioner Heat Pump System Unit,Heavy Duty Foldable mini Split Bracket
Overview: This universal mounting bracket provides a robust solution for installing mini-split condensers weighing up to 330 pounds. Constructed from galvanized steel with epoxy paint, it’s engineered specifically for outdoor HVAC applications where corrosion resistance is paramount. The foldable design simplifies transport and storage, making it practical for both professional installers and DIY homeowners tackling climate control projects.
What Makes It Stand Out: The four integrated rubber isolation pads distinguish this bracket from basic models, actively reducing vibration transfer and operational noise—a critical comfort factor. The bi-directional assembly design offers installation flexibility, while the precise engineering ensures tight, seamless connections that maintain stability over years of service. This attention to noise reduction transforms the user experience.
Value for Money: At $23.79, this bracket delivers professional-grade features at a fraction of contractor-supplied alternatives. The anti-corrosion protection extends service life, preventing premature replacement costs. For DIY installers, it eliminates expensive custom fabrication while providing commercial-grade equipment protection and improved heat dissipation efficiency.
Strengths and Weaknesses: Pros include exceptional corrosion resistance, effective noise dampening, universal compatibility with 7K-18K BTU units, and straightforward installation. The 330-pound capacity covers most residential systems adequately. The anti-corrosion coating demands careful handling to prevent scratches during installation.
Cons are limited to capacity constraints for larger 24K+ BTU units and the need for careful wall material assessment—brick or concrete installation requires proper anchors (not included). The foldable joints, while convenient, must be checked for tightness.
Bottom Line: This bracket excels for residential mini-split installations, offering an ideal balance of durability, noise reduction, and affordability. It’s a smart investment for homeowners prioritizing long-term performance over rock-bottom pricing.
2. Seymour Stack-It Bracket Set, 4 Heavy-Duty Steel Brackets per Set

Overview: This no-frills bracket set provides basic heavy-duty steel supports for stacking applications. Marketed as a closeout item, it includes four steel brackets designed for straightforward assembly without complex hardware requirements, targeting budget-conscious buyers who need simple solutions.
What Makes It Stand Out: The simplicity is its defining characteristic—basic steel brackets that perform fundamental support tasks without unnecessary complexity. The “heavy-duty” steel construction suggests durability for light to medium stacking applications where aesthetics aren’t prioritized. The uncomplicated design works for basic shelving or frame reinforcement in garages or workshops.
Value for Money: Priced at $35.12 for four brackets, the value proposition is compromised by the strict no-return policy. While affordable, buyers assume all risk if the brackets don’t suit their specific application. This makes it suitable only for those with precise measurements and certainty about requirements, eliminating any margin for error.
Strengths and Weaknesses: Pros include solid steel construction, simple installation, and versatility for various stacking projects. The minimal design approach appeals to those wanting functional hardware without premium pricing.
Cons are significant: the no-return policy creates substantial buyer risk, product specifications lack detail (dimensions, weight capacity, finish), and “manufactured in China” raises quality consistency concerns. The duplicate feature bullet suggests careless listing management, potentially reflecting broader quality control issues.
Bottom Line: Purchase only if you’ve verified exact specifications against your needs. For most buyers, alternative brackets with clear specs and return protection offer better value despite potentially higher cost.
3. Mini Split Wall Mounting Bracket: Wall Mount Rack for 7000 9000 12000 18000 24000 30000 36000 BTU Mini Split Air Conditioner Units, Universal Outside Split System Mount Condenser Bracket, Max 550 LBS

Overview: This heavy-duty bracket system accommodates a wider range of mini-split units, from 7K to 36K BTU, supporting up to 550 pounds. The galvanized steel construction ensures rust resistance, while the foldable design simplifies transport and storage before installation. Two size options provide tailored support rather than one-size-fits-all compromise.
What Makes It Stand Out: The integrated gradienter (level) on the horizontal bar is a standout feature, eliminating guesswork during installation and ensuring proper condenser positioning for optimal drainage. Four rubber pads minimize vibration transmission, while the after-sales service commitment provides 24-hour response support, rare in this category.
Value for Money: At $38.99, it commands a premium over lower-capacity alternatives but justifies the cost with superior weight capacity and installation aids. For larger 24K-36K BTU units, it’s substantially cheaper than professional mounting solutions while providing similar load ratings and improved installation precision.
Strengths and Weaknesses: Pros include impressive 550-pound capacity, two size configurations, built-in leveling system, foldable design for easier handling, and responsive after-sales support. The four rubber pads effectively minimize vibration and noise transfer.
Cons involve higher cost for smaller units where 550-pound capacity is unnecessary, and the larger size may prove cumbersome for single-person installation. While galvanized, the finish may not match epoxy-painted alternatives for extreme coastal environments.
Bottom Line: Ideal for medium to large mini-split installations where capacity and installation precision matter. The leveling feature and dual-size options make it worth the premium for DIYers tackling bigger units.
4. GFA28KITN Stacking Kit for GE 28"W Washer Dryer Stack Bracket Kit - Compatible with GE 28 inch Width Front Load Washers and Dryers Laundry Stacking Kit [Patented]
![GFA28KITN Stacking Kit for GE 28"W Washer Dryer Stack Bracket Kit - Compatible with GE 28 inch Width Front Load Washers and Dryers Laundry Stacking Kit [Patented]](https://m.media-amazon.com/images/I/31nZO4P11VL._SL160_.jpg)
Overview: This dedicated stacking kit is engineered specifically for GE 28-inch front-load washers and dryers, providing a secure vertical arrangement to maximize laundry room space efficiently. The kit includes all necessary components for a complete installation without additional hardware purchases, targeting GE appliance owners specifically.
What Makes It Stand Out: Unlike universal kits, this product guarantees precise fitment for GE appliances, eliminating compatibility guesswork entirely. The patented design reflects GE-specific engineering, while the inclusion of high-quality PP spacers and carbon steel brackets with anti-rust paint exceeds typical OEM standards for durability and longevity.
Value for Money: Priced at $44.90, it represents excellent value compared to GE-branded accessories while maintaining or exceeding original equipment quality. The comprehensive kit (spacers, brackets, 16 screws, instructions) prevents multiple hardware store trips, saving time and frustration during installation.
Strengths and Weaknesses: Pros include perfect GE 28-inch model compatibility, premium materials exceeding OEM specs, complete hardware inclusion, and strong after-sale service commitment. The anti-rust coating ensures longevity in humid laundry environments.
The sole significant con is narrow compatibility—it’s useless for non-GE or non-28-inch appliances. Buyers must carefully verify model numbers against the provided list. The “patented” designation prevents use across brands, limiting resale value if you upgrade appliances.
Bottom Line: An essential purchase for GE 28-inch front-load owners seeking to stack their units. The quality, completeness, and perfect fit make it superior to universal alternatives, provided your models match exactly.
5. Framing Hardware 1/2 x 1/2 Zinc Plated Steel Corner Brace L Brackets with Screws for Frame Corners, Stacked Frames, Stretched Canvas, Shelving - 10 Pack
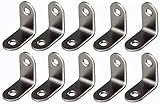
Overview: This 10-pack of miniature L-brackets provides reinforcement for small-scale framing and woodworking projects. Measuring just 1/2" x 1/2" x 3/8", these zinc-plated steel braces are designed for precise corner alignment in delicate applications where larger brackets would be obtrusive and unsightly.
What Makes It Stand Out: The inclusion of appropriately sized mounting screws (3/8" x 4 gauge) eliminates the common frustration of finding compatible hardware. The zinc plating offers decent corrosion resistance for indoor use, while the small profile remains discreet on finished projects like picture frames or stretched canvas artwork.
Value for Money: At $5.95 for ten brackets with screws, this represents exceptional affordability for hobbyists and DIY framers. Bulk purchasing brackets and screws separately would cost significantly more, making this a convenient package for small project batches or craft rooms.
Strengths and Weaknesses: Pros include unbeatable price, included hardware, versatile indoor applications, and adequate strength for light-duty reinforcement. The 10-pack quantity suits multiple projects.
Cons are substantial: extremely limited size restricts applications, insufficient strength for structural support or heavy shelving, and zinc plating provides minimal outdoor corrosion resistance. The tiny 3/8" depth offers minimal gripping surface, making them unsuitable for substantial loads or safety-critical applications.
Bottom Line: Perfect for picture frames, small boxes, and craft projects where discretion and cost matter. Avoid for load-bearing applications or outdoor use. A specialty item that excels within its narrow intended purpose.
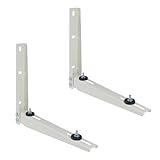
6. Appli Parts APAB-3160 Outdoor Mini Split Wall Mounting Bracket for Ductless Heat Pump or Cooling Only Units Up to 352lbs

Overview: The Appli Parts APAB-3160 is a universal outdoor mounting bracket designed for ductless mini-split heat pumps and cooling units. Supporting up to 352 pounds and accommodating systems from 5,000 to 36,000 BTU, this bracket offers a versatile solution for homeowners and HVAC professionals. Its powder-coated metal construction ensures durability against harsh weather conditions while elevating your investment above ground level to protect against debris, rodents, and vandalism.
What Makes It Stand Out: This bracket’s universal compatibility eliminates guesswork when matching components to specific unit models. The stacking capability is particularly innovative, allowing multiple units to be installed vertically—a game-changer for properties with limited exterior wall space. The comprehensive hardware kit includes everything needed for installation, from cross bars to rubber pads, reducing trips to the hardware store and ensuring you have all necessary components.
Value for Money: At $42.99, this bracket sits in the sweet spot between budget alternatives and overpriced OEM options. Considering its universal design, 352-pound capacity, and complete installation package, it delivers exceptional value. Contractors can standardize on one SKU rather than stocking brand-specific brackets, while DIYers avoid premium markup. The space-saving stacking feature adds value for multi-unit installations that would otherwise require separate wall space.
Strengths and Weaknesses: Strengths include universal fit across major brands, impressive weight capacity, weather-resistant powder coating, and space-saving stackable design. The included hardware kit is genuinely comprehensive. Weaknesses involve potential over-engineering for smaller 5,000 BTU units, and installation may require two people due to the bracket’s size. The instructions could be more detailed for novice installers unfamiliar with mini-split mounting.
Bottom Line: The APAB-3160 is an excellent choice for anyone seeking a robust, versatile mini-split mounting solution. Its universal design and stacking capability make it particularly valuable for multi-unit installations or professional contractors who need reliable, adaptable equipment.
7. 24 Inch Stacking Kit Replaces SK-DH Laundry Stack Bracket for Sam-sung 24 in. Wide Front Load Washers and Dryers, Set of 1

Overview: This 24-inch stacking kit serves as a direct replacement for Samsung’s SK-DH bracket, enabling vertical installation of 24-inch wide front-loading washers and dryers. Constructed from galvanized iron, it provides a rust-resistant foundation for creating space-saving laundry configurations in compact homes, apartments, or closets where floor space is at a premium.
What Makes It Stand Out: The kit’s precise compatibility with Samsung’s 24-inch models ensures a secure fit without modification. Galvanized iron construction offers superior corrosion resistance compared to standard painted steel, extending service life in humid laundry environments. The straightforward design focuses on essential functionality without unnecessary complexity, making it accessible for DIY installation while maintaining structural integrity.
Value for Money: Priced at just $15.99, this represents significant savings over OEM Samsung parts while delivering comparable performance. For budget-conscious consumers needing to reclaim floor space, it’s an accessible solution that doesn’t compromise safety. The included left and right brackets with all necessary hardware eliminate hidden costs. Given that OEM stacking kits often exceed $50, this alternative provides remarkable cost efficiency for Samsung appliance owners.
Strengths and Weaknesses: Strengths include excellent price point, authentic fit for Samsung 24-inch appliances, rust-resistant materials, and complete hardware inclusion. The simple installation process is beginner-friendly with basic tools. Weaknesses are limited compatibility (Samsung 24-inch only), basic aesthetic design, and lack of premium features like vibration dampening. Some users may find the metal gauge lighter than OEM specifications, though adequate for standard residential use.
Bottom Line: For Samsung 24-inch washer/dryer owners seeking an affordable stacking solution, this kit delivers essential functionality at a fraction of OEM cost. It’s a practical, no-frills choice that prioritizes value and compatibility over premium features.
8. [Patented] GFA28KITN Stacking Kit for GE 28"W Washer Dryer Stack Bracket Kit - Compatible with GE 28 inch Width Front Load Washers and Dryers Laundry Stacking Kit
![[Patented] GFA28KITN Stacking Kit for GE 28"W Washer Dryer Stack Bracket Kit - Compatible with GE 28 inch Width Front Load Washers and Dryers Laundry Stacking Kit](https://m.media-amazon.com/images/I/412vMKg+ufL._SL160_.jpg)
Overview: The patented GFA28KITN stacking kit is engineered specifically for GE 28-inch width front-load washers and dryers, providing a secure vertical configuration. This premium kit includes professional-grade components and thoughtful accessories like work gloves and a gradienter, targeting users who want a comprehensive installation experience without multiple hardware store runs or compatibility concerns.
What Makes It Stand Out: Beyond basic brackets, this kit includes spacers made from durable PP material and carbon steel brackets with anti-rust paint exceeding OEM standards. The addition of a gradienter, reversible screwdriver, and work gloves demonstrates exceptional attention to user experience. The patented design ensures perfect fitment for GE models, eliminating compatibility guesswork that plagues universal kits.
Value for Money: At $49.90, this kit commands a premium price but justifies it through included tools and superior materials. When factoring in the cost of purchasing gloves, level, and screwdriver separately (easily $20+), the value proposition strengthens. The after-sale service promise adds peace of mind that budget alternatives lack, making it cost-effective for those prioritizing convenience and support over bare-bones pricing.
Strengths and Weaknesses: Strengths include premium materials, comprehensive tool inclusion, exact GE fitment, and strong customer support with satisfaction guarantee. The gradienter ensures perfect leveling critical for washer performance. Weaknesses involve higher cost compared to basic kits, brand limitation to GE 28-inch models, and potential overkill for DIYers who already own basic tools. The patented status may limit third-party alternatives.
Bottom Line: This GE-specific stacking kit is worth the premium for its quality components, included installation tools, and dedicated support. It’s ideal for those wanting a professional-grade setup without sourcing accessories separately, though tool-equipped homeowners might find better value elsewhere.
9. 5 1/2" Slot - U-Channel Post Street Sign Bracket (Parallel), Bracket Options=Extruded Sign in 5.5 inch Slot

Overview: This specialized bracket mounts 6-inch tall street name signs parallel to U-channel posts via a 5.5-inch extruded slot. Designed for municipal maintenance departments and traffic sign contractors, it provides a standardized solution for overhead street identification signage on 2-pound U-channel posts commonly used in urban and residential areas where directional clarity is essential.
What Makes It Stand Out: The bracket’s singular focus on a specific municipal application ensures reliable performance where generic alternatives might fail. The parallel orientation maintains sign alignment with post direction, crucial for clear visibility at intersections. The 5.5-inch extruded slot accommodates standard sign profiles without modification, reducing installation time for road crews working on traffic control projects.
Value for Money: At $28.33, this bracket offers fair value for professional-grade municipal hardware. While seemingly expensive for a simple bracket, DOT-compliant components command premium pricing due to durability requirements and standardized specifications. Bulk purchasing for city-wide installations would improve cost-effectiveness. For one-off repairs, it’s a necessary expense to maintain code compliance and public safety standards.
Strengths and Weaknesses: Strengths include purpose-built design for specific application, standard compliance, durable construction for decades of outdoor service, and straightforward installation that minimizes road crew exposure time. It solves a very specific problem reliably. Weaknesses are extremely limited application scope, lack of material specification details in the listing, and no included hardware. It’s not adaptable to other sign types, post sizes, or mounting orientations.
Bottom Line: This bracket serves its niche perfectly—municipal sign maintenance. For city crews or contractors handling U-channel post installations, it’s a reliable, code-appropriate choice. Homeowners or general users should look elsewhere, as this specialized tool offers no versatility beyond its intended purpose.
10. Heavy Duty Outdoor Bracket, Air Conditioner Support , AC Bracket for Mointing Mini Split , Units, Two- Way Mounting Support(7000-24000 BTU up to 260 lb)

Overview: This heavy-duty outdoor bracket provides robust support for mini-split air conditioners from 7,000 to 24,000 BTU, though its features suggest compatibility up to 36,000 BTU and 500 pounds. The ribbed steel plate design with two-way mounting options offers flexibility for various wall types and unit configurations while elevating equipment above ground hazards like flooding, dirt, and snow accumulation.
What Makes It Stand Out: The two-way mounting design adapts to different installation scenarios and wall materials, while the ribbed steel construction provides exceptional strength without excessive weight. The powder coating ensures weather resistance, and included rubber vibration pads address noise concerns—a common complaint with wall-mounted condensers that can disturb occupants if not properly isolated.
Value for Money: At $26.99, this bracket significantly undercuts competitors while offering superior weight capacity. The 500-pound rating (despite title stating 260 pounds) provides ample safety margin for most residential units. For HVAC professionals, its versatility across multiple BTU ranges reduces inventory needs. DIYers get commercial-grade support at consumer pricing, making it one of the best price-to-performance ratios in the category.
Strengths and Weaknesses: Strengths include heavy-duty construction, two-way mounting flexibility, excellent weather protection, vibration dampening pads, and outstanding price-to-performance ratio. Weaknesses involve confusing BTU capacity information (title says 24K, features say 36K), potentially requiring professional installation for heavy units, and honest admission that vibration cannot be completely eliminated—manage expectations accordingly.
Bottom Line: This bracket is an exceptional value for anyone installing mini-split systems. Its heavy-duty rating and thoughtful features like vibration pads make it suitable for both professional contractors and capable DIYers seeking reliable, long-term support without premium pricing.
Understanding Stacked Units and Why Proper Mounting Matters
Stacked configurations place significant stress on both appliances and your home’s structure. Unlike side-by-side installations where each unit sits independently on the floor, stacked setups create a top-heavy center of gravity that amplifies every spin cycle’s forces. The upper appliance essentially becomes a dynamic load, shifting and vibrating while the lower unit bears the brunt of the weight.
This mechanical relationship means your mounting system must do three things simultaneously: secure the units together rigidly enough to prevent separation, absorb and dissipate vibration to protect internal components, and distribute weight safely to the floor or wall structure. Compromise any one of these functions and you’ll face premature appliance failure, structural damage to your home, or safety risks to your family. In 2026, building codes in many jurisdictions have begun specifically addressing stacked appliance installations, making proper hardware selection not just wise but legally required for rental properties and new construction.
Key Types of Installation Brackets for Stacked Configurations
Universal vs. Manufacturer-Specific Brackets
The fundamental fork in the road begins with this decision. Manufacturer-specific brackets are engineered for exact model dimensions, bolt patterns, and weight distributions. They typically feature pre-drilled holes that align perfectly with your appliances’ mounting points and often include specialized connectors that integrate with the units’ internal frames. While these offer plug-and-play simplicity, they lock you into a single brand ecosystem and may become obsolete if the manufacturer redesigns their lineup.
Universal bracket systems have evolved dramatically, with 2026 models offering unprecedented adjustability through sliding channels, modular extension arms, and adaptable connection plates. These systems provide flexibility if you upgrade appliances or move to a new home with different models. However, this versatility demands more careful installation and precise measurement. The trade-off lies between guaranteed compatibility and long-term adaptability—neither approach is inherently superior, but your choice should align with your ownership timeline and likelihood of future appliance changes.
Fixed vs. Adjustable Bracket Systems
Fixed brackets create a permanent, immovable bond between your appliances. Once installed, the units become essentially one monolithic piece. This rigidity excels at preventing any shift or sway, particularly crucial for front-loading washers with high-speed spin cycles. The downside? You’ll need complete disassembly to service either unit, and any slight floor settling or wall movement can transfer stress directly to the appliances’ frames.
Adjustable systems incorporate sliding mechanisms, pivot points, or telescoping components that allow for minor repositioning without full disassembly. Modern adjustable brackets feature locking cams that secure after fine-tuning, combining flexibility with stability. These systems prove invaluable in older homes where floors aren’t perfectly level or in rental properties where you might need to remove appliances without leaving permanent modifications. The latest 2026 designs even include micro-adjustment dials that let you level the upper unit independently of the lower one—a game-changer for maintaining proper door alignment and drainage.
Wall-Mount vs. Floor-Supported Solutions
Wall-mount brackets anchor the upper appliance directly to structural studs, effectively hanging the weight from the wall rather than stacking it on the lower unit. This approach completely eliminates weight transfer between appliances, extending their lifespan and reducing vibration transmission. However, wall-mounting demands solid wood or metal studs—drywall alone won’t suffice—and requires precise locating of structural members. In concrete or block construction, specialized masonry anchors become necessary.
Floor-supported systems use the lower appliance as the foundation, with brackets primarily preventing tipping and lateral movement. These are far more common and easier to install, but they require the floor itself to be structurally sound. Upper-floor laundry installations in older homes may need floor reinforcement before attempting a floor-supported stack. Hybrid solutions now exist that use both floor support and wall anchoring, providing redundancy that building inspectors increasingly favor for multi-family dwellings.
Critical Hardware Components Beyond the Brackets
Anchors, Bolts, and Fasteners
The brackets are only as strong as their connection points. Lag bolts into studs remain the gold standard for wall mounting, but 2026 hardware kits increasingly include structural screws with specialized thread designs that grip wood fibers more effectively than traditional lags. For concrete or brick installations, sleeve anchors outperform wedge anchors in dynamic load applications because they distribute stress along a longer length of the anchor body.
The fasteners securing brackets to appliances deserve equal scrutiny. These should always be machine screws with lock washers or nylon-insert lock nuts—not sheet metal screws that can strip under vibration. Some premium hardware kits now include torque-specified fasteners with pre-applied thread locker, ensuring you achieve exactly the clamping force recommended by engineers. Never reuse old fasteners, as the threads may be compromised and the metal could be fatigued from years of vibration cycling.
Vibration Dampening Accessories
Vibration isolation pads have evolved from simple rubber squares to engineered polymer compounds with specific durometer ratings matched to appliance weight ranges. These pads don’t just reduce noise—they decouple the appliances from the floor, preventing harmonic resonance that can amplify shaking. Look for pads with built-in leveling capabilities and non-slip surfaces that maintain grip even on polished floors.
Advanced systems now incorporate spring-loaded dampeners or pneumatic isolation mounts between the brackets and appliances. These actively absorb vibration energy rather than just insulating against it. For second-floor installations, these dampeners can reduce transmitted vibration by up to 80%, preventing the rhythmic thumping that plagues poorly mounted stacks. The 2026 trend favors adjustable dampening, allowing you to tune the system to your specific appliances’ spin speeds and load characteristics.
Safety Straps and Anti-Tip Mechanisms
Building codes in many areas now require redundant safety measures beyond primary brackets. Anti-tip straps anchor the upper appliance to the wall with a separate, independent connection designed to catch the unit if primary brackets fail. These should be rated for at least twice the appliance’s weight and installed at a 45-degree angle to provide both vertical and horizontal restraint.
Earthquake-prone regions demand even more robust solutions, including flexible steel cables that allow slight movement without releasing and automatic gas shutoff valves that trigger if the unit shifts. Even in stable areas, these secondary safety systems provide cheap insurance against the unexpected—whether that’s a child climbing the units or a severe weather event.
Material Science: What Your Brackets Should Be Made Of
Steel remains the dominant material, but not all steel is created equal. Cold-rolled steel offers superior strength and dimensional consistency compared to hot-rolled, making it preferable for precision mounting hardware. The thickness—measured in gauge—is critical; brackets for full-size washers should never be thinner than 11-gauge (approximately 1/8 inch) steel. Thinner metal will flex under load, creating fatigue cracks over time.
Powder coating has largely replaced paint as the protective finish of choice. Quality powder coats provide a uniform thickness that won’t interfere with bolt holes while offering excellent corrosion resistance. For humid environments or coastal installations, look for brackets with a zinc phosphate pretreatment beneath the powder coat—this dual-layer protection prevents rust even if the outer layer gets scratched during installation.
Stainless steel brackets command a premium but justify their cost in specific scenarios. Type 304 stainless handles most residential applications, but Type 316 becomes necessary within 50 miles of saltwater coastlines. The yield strength of stainless is actually lower than carbon steel, so manufacturers must use thicker stock to achieve equivalent load ratings—don’t assume stainless means stronger; it means more corrosion-resistant.
Weight Capacity and Load Ratings: The Non-Negotiable Metrics
Every bracket system carries two critical ratings: static load capacity and dynamic load capacity. Static capacity tells you the maximum weight the brackets can support when the appliances are idle. Dynamic capacity—always the lower number—indicates what the system can handle during operation, accounting for vibration, torque from the motor, and the shifting weight of wet laundry.
A common mistake involves adding the two appliances’ weights together and comparing that to the static rating. You should actually compare the total weight to the dynamic rating, then add a 25% safety margin. For example, if your washer and dryer combine for 400 pounds, you need brackets rated for at least 500 pounds dynamic capacity. The extra margin accounts for the fact that load isn’t perfectly distributed and that vibration creates momentary force spikes far exceeding the static weight.
Pay attention to whether ratings are given per bracket or per system. Some manufacturers list impressive numbers that apply only when using four brackets, but many installations use just two. Always calculate based on your specific configuration, and when in doubt, over-specify. The cost difference between adequate and overbuilt hardware is minimal compared to the cost of replacing a crushed dryer or repairing water damage.
Installation Surface Assessment: What You’re Drilling Into
Your wall’s structure dictates your entire mounting strategy. Wood studs spaced 16 inches on center provide the most straightforward installation, but you must verify stud location with a quality stud finder and confirm the stud’s full width. Modern construction sometimes uses metal studs, which require self-tapping structural screws and provide less holding power than wood—wall-mounting on metal studs often necessitates backing plates that spread the load across multiple studs.
Concrete block or poured concrete walls demand hammer-drilling and specialized anchors. The critical factor here is embedment depth: anchors should penetrate at least 2.5 inches into solid concrete, with the hole depth exceeding the anchor length by at least half an inch to allow for debris clearance. Never mount into mortar joints; the holding power is unpredictable and deteriorates over time.
Drywall-only installations are never acceptable for stacked units, despite what some “heavy-duty” drywall anchors claim. If you can’t locate studs, you must open the wall and install plywood backing between studs, secured with construction adhesive and screws every 6 inches. This backing should be at least 3/4-inch thick and extend vertically at least 24 inches beyond the bracket mounting area to distribute shear forces.
Adjustability Features: Future-Proofing Your Setup
The best 2026 bracket systems incorporate multiple adjustment dimensions. Horizontal slots allow you to fine-tune side-to-side positioning to achieve perfect alignment of doors and control panels. Vertical adjustment ranges of at least 2 inches accommodate different appliance heights and allow for leveling on uneven floors.
Look for brackets with built-in leveling indicators—small bubble levels integrated into the bracket body that eliminate guesswork during installation. Some premium systems feature post-installation adjustment points accessible even after both appliances are in place, letting you correct slight settling without disassembling the entire stack.
Modular bracket designs that accept add-on accessories represent another forward-thinking feature. These systems allow you to attach slide-out shelves, hanging rods, or storage baskets to the same brackets holding your appliances, maximizing utility in tight spaces. If you’re planning a laundry room renovation, consider brackets with integrated cable management channels to route power cords and dryer vents cleanly behind the units.
Safety Standards and Certifications to Demand in 2026
Reputable mounting hardware should carry UL (Underwriters Laboratories) listing specifically for “Appliance Mounting Systems” or “Vibration-Resistant Hardware.” This certification ensures the product has undergone cyclic loading tests that simulate years of operation. Generic UL listings for “steel brackets” don’t guarantee suitability for dynamic appliance loads.
The ANSI/BHMA A156.18 standard, while traditionally for architectural hardware, is increasingly applied to appliance mounting systems. It specifies testing protocols for load-bearing hardware under repeated stress cycles. Ask manufacturers for compliance documentation—legitimate companies provide test reports showing exactly how their hardware performed under controlled conditions.
For seismic zones, look for ICC-ES (International Code Council Evaluation Service) reports that verify compliance with ASCE 7 seismic design requirements. These reports detail how the hardware performs under simulated earthquake conditions, including aftershock sequences. Even if you don’t live in an earthquake-prone area, hardware meeting these standards offers superior resilience against any unexpected lateral forces.
Essential Tools for Proper Installation
Beyond the standard drill and level, specialized tools separate professional-grade installations from problematic DIY attempts. A torque wrench is non-negotiable—over-tightening fasteners can strip threads or crack brackets, while under-tightening invites loosening under vibration. Use the manufacturer’s specified torque values, typically ranging from 12 to 25 foot-pounds for appliance mounting hardware.
A stud finder with deep-scanning capability and metal detection prevents costly mistakes when locating structural members. For concrete installations, a rotary hammer drill with SDS-plus bits drills cleaner, more accurate holes than a standard hammer drill. The difference in anchor performance between a perfectly round hole and a slightly oval one is substantial.
A laser level that projects both horizontal and vertical lines simultaneously ensures your brackets align perfectly in both planes. Even a slight twist in the bracket plane can bind the appliances together unevenly, transferring stress to door seals and internal components. Finally, invest in a good deburring tool to clean drill holes—metal shavings left in holes can work their way into moving parts or prevent anchors from seating properly.
Common Installation Pitfalls and How to Avoid Them
The number one mistake is inadequate structural assessment. Homeowners often assume their walls are standard wood studs, only to discover unusual spacing, engineered lumber, or unexpected plumbing and electrical runs after drilling begins. Always cut a small inspection hole first to confirm stud location and composition if you have any doubts about your wall’s construction.
Another frequent error involves mixing hardware types. Using the brackets from one manufacturer with fasteners from another voids warranties and creates unpredictable performance. Hardware kits are engineered as systems; the brackets, bolts, and anchors are designed to work together with specific clamping forces and load distributions. Substituting a “similar” bolt from the hardware store introduces a weak link.
Failing to account for floor slope is equally problematic. Even a 1-degree slope across a 30-inch depth creates a 1/2-inch height difference that can prevent brackets from aligning properly. Always level the lower appliance first, then install brackets, then level the upper unit relative to the brackets—not the floor. Many failed installations result from trying to force alignment by over-tightening fasteners, which bends brackets and creates stress concentrations.
Maintenance and Inspection Protocols
Mounting hardware is not install-and-forget. Schedule quarterly inspections during the first year after installation, checking for loose fasteners, cracked brackets, or any separation between appliances. After the first year, semi-annual inspections suffice unless you notice unusual vibration or noise.
Use a paint marker to make alignment witness marks on all bolt heads and bracket joints. During inspections, any movement becomes immediately visible when the marks no longer line up. This simple trick catches problems before they become dangerous. Pay special attention to the lower bracket connections, as they bear constant load and are most susceptible to fatigue.
Vibration isolation pads compress over time, losing effectiveness. Plan to replace them every 3-5 years, or sooner if you notice increased noise transmission. When inspecting, look for cracking, permanent deformation, or loss of elasticity. Quality pads should spring back immediately when you press them; if they hold an indentation, they’ve lost their dampening properties.
Cost vs. Value: Making Smart Investment Decisions
Budget bracket kits start around $30, while premium systems can exceed $200. The price difference reflects material thickness, finish quality, included accessories, and engineering testing. For a $2,000 appliance pair, spending 5-10% of their cost on mounting hardware represents cheap insurance. The cheapest acceptable hardware for a standard residential installation typically runs $50-75; anything less likely cuts corners on material gauge or finish quality.
Consider total cost of ownership. A $150 bracket kit that includes integrated vibration dampening, anti-tip straps, and a 10-year warranty costs less over time than a $40 kit that needs replacement pads every two years and lacks safety redundancy. Factor in potential damage costs: a falling dryer can destroy flooring, walls, and itself, while a leaking washer can cause five-figure water damage.
Installation costs present another variable. Professional installation typically adds $150-300 but includes liability insurance and warranty protection. If you’re comfortable with structural work, DIY saves money but risks improper installation. A middle ground involves hiring a professional for the initial structural assessment and bracket installation, then handling appliance connection yourself.
Warranty Coverage and Manufacturer Support
Read warranty terms carefully. Most appliance manufacturers require use of their proprietary mounting hardware to maintain warranty coverage on stacked configurations. Using universal brackets may void warranties on both units if they can trace a failure to mounting-related stress. Some manufacturers have relaxed these restrictions for 2026 models, explicitly approving specific third-party brackets—check your owner’s manual’s fine print.
Hardware warranties themselves vary widely. Basic kits might offer 1-year limited coverage, while premium systems provide lifetime guarantees against manufacturing defects. The crucial distinction is whether the warranty covers consequential damage. If a bracket fails and destroys your appliances, will the hardware manufacturer pay for replacements? Quality companies carry product liability insurance and explicitly cover consequential damage in their warranty terms.
Support quality matters as much as warranty length. Can you reach technical support by phone to discuss your specific installation scenario? Do they provide detailed installation videos and engineering drawings? Companies that invest in customer support typically engineer better products, understanding that proper installation is as important as hardware quality.
2026 Trends: Smart Mounting Solutions
The integration of IoT technology into mounting hardware represents the most significant 2026 advancement. Smart brackets incorporate accelerometers that monitor vibration patterns and send alerts to your phone if they detect abnormal movement. Some systems can even differentiate between normal operation and impending failure signatures, giving you advance warning before a catastrophic separation occurs.
Self-leveling brackets with motorized adjustment are emerging in high-end systems. These use small electric actuators to maintain perfect level despite floor settling or appliance load shifts, adjusting automatically within a 1-inch range. While currently premium features, expect these to become standard in mid-range hardware within the next product cycle.
Sustainability has entered the hardware conversation. Manufacturers now offer brackets made from recycled steel with carbon-neutral production processes, and some provide take-back programs for old hardware. Eco-conscious consumers can find hardware certified by the Cradle to Cradle Products Innovation Institute, ensuring brackets are designed for disassembly and material recovery at end-of-life.
Professional Installation vs. DIY: Making the Right Choice
Assess your skill level honestly. Installing stacked unit brackets requires competence in structural assessment, precise measurement, and proper fastening techniques. If you’ve never located studs accurately or drilled into masonry, this isn’t the project to learn on. The consequences of failure—thousands in appliance damage, water leaks, or injury—far exceed the cost of professional installation.
Professional installers bring specialized tools and experience that ensure correct installation in less time. They can identify structural issues like undersized studs or plumbing interference before they become problems, and their work typically includes a warranty on the installation itself. Many also carry insurance that protects you if their installation causes damage.
DIY installation makes sense if you have solid handyman skills, own the necessary tools, and enjoy the satisfaction of self-reliance. The key is thorough preparation: read all instructions twice, watch manufacturer installation videos, and don’t rush. Allocate a full day for the project, and have a helper available for lifting the upper unit. Never attempt to lift a dryer onto a washer alone—the balance and weight distribution make single-person installation dangerous.
Frequently Asked Questions
What’s the most critical factor when choosing brackets for a stacked washer and dryer?
Dynamic load rating is paramount. Always select brackets rated for at least 25% more than your combined appliance weight, and ensure that rating accounts for operational vibration forces, not just static weight.
Can I reuse brackets when I replace my appliances?
Only if the new appliances have identical mounting points and weight distribution. Even within the same brand, model changes can alter bolt patterns and center of gravity. Universal brackets offer more reuse potential, but always verify compatibility before reinstallation.
How do I know if my wall can support a wall-mounted dryer?
You need solid wood or metal studs at 16-inch centers (or less) that are at least 2×4 dimensional lumber. Use a stud finder to confirm stud location, then drill a small pilot hole to verify solid wood. If you encounter metal studs or uncertain construction, consult a structural engineer.
Are anti-vibration pads really necessary?
Absolutely. They do more than reduce noise—they prevent vibration from transferring between appliances and into your home’s structure, which significantly extends the lifespan of both your appliances and the mounting hardware itself.
What’s the difference between manufacturer brackets and universal ones?
Manufacturer brackets guarantee perfect fit and typically maintain appliance warranties but lock you into that brand. Universal brackets offer flexibility for future changes but require more careful installation and may void warranties if not explicitly approved by the appliance maker.
How often should I inspect my mounting hardware?
Inspect quarterly for the first year, then semi-annually thereafter. Look for loose bolts, cracked brackets, compressed vibration pads, and any separation between appliances. Mark bolt positions with paint to easily spot movement.
Can I install stacked units on a second floor?
Yes, but floor reinforcement may be necessary. Have a contractor verify that floor joists can handle the concentrated load (typically 600+ pounds including water and laundry). Consider wall-mounting the upper unit to eliminate weight transfer through the floor.
What tools are absolutely essential for installation?
Beyond basic hand tools, you need a torque wrench, quality stud finder, laser level, and for concrete walls, a rotary hammer drill. These tools ensure proper fastening force, accurate structural location, and precise alignment.
Do building codes regulate stacked appliance installations?
Increasingly, yes. Many jurisdictions now require anti-tip devices for stacked units, and some specify minimum bracket strength ratings. Check your local building department’s requirements before purchasing hardware.
Is professional installation worth the cost?
For most homeowners, yes. The $150-300 cost is minor compared to the $2,000+ value of your appliances and the potential for water damage or injury from a failed installation. Professionals also provide liability coverage and installation warranties that DIY work cannot match.