When your washing machine enters its powerful spin cycle, it transforms from a gentle cleaning appliance into a high-speed centrifuge capable of generating forces exceeding 400 Gs. That energy keeps your clothes fresh but poses real risks if the lid opens unexpectedly. The humble lid switch—an often-overlooked component no larger than a matchbox—serves as the silent guardian that prevents disaster. Understanding these critical safety devices isn’t just about avoiding a broken machine; it’s about protecting your family from flying debris, water damage, and serious injury.
Today’s washer lid switches have evolved far beyond simple mechanical triggers. Modern designs incorporate magnetic sensors, microprocessors, and redundant safety circuits that work together to ensure your spin cycle stays safely contained. Whether you’re troubleshooting a washer that won’t start or proactively upgrading an aging component, knowing what separates a reliable lid switch from a dangerous cheap imitation can save you hundreds in repairs and countless headaches. This comprehensive guide walks you through everything that matters when evaluating these essential safety devices.
Top 10 Washer Lid Switches for Spin Cycles
Detailed Product Reviews
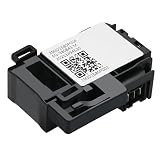
1. Washer Lid Switch for Kenmore 70 series, 80 Series and 90 Series Washers.

Overview: The Washer Lid Switch for Kenmore 70, 80, and 90 Series offers a targeted solution for owners of these specific washer models. This three-wire lead switch serves as a critical safety component that communicates lid closure to the machine’s control system. Designed to address four common failure symptoms—including failure to drain, start, spin, or agitate—this replacement part provides a straightforward fix for what might otherwise require expensive service calls or complete appliance replacement.
What Makes It Stand Out: This switch distinguishes itself through its precise fitment for Kenmore’s most popular washer series from the past few decades. The manufacturer has conducted thorough testing to ensure reliable performance despite being a non-OEM component. The three-wire configuration matches original specifications exactly, ensuring seamless integration without wiring modifications. Its ability to resolve multiple failure symptoms simultaneously makes it a versatile diagnostic tool for homeowners troubleshooting their appliances.
Value for Money: At $12.99, this switch represents exceptional value, costing 70-80% less than genuine OEM parts while meeting the same quality standards. Considering that a service technician visit typically costs $75-150 just for diagnosis, this part pays for itself immediately. The durable construction ensures longevity comparable to original components, making it a financially sound investment for extending your washer’s lifespan by years.
Strengths and Weaknesses: Strengths: Precise fit for Kenmore series; multi-symptom fix; manufacturer-tested durability; significant cost savings over OEM; straightforward installation for DIYers.
Weaknesses: Limited to specific Kenmore series; non-OEM status may concern some buyers; installation requires basic technical comfort; no mention of warranty or return policy.
Bottom Line: For Kenmore 70, 80, or 90 series owners experiencing lid switch failures, this component delivers OEM-comparable performance at a fraction of the cost. While the non-original status might give pause, the manufacturer’s testing and quality materials justify the investment. DIY-savvy homeowners will find this an economical and reliable solution that restores full washer functionality without professional help.
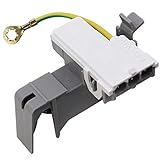
2. HPUY WH01X27954 Washer Lid Lock Switch Compatible for GE Washer Lid Lock Switch and Hotpoint Replace 290D1580P004 290D1580P002 WH01X24114 WH01X26114
Overview: The HPUY WH01X27954 Washer Lid Lock Switch provides a comprehensive compatibility solution for GE and Hotpoint top-load washer owners. This versatile component replaces multiple part numbers across numerous models, serving as a universal solution for lid lock failures. Designed to restore critical safety functions, this switch prevents washer operation when the lid is open while enabling normal cycles when properly engaged. Its broad model support makes it a go-to option for many GE appliance owners.
What Makes It Stand Out: The switch’s most impressive feature is its extensive compatibility list covering dozens of modern GE and Hotpoint models, including popular series like GTW460ASJ and GTW335ASN. Unlike generic replacements, HPUY provides explicit model verification guidance, reducing purchase uncertainty. The durable construction ensures reliable locking mechanism performance, while the design accommodates easy installation with just a screwdriver and needle-nose pliers, making professional assistance unnecessary for most users.
Value for Money: Priced at $11.97, this switch offers tremendous value by consolidating multiple OEM part numbers into one affordable solution. OEM GE lid locks often exceed $40, making this a 70% cost reduction. The time savings are equally significant—avoiding a service appointment saves hundreds of dollars. For DIY enthusiasts, the combination of detailed compatibility information and straightforward installation maximizes both financial and practical value.
Strengths and Weaknesses: Strengths: Broad GE/Hotpoint compatibility; consolidates multiple part numbers; easy DIY installation; durable materials; explicit model list provided; excellent cost savings.
Weaknesses: Requires careful model verification before purchase; Hotpoint compatibility may be more limited than GE; no warranty details mentioned; installation still requires some technical skill.
Bottom Line: GE and Hotpoint owners should strongly consider this HPUY switch as their first option for lid lock replacements. The extensive compatibility list and clear part number cross-referencing eliminate guesswork, while the sub-$12 price point makes it a low-risk, high-reward repair. Verify your model number first, then enjoy professional-grade results without the service call expense.
3. 3949247 Washer Lid Switch by Seentech, Fit for Whirlpool & Kenmore Washing Machines - Replaces Part Number: 3949247VP,3949247V, AP5983746, 3949237, 3949239, PS11722098, PS350434

Overview: Seentech’s 3949247 Washer Lid Switch delivers a precision-engineered solution for Whirlpool and Kenmore washing machine owners facing lid switch failures. This component addresses the root cause of multiple operational issues, from drainage problems to spin cycle failures. With compatibility spanning numerous model numbers across four major brands, it serves as a versatile replacement option. The switch’s design focuses on restoring essential safety interlock functions that prevent operation with an open lid.
What Makes It Stand Out: The product excels through its exhaustive model compatibility list, covering hundreds of specific Whirlpool, Kenmore, Roper, and Estate washers. Seentech provides explicit installation instructions requiring common tools and 20-45 minutes of time, empowering even novice DIYers. The 30-day return window demonstrates manufacturer confidence and reduces purchase risk. This switch specifically targets the door switch as a common failure point for multiple symptoms, simplifying diagnostics for homeowners.
Value for Money: At $9.27, this is among the most affordable quality lid switches available, representing up to 75% savings versus OEM parts. The combination of low price, comprehensive compatibility, and clear installation guidance creates exceptional value. The 30-day return policy adds financial protection, while the potential to avoid $100+ service calls makes this a financially prudent choice for budget-conscious consumers seeking reliable appliance repairs.
Strengths and Weaknesses: Strengths: Extensive brand/model compatibility; lowest price point; clear installation instructions; 30-day return policy; addresses multiple failure symptoms; includes detailed model list.
Weaknesses: Installation time may be longer than advertised for some users; limited to specific washer architectures; non-OEM construction quality varies; customer service responsiveness unknown.
Bottom Line: For Whirlpool and Kenmore owners seeking maximum affordability without sacrificing functionality, Seentech’s 3949247 switch is an outstanding choice. The sub-$10 price and generous return policy minimize risk, while the broad compatibility maximizes applicability. Invest 30-45 minutes of DIY effort and save substantially over professional repairs or OEM parts.
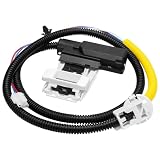
4. 8318084 WP8318084 Washer Lid Switch Top Load Washer Lid Switch Assembly Compatible with Whirlpool, Kenmore, Roper, KitchenAid Washer

Overview: The 8318084 WP8318084 Washer Lid Switch Assembly provides a robust safety solution for a wide array of top-load washers across multiple major brands. This component serves as a critical interlock device that halts operation when the lid is opened, protecting users from hazardous moving parts. Compatible with Whirlpool, Kenmore, Maytag, Estate, Roper, KitchenAid, and Inglis models, it offers near-universal application for many popular washer families. The assembly includes all necessary components for complete replacement.
What Makes It Stand Out: This switch’s primary advantage is its exceptional brand compatibility, covering seven major appliance manufacturers with one part number. The manufacturer emphasizes safety features, highlighting how the switch prevents accidents by stopping cycles when lids open. The high-quality material construction ensures durability under frequent use, while the comprehensive cross-reference list (WP8318084, AP6012742, etc.) simplifies part number matching. After-sales guarantee support provides additional purchase confidence.
Value for Money: At $8.99, this switch delivers remarkable value across multiple brand ecosystems. OEM parts for premium brands like Maytag or KitchenAid can exceed $50, making this an 80%+ cost saving. The universal compatibility means repair shops and multi-brand households can stock one part for various applications, increasing efficiency. While basic repair knowledge is required, the investment in learning pays dividends across future appliance maintenance.
Strengths and Weaknesses: Strengths: Unmatched brand compatibility; lowest price for multi-brand support; safety-focused design; comprehensive part number cross-reference; after-sales guarantee; durable construction.
Weaknesses: Requires basic repair knowledge; installation complexity varies by model; no specific warranty period stated; grounding wire instructions may be unclear for novices.
Bottom Line: This 8318084 switch assembly is the ideal choice for households with multiple washer brands or DIYers seeking maximum compatibility flexibility. At under $9, it delivers OEM-comparable safety functions across seven major manufacturers. While installation requires some technical skill, the extraordinary cost savings and broad applicability make it an essential addition to any home repair toolkit.
5. 8318084 AP3180933 PS886960 Washer Door Lid Switch Kit Replacement Fits Whirlpool Roper Estate
Overview: The 8318084 AP3180933 PS886960 Washer Door Lid Switch Kit offers a comprehensive replacement solution for Whirlpool, Kenmore, Maytag, and Roper washers. This kit includes the essential green grounding wire often omitted in inferior replacements, ensuring proper electrical safety and compliance. Designed to resolve four common failure modes—failure to start, agitate, advance timer, or spin—this switch restores full operational capability. The manufacturer emphasizes direct OEM replacement quality while maintaining affordability.
What Makes It Stand Out: This kit distinguishes itself by explicitly including the green grounding wire, a critical safety component frequently missing in budget alternatives. The manufacturer claims quality exceeding OEM requirements while maintaining a sub-$11 price point. The extensive model fitment list covers popular series like 11016102500 and 1CWTW5200VQ0, providing specific validation for purchasers. The “snap into place” installation description suggests tool-free mounting in some applications, potentially simplifying replacement.
Value for Money: At $10.98, this switch kit provides exceptional value by combining premium materials, complete assembly components, and claimed OEM-exceeding quality. The inclusion of the grounding wire eliminates separate purchases or safety compromises. With OEM parts costing $35-60, this offers 65-80% savings. The money-back guarantee and warranty coverage further enhance value by eliminating financial risk, making it as secure as buying original parts at a fraction of the cost.
Strengths and Weaknesses: Strengths: Includes grounding wire; claims OEM+ quality; money-back guarantee; extensive model compatibility; addresses multiple symptoms; cost-effective; clear part number cross-referencing.
Weaknesses: Slightly higher price than generic alternatives; installation ease varies by model; warranty details unspecified; “snap fit” may not apply to all washers.
Bottom Line: This 8318084 switch kit is the premium choice among aftermarket options, justifying its slightly higher price through included safety components and quality assurances. The grounding wire inclusion alone makes it superior to many competitors. For safety-conscious DIYers with compatible Whirlpool-family washers, this kit delivers peace of mind, OEM-comparable performance, and substantial savings backed by a satisfaction guarantee.
6. Seentech 3949238 Washer Door Lid Switch - Exact fit for Whirlpool & Kenmore Washers - Replaces for: WP3949238, WP3949238VP, AP6008880, PS11742021, AP3100001, PS350431
Overview: The Seentech 3949238 offers a budget-friendly solution for Whirlpool and Kenmore washer owners experiencing lid switch failures. This assembly replaces numerous OEM part numbers and addresses common problems like failure to start, drain, spin, or advance cycles. The flat three-pin plug design matches original specifications for seamless integration.
What Makes It Stand Out: This part stands out with its exceptional cross-reference compatibility, covering over a dozen OEM numbers including WP3949238 and AP6008880. The manufacturer emphasizes its DIY-friendly nature, requiring only basic tools and 20-45 minutes of installation time. It directly addresses multiple failure symptoms with one component, eliminating diagnostic guesswork.
Value for Money: At $8.99, this switch costs 70-80% less than OEM alternatives while claiming to meet the same manufacturing standards. For the price of a single service call diagnostic fee, you get a complete replacement part that could restore your washer for years. The durability claim and manufacturer testing add confidence to this economical choice.
Strengths and Weaknesses: Pros: Extremely affordable; broad OEM replacement coverage; straightforward installation with common tools; manufacturer-tested durability; solves multiple washer issues. Cons: 20-45 minute installation may challenge novice DIYers; limited to Whirlpool/Kenmore brands; no explicit warranty mentioned; requires careful model verification.
Bottom Line: The Seentech 3949238 is an outstanding value for confident DIYers with compatible Whirlpool or Kenmore washers. While the installation requires some mechanical aptitude, the cost savings and comprehensive symptom resolution make it a smart first attempt before calling for professional service.
7. 3949247 Washer Lid Switch Replacement part for Whirlpool & Kenmore Washer - Replaces 3949237, 3949239, 3949240, 3949247V

Overview: This 3949247 lid switch replacement serves as a universal solution across multiple washer brands including Whirlpool, KitchenAid, Kenmore, Roper, Inglis, Estate, and Crosley. Designed to replicate the original lever-activated mechanism, it ensures your washer recognizes when the lid is closed before starting cycles.
What Makes It Stand Out: The cross-brand compatibility is this part’s primary advantage, covering seven major appliance brands with one part number. Its simple mechanical design requires no special tools or advanced skills, making it accessible to virtually any homeowner. The explicit safety reminder about disconnecting power demonstrates thoughtful customer support.
Value for Money: Priced at $8.99, it matches the most affordable options while offering broader brand compatibility than many competitors. This versatility means you’re less likely to order the wrong part, saving time and return shipping costs. The premium materials promise longevity that justifies the minimal investment.
Strengths and Weaknesses: Pros: Impressive brand compatibility; simple installation; safety-conscious instructions; premium material construction; competitive pricing. Cons: Lacks a stated warranty; fewer model-specific details than some alternatives; lever mechanism may wear faster than magnetic switches on newer models; no troubleshooting guide included.
Bottom Line: Ideal for households with older top-load washers across multiple brands, this 3949247 switch delivers exceptional versatility at a bargain price. Verify your model number carefully, but if compatible, it’s a low-risk repair that can restore functionality for under ten dollars.
8. W11307244 W10682535 Washer Lid Lock Switch for Amana Whirlpool Kenmore 110 200 500 Series Maytag Crosely Washer Machine Replace for W10838613 W10838613VP W11253733 PS12704713 AP6832601
Overview: This W11307244 lid lock assembly represents a premium upgrade for modern washer models from Amana, Whirlpool, Kenmore, Maytag, and Crosley. Unlike basic switches, this lock mechanism prevents lid opening during active cycles, addressing safety and operational issues across numerous 110, 200, and 500 series models.
What Makes It Stand Out: The standout feature is the comprehensive three-year warranty, rare in aftermarket parts. Extensive model compatibility lists for each brand eliminate guesswork. The part addresses seven distinct failure symptoms—from no-spin to unresponsive touchpads—making it a versatile diagnostic solution.
Value for Money: At $18.99, it costs twice budget alternatives but includes warranty protection and broader symptom resolution. For newer washers worth hundreds of dollars, this investment protects your appliance investment while avoiding $150+ service calls. The quality materials and strict testing justify the premium.
Strengths and Weaknesses: Pros: Industry-leading 3-year warranty; extensive model compatibility; solves multiple symptoms; high-quality materials; tested to strict standards. Cons: Higher price point; may be unnecessary for older washers; installation complexity varies by model; limited return window if misordered.
Bottom Line: This W11307244 lock is the smart choice for owners of compatible newer washers who value warranty protection. While pricier than basic switches, the three-year guarantee and comprehensive symptom coverage provide peace of mind that budget options cannot match. Perfect for diagnosing ambiguous washer problems.
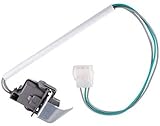
9. Washer Lid Switch Connector Wire Harness Fit for WP2172937, 2172937, AP6005924, 6005924, PS1173898

Overview: This connector wire harness addresses a specific failure point in washing machines: the melted or burnt lid switch connector. Designed for WP2172937 applications, it includes terminals, wire leads, and sealing connectors for complete harness replacement in agitator washers, combination units, and stacked systems.
What Makes It Stand Out: The product’s honesty about the root cause—lid switch failure melting connectors—sets it apart. It provides a complete kit with terminals and sealing connectors, ensuring a professional repair. The explicit warning that you must replace both switch and connector prevents repeat failures.
Value for Money: At $10.59, it’s fairly priced for a specialized component, but represents only half the repair solution. Value emerges when you realize a melted connector can make the new switch unusable. Buying this with a new switch still costs under $20, far less than a professional harness replacement.
Strengths and Weaknesses: Pros: Addresses often-overlooked connector failure; complete installation kit; quality materials resist heat; precise OEM fitment; prevents recurring issues. Cons: NOT a lid switch—must purchase separately; confusing for DIYers who don’t understand electrical connectors; requires wire splicing skills; limited brand compatibility information.
Bottom Line: Purchase this harness ONLY if you’ve confirmed your connector is melted or damaged. It’s an essential companion to a new lid switch, not a standalone fix. For those comfortable with basic wiring, it ensures a complete, lasting repair. Novices should consider a full switch assembly with integrated connector instead.
10. W11414731 Washer Lid Lock Switch Assembly Replacement for Whirlpool Maytag Crosley WTW5010LW1 WTW5057LW0 CAW45125LW1, Fix No Drain/Spin, Replaces W11513248 AP7002928 PS16543458 DTL60003 by YINZHIGUO

Overview: The W11414731 lid lock assembly targets newer Whirlpool, Maytag, and Crosley washers with 3-wire Molex plug systems. This replacement directly addresses common failures in models like WTW5010LW1 and MVW5430MW0, where faulty locks prevent draining, spinning, or cycle completion.
What Makes It Stand Out: This assembly boasts the fastest installation time—just 10 minutes with a screwdriver—making it the most DIY-friendly option. It specifically targets newer models with Molex connectors, ensuring proper electrical connection. The clear safety instructions and wide compatibility list streamline the selection process.
Value for Money: At $29.10, it’s the most expensive option but targets a specific market: owners of newer washers where OEM parts cost $50-80. For a ten-minute repair that avoids a $200 service visit, the value is clear. The quality construction promises durability matching original equipment.
Strengths and Weaknesses: Pros: Lightning-fast 10-minute installation; precise fit for newer models; high-quality construction; comprehensive safety guidance; genuine replacement quality. Cons: Highest price in category; limited to specific newer models; may not fit older washers; premium cost without warranty mention.
Bottom Line: This is the premium choice for owners of compatible newer washers who want OEM-quality results. If your model matches, the ten-minute installation and quality construction justify the higher price. For older machines or budget-conscious buyers, less expensive alternatives suffice. Verify your model number before purchasing.
Understanding Washer Lid Switches: Your First Line of Defense
The Critical Role of Lid Switches in Modern Laundry Safety
A washer lid switch acts as the primary interlock mechanism that prevents the machine from entering high-speed operations when the lid is open. This isn’t merely a convenience feature—federal safety regulations mandate these devices on all residential washing machines manufactured after 1995. The switch creates an electrical circuit that signals the control board when the lid is securely closed, enabling the spin cycle to engage. When functioning correctly, it stops the washer immediately if the lid opens even a fraction of an inch.
The physics behind spin cycle dangers is sobering. A typical load can weigh 15-20 pounds when wet, and at 1,200 RPM, that mass becomes a projectile hazard. Modern switches must detect lid position within milliseconds while withstanding years of vibration, moisture, and temperature fluctuations. They achieve this through precision-engineered contact points and robust housing materials that resist degradation from detergent residue and humidity.
How Lid Switches Prevent Spin Cycle Catastrophes
The mechanism works through a simple but elegant principle: interruption of power to the motor control circuit. When you close the lid, a plunger or magnet aligns with the switch body, completing a low-voltage signal path. The control board receives this “all clear” signal and allows the drive motor to ramp up to spin speed. Open the lid, and a spring-loaded contact instantly breaks this circuit, triggering an immediate motor shutdown.
Advanced models incorporate time-delay relays that prevent the motor from restarting for 5-10 seconds after the lid closes. This prevents rapid cycling that could damage the motor and gives the drum time to coast down safely. Some premium designs even include secondary verification sensors that double-check lid position, creating a fail-safe redundancy that single-switch systems can’t match.
Key Safety Mechanisms Built Into Quality Lid Switches
Magnetic vs Mechanical: Two Approaches to Safety
Mechanical lid switches use physical contact between a plunger and electrical contacts. These time-tested designs offer proven reliability and cost-effectiveness. The best mechanical switches feature gold-plated contacts that resist corrosion and maintain conductivity even in humid environments. Look for models with at least 100,000-cycle ratings, which translates to roughly 10 years of average household use.
Magnetic reed switches represent the newer generation, using a magnet embedded in the lid and a sealed sensor in the frame. These have no moving parts to wear out and excel in wet environments since the sensor can be completely encapsulated. However, they require precise alignment—sometimes within 2-3 millimeters—to function reliably. High-quality magnetic switches include compensation circuits that adjust for minor misalignment over time.
Emergency Stop Features That Save Lives
Premium lid switches integrate emergency stop functionality that triggers if the switch itself fails. This “fail-safe” design defaults to an open circuit position, meaning a broken switch prevents the washer from operating rather than allowing it to run unsafely. Some advanced models include thermal fuses that blow if internal temperatures exceed safe limits, protecting against electrical fires caused by arcing contacts.
The most sophisticated switches incorporate microprocessor-based diagnostics that can detect intermittent failures before they become complete breakdowns. These smart switches communicate with the main control board, logging error codes that technicians can read during service calls. This predictive capability transforms a simple safety device into a proactive maintenance tool.
Decoding Compatibility: Finding the Right Switch for Your Machine
OEM vs Universal Parts: Making the Smart Choice
Original Equipment Manufacturer (OEM) switches guarantee exact fit and electrical compatibility but often cost 40-60% more than aftermarket alternatives. The premium buys you confidence in connector types, mounting hole alignment, and wire gauge specifications. For washers still under warranty, OEM parts are non-negotiable—using universal replacements can void coverage instantly.
Universal switches offer flexibility for older or discontinued models. The best universal kits include multiple mounting brackets, adjustable actuators, and adapter harnesses. However, “universal” rarely means truly universal. Pay close attention to voltage ratings (most are 120V AC but some HE models use 24V DC), current capacity (typically 10-15 amps), and the number of contacts (single-pole single-throw vs double-pole double-throw configurations).
Model Numbers and Why They Matter
Your washer’s model number contains critical information beyond brand and capacity. The suffix often indicates manufacturing revisions that affect switch design. A Whirlpool WTW5000DW3 may use a completely different lid switch than a WTW5000DW4 due to control board updates. Always check the parts diagram for your specific revision number, usually found on a sticker inside the lid or behind the control panel.
Cross-reference any potential purchase against the manufacturer’s parts database. Most major brands maintain online portals where you can input your model number and receive the exact part number for your switch. This step eliminates guesswork and prevents the hassle of returns. For older machines, appliance parts retailers often have cross-reference tools that match obsolete part numbers to current replacements.
Essential Features to Evaluate Before Buying
Durability Ratings and Cycle Life Expectancy
A switch’s cycle rating directly predicts its lifespan. Residential-grade switches typically handle 50,000-100,000 cycles, while commercial units exceed 250,000. Calculate your household’s usage: a family of four averaging one load daily uses approximately 365 cycles per year. A 50,000-cycle switch would theoretically last 137 years, but real-world conditions—moisture, temperature swings, vibration—reduce actual lifespan to 5-7 years.
Examine the contact material specifications. Silver-nickel alloy contacts offer superior conductivity and arc resistance compared to plain copper. Gold flashing on contact points adds another layer of corrosion protection, crucial in laundry room environments where humidity often exceeds 70%. The housing material matters too: glass-filled nylon provides better dimensional stability than standard ABS plastic, preventing warping that causes misalignment.
Water Resistance and Moisture Protection
Look for switches with IP (Ingress Protection) ratings of at least IP54, which guarantees protection against water splashes from any direction. Premium models achieve IP67 ratings, offering temporary immersion protection. This matters because steam from hot water cycles condenses inside the machine, and leaky hoses can direct water onto the switch assembly.
Internal potting compounds—epoxy resins that encapsulate the contacts—prevent moisture intrusion at the most vulnerable points. Switches with silicone gaskets around the housing seams offer secondary protection. Avoid models with exposed screw terminals; opt instead for sealed quick-connect terminals that snap securely onto wiring harnesses.
Contact Material Quality and Corrosion Resistance
The microscopic contact surfaces inside the switch determine reliability. Every actuation creates a tiny electrical arc that slowly erodes the material. Quality switches use tungsten or silver-cadmium oxide contacts that resist this erosion, maintaining consistent electrical resistance throughout their lifespan. Cheap switches rely on brass contacts that develop oxide layers, increasing resistance until the switch fails intermittently.
Corrosion resistance extends beyond the contacts. Terminal pins should be tin-plated or stainless steel to prevent rust that increases electrical resistance. The best switches include dielectric grease pre-applied to terminals, creating a moisture barrier. If you’re inspecting an existing switch, green or white powdery deposits on terminals signal advanced corrosion requiring immediate replacement.
Installation Insights: What to Know Before You Start
DIY-Friendly Designs vs Professional-Grade Components
Some manufacturers design switches for tool-free replacement, featuring snap-in mounting tabs and color-coded connectors. These user-friendly designs reduce installation time to under 15 minutes. However, this convenience sometimes sacrifices durability—snap tabs can break if removed multiple times, and simplified connectors may not grip as securely as screw terminals.
Professional-grade switches often require minor modifications, like drilling mounting holes or splicing wires. While this demands more skill, the result is typically a more secure installation. Consider your comfort level with basic electrical work. If you can use a multimeter to verify voltage and continuity, you can handle most switch replacements. If terms like “continuity test” are unfamiliar, professional installation is worth the $75-150 service fee.
Tool Requirements and Skill Level Assessments
Most switch replacements need only a Phillips screwdriver and needle-nose pliers. However, accessing the switch can require removing the control panel or entire cabinet, which might need a putty knife to release clips and a socket set for machine screws. A multimeter becomes essential for verifying the new switch works before reassembly.
Skill assessment is crucial. The electrical portion is simple—typically two or three wires that connect one-to-one. The mechanical challenge lies in proper alignment. The actuator must depress the switch plunger fully when the lid closes, but not over-compress it. This requires careful adjustment of mounting position, sometimes using slotted holes or shims. Misalignment causes premature failure or intermittent operation that frustrates troubleshooting efforts.
Performance Metrics That Separate Good from Great
Response Time and Actuation Force
Top-tier switches respond within 5-10 milliseconds of lid closure, ensuring the control board receives instantaneous feedback. Slow-responding switches create delays that users perceive as machine malfunction. Actuation force—the pressure needed to activate the switch—should be light enough for easy lid closure (typically 50-100 grams) but firm enough to prevent vibration from triggering false activations.
Magnetic switches excel here, responding faster than mechanical plungers and requiring minimal force. However, they need consistent magnet strength. Over time, exposure to heat and moisture can weaken magnets, increasing the required closing force. Quality switches use neodymium magnets rated for 150°C continuous operation, ensuring stable performance for the component’s lifetime.
False Trigger Prevention Technology
Vibration during spin cycles can cause marginal switches to momentarily open, triggering emergency stops that abort the cycle. Premium designs incorporate hysteresis circuits that require a deliberate, sustained open signal before interrupting power. This prevents nuisance trips while maintaining safety.
Some advanced models use dual sensors that must both agree the lid is open before stopping the motor. This redundancy filters out vibration-induced false triggers. The control logic typically requires both sensors to show “open” for at least 100 milliseconds, effectively ignoring brief contact chatter while still responding to genuine lid openings within a safe timeframe.
The Hidden Costs of Choosing Wrong
Warranty Implications of Aftermarket Parts
Using non-OEM switches in a warrantied machine creates immediate financial risk. Manufacturers can deny coverage for any subsequent failure, arguing the aftermarket part caused or contributed to the issue. A $15 savings on a universal switch can void a $300 warranty. Document everything: keep receipts, take installation photos, and save the original part. Some manufacturers allow aftermarket parts if installed by certified technicians—check your warranty terms carefully.
Extended warranty companies are even stricter. Third-party warranty providers often require OEM parts with professional installation for any covered repair. A DIY switch replacement using a universal part can invalidate your entire extended warranty, not just coverage for that specific component. Read the fine print before making any repair decisions.
How a Cheap Switch Can Destroy Your Washer
A failing lid switch doesn’t just stop working—it often fails partially, creating resistance that generates heat. This heat transfers to the wiring harness, melting insulation and potentially reaching the control board. A $10 switch can cause $200 in wiring damage and $300+ in control board replacement. The thermal runaway scenario is rare but catastrophic when it occurs.
Intermittent failures are equally destructive. A switch that randomly opens during spin cycles forces the motor controller to apply emergency braking repeatedly. This stresses motor windings, drive belts, and suspension components, accelerating wear across multiple systems. What appears as a minor annoyance—cycles occasionally aborting—can shorten your washer’s lifespan by years.
Maintenance Strategies for Long-Term Reliability
Cleaning Protocols That Prevent Premature Failure
Quarterly cleaning extends switch life dramatically. Use compressed air to blow out lint and dust from the actuator mechanism. For mechanical switches, apply a single drop of electrical contact cleaner (not WD-40) to the plunger, then work it manually 10-15 times to distribute the lubricant. Avoid household cleaners—they leave residues that attract moisture.
Magnetic switches require different care. Clean the magnet surface with isopropyl alcohol to remove detergent buildup that weakens the magnetic field. Inspect the sensor housing for cracks that could allow moisture intrusion. A dab of silicone sealant on housing seams provides extra protection in high-humidity environments.
Inspection Schedules for Optimal Safety
Monthly visual inspections catch problems early. Check for physical damage to the switch housing, loose mounting screws, and frayed wires. Test operation manually: with the machine unplugged, press the switch and listen for a crisp click. A mushy or silent activation indicates internal wear.
Annual electrical testing with a multimeter provides definitive health assessment. Measure continuity across the switch terminals in both open and closed positions. Resistance should be near zero when closed and infinite when open. Readings above 1 ohm when closed signal contact degradation requiring replacement. This proactive approach costs nothing but prevents mid-cycle failures that leave you with a washer full of soggy clothes.
Troubleshooting Common Lid Switch Problems
Intermittent Failures and What They Signal
Intermittent operation—working sometimes but not others—almost always indicates contact corrosion or mechanical wear. Temperature changes cause microscopic expansion and contraction of metal parts, temporarily restoring or breaking connections. If your washer works fine in morning cycles but fails in evening loads, thermal effects are likely at play.
Test this theory by running cold water cycles versus hot water cycles. If failures increase with hot water, heat-induced expansion is exposing marginal contacts. This pattern confirms replacement is needed; cleaning provides only temporary relief. Log failure conditions—cycle type, load size, time of day—to identify patterns that point to specific failure modes.
When Your Washer Thinks the Lid Is Always Open
A washer that won’t start and displays a lid error code may have a stuck-open switch rather than a broken one. Corrosion can create a permanent open circuit, or the actuator may have broken, leaving the switch permanently depressed. First, verify the actuator alignment: close the lid slowly and watch whether it properly engages the switch plunger.
Use a multimeter to test switch continuity directly at the connector. If the switch shows open when the lid is closed, it’s failed. However, if the switch tests good, the problem lies in the wiring harness or control board. Trace wires for damage, especially where they flex near the hinge. A broken wire in the harness mimics a bad switch, leading to unnecessary part replacement.
Environmental and Usage Factors That Impact Longevity
Humidity, Temperature, and Laundry Room Conditions
Laundry rooms often maintain 60-80% humidity, accelerating corrosion in poorly sealed switches. If your room lacks ventilation, consider upgrading to a switch with a higher IP rating. Install a small dehumidifier to keep relative humidity below 50%—this single change can double component lifespan.
Temperature extremes also stress switches. Garages or unheated basements expose components to freezing conditions that make plastic brittle and contacts contract. Choose switches rated for -20°C to 85°C operation if your laundry area experiences temperature swings. Avoid mounting switches near dryer vents where heat cycles cause rapid expansion and contraction.
High-Frequency Use vs Occasional Operation
Households running 10+ loads weekly need commercial-grade switches rated for 250,000+ cycles. The cost premium of 30-50% pays for itself in avoided replacements. Conversely, vacation homes with minimal use face different risks: corrosion from disuse rather than wear from overuse. For occasional-use machines, prioritize corrosion resistance over cycle ratings. Apply dielectric grease to terminals annually, and operate the switch manually every few months to prevent contacts from seizing.
Technological Advancements in Lid Switch Design
Smart Switches and IoT Integration
Next-generation washers feature lid switches that communicate digitally with the main control board, sending not just open/closed status but also diagnostic data. These smart switches monitor their own health, reporting contact resistance and cycle counts to predict failure before it occurs. Some integrate with home automation systems, sending smartphone alerts if the lid opens mid-cycle.
While currently limited to high-end models, this technology is trickling down to replacement parts. Aftermarket smart switches can retrofit older machines, adding diagnostic capabilities via Bluetooth connectivity. These upgrades cost 3-4 times standard switches but provide peace of mind through real-time monitoring and predictive maintenance alerts.
Fail-Safe Redundancies in Modern Systems
The latest safety standards require dual-channel redundancy in premium washers. Two independent switches must both signal “closed” before the spin cycle engages. If one switch fails, the machine either refuses to spin or limits speed to a safe 200 RPM, preventing hazards while still allowing water extraction. This redundancy mirrors aerospace safety systems and represents the gold standard in consumer appliance safety.
Some designs incorporate mechanical interlocks that physically block the drum from spinning unless the lid is locked. These combination electro-mechanical systems provide backup safety even if the electrical switch fails completely. While more complex and expensive, they eliminate the single-point-of-failure risk inherent in simpler designs.
Red Flags: Warning Signs Your Lid Switch Needs Replacement
Audible Clicks, Buzzes, and Silence
A healthy mechanical switch produces a crisp, quiet click when activated. Loud clicking, buzzing, or humming indicates arcing contacts struggling to maintain connection. Silence when manually pressing the switch points to complete internal failure. These auditory cues provide early warning, often weeks before total failure.
Listen during the spin cycle. Any buzzing from the switch area signals dangerous arcing that generates heat and risks fire. Unplug the machine immediately and replace the switch. Don’t wait for complete failure—electrical arcing degrades surrounding components, turning a $20 part into a $200 repair.
Visual Damage Indicators
Cracked housing, melted plastic, or discolored terminals are obvious replacement triggers. Less obvious but equally serious: a loose mounting that allows the switch to wobble. This movement causes the actuator to strike off-center, rapidly wearing the plunger and creating intermittent contacts. Tighten mounting screws annually; if they won’t tighten due to stripped holes, replace the entire switch assembly.
Corrosion appears as green or white powder on terminals, or a dull gray film on contact points. This deterioration increases electrical resistance, generating heat and voltage drops that confuse the control board. Once corrosion is visible externally, internal damage is already advanced. Clean terminals provide only temporary relief—replacement is the only reliable solution.
Professional vs DIY Replacement: Making the Right Call
When to Save Money and When to Call an Expert
DIY replacement makes sense when the switch is easily accessible, typically mounted on the lid frame with a simple wiring harness. If you can see the switch by removing a few screws, you can likely handle the job. Watch online videos for your specific model—if the process looks straightforward and doesn’t require removing the cabinet, DIY is safe and economical.
Call a professional when access requires tipping the machine on its back or removing the entire outer cabinet. These procedures risk damaging hoses, straining electrical connections, and creating safety hazards. The $100-150 service fee is cheap insurance against a $500 mistake. Additionally, if your diagnosis is uncertain, a technician’s expertise prevents replacing the wrong part.
Safety Risks of Improper Installation
Incorrect wiring is the primary danger. Reversing wires on a simple switch might seem harmless but can send voltage to the wrong control board circuit, frying sensitive electronics. More critically, bypassing the switch entirely—some DIYers do this temporarily—creates an immediate safety hazard and potential liability. If someone is injured, your homeowner’s insurance may deny claims due to unauthorized modifications.
Mechanical installation errors cause subtle but serious risks. A switch mounted too high might not activate, leaving the washer inoperable. Mounted too low, it can be over-compressed, causing premature failure and potentially jamming the lid closed. Either scenario can damage the lid, hinges, or switch housing. Always verify actuator alignment with the lid closed and measure plunger depression to match manufacturer specifications.
Warranty and Support Considerations
What to Look for in Manufacturer Guarantees
Quality switches come with 1-3 year warranties covering manufacturing defects. Read the fine print: does the warranty require professional installation? Does it cover consequential damage if the switch fails and destroys the control board? The best warranties offer 90-day money-back guarantees plus extended coverage for parts, demonstrating manufacturer confidence.
OEM parts typically include warranty terms that match the original machine warranty, providing seamless coverage. Aftermarket parts vary widely—some offer comparable terms, others provide only 30 days. Factor this into the total cost of ownership. A $30 switch with a 2-year warranty often provides better value than a $15 switch with 90 days of coverage, especially for heavily used machines.
Customer Support Quality as a Value Indicator
Before purchasing, test the manufacturer’s support. Call their tech line with a compatibility question and note response time and knowledge level. Companies that invest in knowledgeable support staff typically produce higher-quality components. Check online forums for warranty claim experiences—do they honor claims without hassle, or require you to jump through hoops?
Reputable suppliers provide detailed installation videos, wiring diagrams, and troubleshooting guides. This support infrastructure indicates they stand behind their products. Avoid sellers who can’t provide basic technical specifications like voltage ratings or cycle life. The inability to answer simple questions suggests they’re merely reselling cheap imports without quality control.
Frequently Asked Questions
How do I know if my washer lid switch is bad or if it’s another problem?
Test the switch with a multimeter set to continuity mode. With the washer unplugged, disconnect the switch and check for continuity when the plunger is depressed. No continuity means the switch is bad. If it tests good, check the wiring harness for breaks, especially where it flexes near the hinge. Also inspect the actuator that presses the switch—if it’s broken or misaligned, it won’t activate the switch even when the lid closes.
Can I temporarily bypass my lid switch to finish a load of laundry?
Never bypass a lid switch. This creates an immediate safety hazard and may violate local housing codes. The spin cycle generates enough force to cause serious injury if the lid opens unexpectedly. Additionally, bypassing can damage your washer’s control board and will void any warranty. If you need laundry done urgently, use a laundromat until you can replace the switch properly.
What’s the difference between a lid switch and a lid lock?
A lid switch simply detects whether the lid is open or closed. A lid lock physically secures the lid and includes a switch component. Modern HE washers often use lid locks that engage after the cycle starts, preventing opening during operation. Locks are more complex and expensive but provide superior safety. When replacing, you must match the original type—swapping a switch for a lock or vice versa will cause error codes.
How long should a quality washer lid switch last?
In typical residential use (5-7 loads weekly), a quality switch should last 7-10 years. Commercial-grade switches can exceed 15 years. However, high humidity, temperature extremes, or frequent overloading can reduce lifespan to 3-5 years. Signs of premature aging include intermittent operation, audible buzzing, or visible corrosion. Annual testing helps identify degradation before complete failure.
Are magnetic lid switches better than mechanical ones?
Each has advantages. Magnetic switches have no moving parts, making them more durable in theory and completely sealed against moisture. They respond faster and require less closing force. However, they need precise alignment and can be affected by nearby metal objects or strong external magnetic fields. Mechanical switches are more forgiving of alignment issues and easier to test with basic tools. For most users, a quality mechanical switch offers the best balance of reliability and simplicity.
Why does my new lid switch work intermittently after installation?
Intermittent operation after replacement usually indicates alignment issues. The actuator may not be fully depressing the plunger, or it might be over-compressing it. Check that mounting screws are tight and the switch doesn’t wobble. Verify the actuator hasn’t cracked or worn down. Also inspect wire connections—loose terminals cause voltage drops that mimic switch failures. Finally, ensure you purchased the correct switch type; using a normally-open switch in a normally-closed circuit creates erratic behavior.
Can I use a switch with a higher voltage rating than my washer requires?
Yes, using a switch rated for higher voltage is safe and often beneficial. A 250V-rated switch in a 120V washer will have more robust contact separation and better arc suppression. However, never use a switch with a lower voltage rating than specified—this creates fire and shock hazards. The current rating (amperage) must also meet or exceed the original specification, typically 10-15 amps for residential washers.
How do I prevent my new lid switch from failing prematurely?
Reduce humidity in your laundry room with ventilation or a dehumidifier. Avoid slamming the lid, which stresses the switch mechanism. Clean the actuator and switch area quarterly with compressed air. Don’t overload the washer—unbalanced loads create excessive vibration that damages switches. For mechanical switches, a single drop of electrical contact cleaner annually prevents corrosion. Keep the lid closed when not in use to minimize dust accumulation.
What tools do I need to replace a washer lid switch?
Most replacements require only a Phillips screwdriver and needle-nose pliers. A putty knife helps release cabinet clips if you need deeper access. A multimeter is essential for testing the old switch and verifying the new one works before reassembly. Some installations need a socket set for hex-head screws. Always have zip ties on hand to secure wiring neatly. A headlamp or flashlight improves visibility in tight spaces.
Is it worth upgrading to a smart lid switch with diagnostic features?
For tech-savvy homeowners or those with expensive washers, smart switches offer valuable predictive maintenance capabilities. They can alert you to degradation before failure and help technicians diagnose issues remotely. However, they cost 3-4 times more than standard switches and require compatible control boards. For basic top-load washers over five years old, the investment rarely pays off. Save the money for your next washer purchase, which will likely include these features standard.