You’ve finally installed those gorgeous luxury vinyl plank (LVP) floors throughout your home—sleek, waterproof, and worry-free. But now you’re staring at your new washer and dryer set, and a sinking realization hits: how do you safely install these 300-pound vibrating beasts on a floating floor system designed to expand and contract? You’re not alone. This conundrum has become one of the most overlooked challenges in modern home design, with homeowners discovering too late that improper installation can lead to cracked planks, voided warranties, and costly repairs.
The intersection of heavy, dynamic appliances and delicate floating floors demands a strategic approach that goes far beyond simple rubber pads. This comprehensive guide dives deep into the engineering principles, hardware solutions, and installation methodologies that protect both your investment in premium flooring and the appliances that sit atop it. We’ll explore everything from load distribution physics to moisture management, equipping you with the knowledge to make informed decisions that preserve your home’s functionality and beauty for years to come.
Top 10 Installation Hardware for Stackables on Vinyl Plank Floors
Detailed Product Reviews
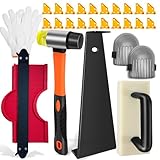
1. REXBETI Laminate Wood Flooring Installation Kit, LVP Installation Kit, Vinyl Flooring Tools - Tapping Block with Handle, Pull Bar, Double-Faced Mallet and Spacers

Overview:
The REXBETI Laminate Wood Flooring Installation Kit delivers a complete solution for DIY flooring projects. This five-piece set includes a double-faced mallet, pull bar, innovative tapping block with handle, and 40 plastic spacers—everything needed for professional-looking results. The kit targets homeowners installing laminate, LVP, or vinyl planks without investing in contractor-grade tools.
What Makes It Stand Out:
The tapping block’s integrated handle distinguishes this kit from basic alternatives, allowing direct striking without a mallet while protecting your hands. The 40 spacers with non-slip slots provide comprehensive coverage for medium-sized rooms. Precise specifications matter: the cast iron mallet with 90±5 HAS hardness offers controlled strikes, while the 3mm thick A3 steel pull bar includes protective pads to prevent surface damage.
Value for Money:
At $19.99, this kit undercuts professional tool sets by 60% while including more spacers than most competitors. The component quality exceeds dollar-store alternatives, particularly the chrome-plated mallet and reinforced tapping block design. For one-time installations, it eliminates rental costs that typically run $15-25 daily.
Strengths and Weaknesses:
Strengths include the ergonomic handle design, generous spacer count, and clear product specifications. The mallet’s compact 10.3-inch length suits tight spaces. Weaknesses involve the pull bar’s moderate 3mm thickness, which may flex under extreme pressure, and plastic spacers that lack the stability of premium wedge designs. The tapping block’s polypropylene material, while functional, isn’t as durable as nylon alternatives.
Bottom Line:
This kit excels for homeowners tackling single-room installations. The handle-equipped tapping block and ample spacers streamline the process, while the price point makes professional results accessible. Consider upgrading individual components only for whole-house projects or commercial use.
2. NAACOO Tapping Block for Vinyl Plank Flooring, 3 Edges - Meet Different Floor Thickness. Double Sided with Notches - Use for Tongue&Groove or Click-Lock Floor, Universal Laminate/Vinyl Flooring Tools.

Overview:
The NAACOO Tapping Block addresses a specific challenge: installing multiple flooring types with varying thicknesses using one tool. This single-piece solution works with tongue-and-groove or click-lock systems across vinyl, laminate, and hardwood floors. Its universal design eliminates the need for multiple specialized blocks, making it ideal for contractors or homeowners working with mixed flooring materials.
What Makes It Stand Out:
Three distinct edges accommodate floor thicknesses from 3.5mm to 12mm—a range covering most residential products. The clever 1.5mm inclined edge hooks planks to prevent shifting during installation, solving a common frustration. At 9-1/4 inches long and made from durable PP material, it prevents damage to delicate tongue-and-groove profiles while remaining lightweight for extended use.
Value for Money:
At $6.99, this block costs less than a fast-food meal but saves hours of frustration. Purchasing three separate blocks for different thicknesses would exceed $20, making this a 65% savings. For DIYers installing leftover flooring from different batches or contractors handling varied jobsites, the ROI is immediate.
Strengths and Weaknesses:
Strengths include unmatched versatility, the anti-slip inclined edge design, and compact portability. The PP construction protects flooring while being strong enough for professional use. Weaknesses: it’s a single tool without the driving force of a mallet kit—you’ll need to supply your own striking tool and spacers. The lightweight design may require more strikes than heavier blocks for stubborn planks.
Bottom Line:
This tapping block belongs in every flooring installer’s toolbox. Its universal compatibility and innovative edge design make it indispensable for mixed-material projects. While not a complete kit, it’s the smartest single-tool investment for flooring work.
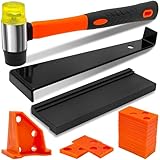
3. Laminate & Vinyl Flooring Installation Kit, Heavy Tapping Block, Pull Bar, Spacers, Contour Gauge, Rubber Mallet (7 in 1 Flooring Tools
Overview:
This Laminate & Vinyl Flooring Installation Kit positions itself as a comprehensive seven-in-one solution for flooring projects. The set includes a heavy tapping block, pull bar, spacers, 10-inch contour gauge, and rubber mallet—covering both basic installation and complex fitting challenges. It targets DIYers wanting professional results without piecing together individual tools.
What Makes It Stand Out:
The inclusion of a contour gauge elevates this beyond standard kits, allowing users to transfer irregular wall profiles for precise cuts around corners and pipes. The “heavy-duty” designation suggests professional-grade construction, while the versatile mallet provides controlled force across different flooring materials. This combination addresses both plank installation and custom fitting in one purchase.
Value for Money:
At $26.99, the kit offers solid value considering a contour gauge alone costs $10-15. The five core tools would typically run $40+ when purchased separately, representing roughly 30% savings. For homeowners tackling whole-house installations with complex architectural features, the bundled convenience justifies the price premium over basic kits.
Strengths and Weaknesses:
Strengths include the versatile tool selection, contour gauge bonus, and cohesive kit packaging. The heavy-duty claim implies durability for multiple projects. Weaknesses stem from vague material specifications—unlike competitors, it doesn’t detail steel grades or mallet composition. The generic descriptions raise questions about whether “heavy-duty” matches professional standards or is merely marketing language.
Bottom Line:
This kit suits DIYers facing complex installations with irregular walls or obstacles. The contour gauge adds genuine value, but material transparency issues suggest it’s best for occasional use rather than professional applications. Verify your flooring thickness compatibility before purchasing.
4. Laminate Flooring Tools, NAACOO LVP Installation Kit, Professional Vinyl Flooring Tools - Tapping Block with Handle, 10” Contour Gauge, Pull Bar, 2 in 1 Spacers, Double-Faced Mallet.

Overview:
The NAACOO LVP Installation Kit targets serious DIYers and professionals with premium materials and thoughtful engineering. This five-piece set includes a nylon tapping block with handle, 10-inch contour gauge with lock, upgraded pull bar, dual-size spacers, and a double-faced mallet. Every component reflects professional-grade specifications rarely seen in kits under $30.
What Makes It Stand Out:
The nylon tapping block outperforms standard polypropylene with superior durability and impact resistance. The quenched 45# steel pull bar exceeds typical A3 steel strength, while the 2-in-1 spacers offer both 1/4-inch and 1/2-inch gaps—critical for different flooring requirements. The contour gauge features a locking mechanism to maintain shapes during transfer, and the mallet’s forged head eliminates separation issues common in budget hammers.
Value for Money:
At $27.99, this kit costs only $1 more than the generic seven-piece set but delivers significantly better materials. Professional-grade nylon blocks alone cost $15-20, and quenched steel pull bars retail for $12-18. You’re essentially getting premium components at budget-kit pricing, with a 40-50% savings versus buying tools separately.
Strengths and Weaknesses:
Strengths include professional material specifications (nylon, 45# steel), the innovative locking contour gauge, and stable triangle spacers. The forged mallet design ensures longevity. Weaknesses: the tapping block is slightly smaller than some competitors (7 inches vs. 9+ inches), which may require more positioning adjustments. The premium materials add minimal weight, potentially reducing strike force efficiency.
Bottom Line:
This is the best value for quality-conscious installers. The professional-grade materials and intelligent design features justify every penny. For whole-house installations or frequent use, this kit outperforms all budget alternatives while matching contractor-grade durability.
5. Upgraded Flooring Spacers Kit with 1/4” & 1/3” Gap - Wood Floor Install Tool for Laminate, Vinyl Plank Flooring Installation(20, Blue, 1/3-1/4)

Overview:
The Upgraded Flooring Spacers Kit solves a specific but critical installation problem: maintaining stable, consistent expansion gaps. This 20-piece set provides dual-gap options (1/4-inch and 1/3-inch) in a triangular design that stays upright without taping. Available in three colors, it focuses exclusively on spacing challenges that plague DIY flooring projects.
What Makes It Stand Out:
The triangular architecture eliminates the tipping, slipping, and falling issues common with flat spacers. Unlike traditional designs that require constant adjustment or wall taping, these spacers stand independently, freeing both hands for plank placement. The dual-gap sizing accommodates different flooring manufacturers’ requirements, while the impact-resistant plastic ensures reusability across multiple projects.
Value for Money:
At $11.99 for 20 spacers, the per-unit cost is higher than basic flat spacers, but the stability and reusability deliver better long-term value. Standard spacer kits include 30-40 pieces but often need replacement after one use due to cracking or deformation. These durable triangles survive multiple installations, effectively costing $2-3 per project over their lifetime—cheaper than disposable alternatives.
Strengths and Weaknesses:
Strengths include exceptional stability, dual-gap versatility, and durable construction. The color options help organize different gap sizes visually. Weaknesses: the set includes only spacers—no tapping block, pull bar, or mallet. The triangular shape may not fit flush against some baseboard profiles, requiring occasional trimming. At 20 pieces, larger rooms may need two sets.
Bottom Line:
These spacers are a must-have supplement to any flooring toolkit. Their stability alone justifies the cost by reducing installation time and frustration. While not a standalone solution, they outperform every bundled spacer included in multi-tool kits. Buy these plus a quality tapping block for the best budget combination.
6. Upgraded 40 Pack Flooring Spacers Laminate Flooring Installation Kit with 1/4” & 1/2” Gap, Wood Floor Install Tool for Laminate, Vinyl Plank, Hardwood, LVT, Bamboo and Floating Floor Installation
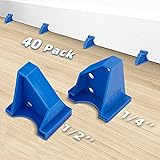
Overview: The Tanzfrosch Upgraded 40 Pack Flooring Spacers delivers a specialized solution for professional and DIY flooring installations. This kit provides forty durable spacers designed to maintain proper expansion gaps between floating floors and walls, accommodating both 1/4-inch and 1/2-inch spacing requirements in a single set.
What Makes It Stand Out: The dual-gap design distinguishes this kit from standard single-size spacers. The innovative triangle configuration ensures stability without requiring tape or wall pressure, preventing the tipping and slipping common with traditional flat spacers. Made from impact and chemical-resistant plastic, these spacers withstand repeated use across multiple projects, from laminate and vinyl plank to hardwood and bamboo installations.
Value for Money: At $23.99 for 40 spacers ($0.60 per unit), this kit offers reasonable value for large-area projects. While pricier than basic wedge spacers, the dual-functionality eliminates purchasing separate 1/4-inch and 1/2-inch sets. For contractors or homeowners installing 500+ square feet, the time savings and reusability justify the investment compared to disposable alternatives.
Strengths and Weaknesses: Strengths include the versatile dual-gap design, stable triangle geometry that prevents floor damage, durable construction for repeated use, and sufficient quantity for substantial installations. The easy installation and removal process saves significant time. Weaknesses are the limited scope—spacers only, no tapping block or pull bar—and the relatively high per-unit cost for small, one-time projects. The 1/2-inch gap may be excessive for some vinyl plank applications.
Bottom Line: Ideal for serious DIYers and professionals tackling large floating floor installations. The durable, reusable design and dual-gap versatility make it worth the premium price if you need both spacing options, though casual users might prefer a more basic kit.
7. 49 Pack Laminate,Vinyl Flooring Installation Kit,Flooring Tools,Tapping Block for Vinyl Plank Flooring,Pull Bar,Floor Spacers, Rubber Mallet
Overview: This comprehensive 49-piece flooring installation kit provides everything needed for laminate and vinyl plank projects in one convenient package. Combining essential tools with two spacer types, it targets DIY homeowners seeking professional results without buying components separately.
What Makes It Stand Out: The kit’s completeness sets it apart—featuring a dual-head rubber mallet with rubber and plastic faces, six stable triangle spacers for 1/4-inch and 1/3-inch gaps, and forty wedge spacers with non-slip serrated edges. The enhanced heavy-duty pull bar undergoes quenching treatment for durability, while the tapping block offers three edge thicknesses (1.5mm, 2.5mm, 3.5mm) to accommodate various flooring profiles from 3.5mm to 12mm.
Value for Money: At $18.99 for 49 pieces ($0.39 per item), this kit delivers exceptional value. Purchasing tools individually would cost $40-60. The dual spacer systems provide flexibility, while the multi-thickness tapping block eliminates guesswork for different flooring types, making it economical for one-time installers.
Strengths and Weaknesses: Strengths include the all-in-one convenience, versatile tapping block for multiple floor thicknesses, stable triangle spacers that don’t require taping, and a robust pull bar with protective felt pads. The double-faced mallet prevents damage during installation. Weaknesses include potential quality compromises in the mallet’s long-term durability, wedge spacers that may be less user-friendly than additional triangles, and no storage case. The mixed spacer types could confuse novice installers.
Bottom Line: Perfect for DIY enthusiasts wanting a complete starter kit. The comprehensive tool selection and attractive price outweigh minor quality concerns, making it the best value for homeowners undertaking their first floating floor project.
8. LOZAGU 43-Piece Laminate Flooring Tools, LVP installation kit, Vinyl Flooring Tools, Tapping Block with Handle, Spacers, Double-Faced Mallet and Pull Bar (43-PIECE)

Overview: The LOZAGU 43-Piece Kit positions itself as an ergonomic upgrade to traditional flooring installation sets. Designed specifically for luxury vinyl plank and laminate installations, this kit emphasizes user comfort and tool specifications while maintaining comprehensive functionality for professional and DIY applications.
What Makes It Stand Out: The standout feature is the ergonomic tapping block with an integrated handle, eliminating hand-knock risks and enabling direct tapping without a mallet. The double-faced mallet boasts impressive specs: cast iron construction, 90±5 Shore A hardness rating, and vibration-absorbing grip. The pull bar features high-quality steel with matte coating, precise 10.5-inch length, and protective soft pads, demonstrating attention to engineering details often overlooked in budget kits.
Value for Money: Priced at $17.99 for 43 pieces, this kit offers strong mid-range value. While slightly more expensive than basic kits, the ergonomic improvements and specified tool ratings justify the cost for users prioritizing comfort and precision. The reusable components provide long-term value for multiple installations.
Strengths and Weaknesses: Strengths include the innovative handle-equipped tapping block, detailed product specifications, quality materials (cast iron mallet, steel pull bar), protective features (felt pads, soft grips), and ergonomic design reducing user fatigue. The kit balances sturdiness with manageable weight. Weaknesses are the unclear spacer details—quantity and type aren’t explicitly stated—and potential omissions like specialized edge thickness options. The compact tapping block may lack heft for stubborn planks.
Bottom Line: An excellent choice for installers valuing ergonomics and quality specifications. The handled tapping block alone justifies the modest price increase, though buyers should verify spacer details meet their project needs.
9. Upgraded Flooring Spacers Kit with 1/4” & 1/3” Gap - Wood Floor Install Tool for Laminate, Vinyl Plank Flooring Installation(20, red, 1/3-1/4)

Overview: This Upgraded Flooring Spacers Kit targets the common frustrations of DIY installers with a focused 20-pack solution. Designed specifically to address the instability issues of traditional spacers, it provides dual-gap functionality in a stable triangle format for laminate and vinyl plank installations requiring 1/4-inch or 1/3-inch expansion spacing.
What Makes It Stand Out: The kit directly confronts thin spacer failures—slipping, tipping, and requiring manual holding—through its stable triangle geometry that stands independently. Offering both 1/4-inch and 1/3-inch gaps in one set eliminates purchasing multiple spacer types. The availability in three colors (blue, red, yellow) and quantity options allows customization to project scale, while the impact-resistant plastic ensures durability across multiple installations.
Value for Money: At $11.96 for 20 spacers, this kit presents excellent budget value. The per-unit cost remains competitive with basic spacers while delivering superior stability. For projects under 400 square feet, 20 spacers suffice, making it more economical than larger 40-piece sets. The reusability factor enhances long-term value.
Strengths and Weaknesses: Strengths include the problem-solving triangle design, dual-gap versatility, color customization, durable chemical-resistant construction, and targeted solution to common installation headaches. The lightweight portability suits quick jobs. Weaknesses are the limited quantity for large rooms, absence of larger 1/2-inch gap option for specific flooring requirements, and lack of complementary tools like a pull bar. Some users may prefer more spacers for faster workflow.
Bottom Line: A smart, affordable upgrade for small to medium flooring projects. The stable design eliminates frustration worth far more than the price difference, making it ideal for DIYers tired of fighting with flimsy spacers.
10. NAACOO Flooring Spacers 20Pack, 1/4’’ Gap & 1/2’’ Gap, Laminate Wood Flooring Tools – Use for Vinyl Plank, Engineered Hardwood, Bamboo, LVT, Subfloor Panels.

Overview: NAACOO’s Flooring Spacers offer a specialized 20-pack solution emphasizing larger expansion gaps for comprehensive floating floor installations. This kit specifically targets installers needing both standard 1/4-inch and substantial 1/2-inch spacing, addressing a gap in the market where most competitors max out at 1/3-inch spacing.
What Makes It Stand Out: The dual-gap capability including a full 1/2-inch option distinguishes this kit, accommodating engineered hardwood, bamboo, and subfloor panels requiring generous expansion room. The stable triangle design directly critiques competitor weaknesses, ensuring the spacers won’t tilt, slip, or require manual holding during installation. The big triangle geometry maintains position independently, streamlining workflow and reducing installation errors.
Value for Money: At $11.99 for 20 spacers, this kit delivers strong value for projects requiring larger gaps. While per-unit cost matches budget options, the inclusion of 1/2-inch spacing eliminates purchasing a separate specialized set. For installations involving moisture-sensitive materials needing extra expansion room, this targeted functionality justifies the investment.
Strengths and Weaknesses: Strengths include the rare 1/2-inch gap option, stable triangle design preventing common spacer failures, sufficient quantity for modest rooms, and versatility across multiple flooring types including subfloor panels. The reusable plastic construction ensures durability. Weaknesses are the limited 20-piece count for expansive areas, lack of smaller 1/3-inch intermediate option, and absence of complementary installation tools. The brand recognition lags behind established competitors, though performance appears comparable.
Bottom Line: Perfect for installers working with materials requiring larger expansion gaps. The 1/2-inch capability makes it uniquely valuable for engineered hardwood and bamboo projects, though buyers should verify quantity meets their room size needs.
Understanding the Unique Challenge of Vinyl Plank Flooring
Vinyl plank flooring represents a revolutionary shift in residential design, but its very innovation creates specific vulnerabilities when supporting stackable appliances. Unlike traditional hardwood or tile that’s permanently affixed to the subfloor, LVP systems “float” above the surface, creating a dynamic relationship with everything placed upon them.
The Floating Floor Dilemma
The click-lock mechanism that makes LVP so DIY-friendly also makes it susceptible to vertical pressure points. Each plank connects through delicate tongue-and-groove edges that can compress, separate, or crack under concentrated loads. When your dryer spins at 1,200 RPM, it doesn’t just create downward force—it generates dynamic loads that shift across these connection points hundreds of times per load. This continuous micro-movement can gradually degrade the locking system, leading to gaps that compromise the floor’s water resistance and structural integrity.
Weight Concentration Points
Stackable washer-dryer units concentrate approximately 250-400 pounds onto four small feet, each creating pressure exceeding 60 pounds per square inch. This point-load configuration is kryptonite to floating floors, which are engineered for distributed residential loads of 40-50 pounds per square foot. Without proper intervention, this pressure differential will eventually cause permanent indentation, plank separation, or subfloor compression that no amount of spot-repair can fix.
Click-Lock System Vulnerabilities
The weakest points in any LVP installation aren’t the planks themselves but the connections between them. High-frequency vibrations from spin cycles act like microscopic jackhammers, gradually working the joints loose. Once separation begins, it creates a domino effect: one compromised seam transfers stress to adjacent planks, potentially ruining an entire floor section. Quality hardware solutions must address not just weight distribution but also vibration dampening at frequencies specific to residential appliances.
Essential Hardware Categories for Stackable Installations
Navigating the hardware landscape requires understanding three distinct solution categories, each addressing different aspects of the floor-appliance interaction. The most effective approach often combines elements from multiple categories rather than relying on a single magic bullet.
Anti-Vibration Pads vs. Full-Size Platforms
Anti-vibration pads offer targeted solutions for individual appliance feet, typically measuring 2-4 inches in diameter. These work by creating a buffer zone that absorbs high-frequency vibrations before they reach the floor. However, their small footprint maintains the problematic point-load configuration. Full-size platforms, conversely, span the entire appliance footprint—often 27" x 30" or larger—transforming four point loads into one distributed load. The trade-off involves height addition (platforms raise appliances 1-3 inches) versus installation simplicity (pads simply slip under existing feet).
Load Distribution Plates
These specialized plates, usually constructed from reinforced polymers or coated metals, serve as intermediaries that spread appliance weight across multiple planks. The most effective designs feature a slightly flexible composition that conforms to minor floor irregularities while maintaining structural rigidity. Look for plates with textured undersides that grip the floor without adhesive, preventing lateral movement during operation. The ideal plate thickness ranges from 1/4" to 1/2"—thick enough to distribute loads but thin enough to avoid creating a tripping hazard.
Moisture Barriers and Underlayment Solutions
While LVP itself is waterproof, the subfloor beneath it often isn’t. Moisture barriers address two scenarios: active leaks from appliances and condensation trapped between the appliance base and floor surface. Rigid moisture barriers with built-in drainage channels provide superior protection compared to simple sheet barriers. Some advanced systems incorporate a dimpled design that creates a 1/8" air gap, allowing moisture to evaporate while preventing it from reaching the subfloor.
Critical Features to Evaluate Before Purchasing
Hardware specifications can be overwhelming, but focusing on these key performance indicators separates effective solutions from marketing gimmicks. Each parameter directly impacts long-term floor protection and appliance stability.
Weight Capacity Ratings
Always select hardware rated for at least 150% of your appliance’s maximum operational weight. This safety margin accounts for dynamic loads during spin cycles, which can momentarily increase forces by 30-50%. Pay attention to whether ratings are listed as “static” or “dynamic” capacity—dynamic ratings reflect real-world conditions and should be your primary reference. For stackable units, consider the combined weight plus a full water load (washers can hold 15-20 gallons, adding 125+ pounds during operation).
Material Composition and Floor Compatibility
Not all rubber is created equal. Cheap, petroleum-based rubber pads can off-gas chemicals that react with LVP wear layers, causing discoloration or finish breakdown over time. Look for virgin polyurethane or EPDM rubber formulations specifically tested for vinyl compatibility. Metal components should feature powder-coated finishes rather than raw steel, which can rust and stain flooring if moisture penetrates. The durometer rating—measuring material hardness—should fall between 60-70 Shore A for optimal vibration absorption without excessive compression.
Height Adjustability and Leveling Mechanisms
Stackable units require precise leveling to prevent excessive vibration and ensure proper drainage. Hardware with integrated leveling feet or shimming capabilities saves separate adjustment steps. Some platforms feature independent corner adjustability, allowing you to fine-tune height across a 1" range without removing the appliance. This adjustability proves crucial when installing on floors that aren’t perfectly level—a common scenario in older homes where LVP has been installed over existing subfloor imperfections.
The Science of Vibration Isolation
Effective vibration control requires matching hardware properties to the specific frequency ranges your appliances generate. This technical matching determines whether your solution truly protects the floor or merely provides psychological comfort.
Frequency Ranges and Appliance Types
Front-load washers typically produce vibrations between 12-20 Hz during spin cycles, while top-load models generate broader frequencies from 8-25 Hz. Dryers operate at higher frequencies, generally 30-50 Hz due to faster motor speeds. Effective isolation requires hardware with natural frequency at least 50% lower than the appliance’s operating frequency. This prevents resonance amplification—a phenomenon where the isolation system actually increases vibration transmission rather than reducing it.
Rubber vs. Polyurethane Performance
Natural rubber excels at dampening low-frequency vibrations but degrades faster under continuous compression and exposure to laundry detergents and fabric softeners. Polyurethane compounds offer superior chemical resistance and maintain their damping properties over a broader temperature range (crucial for garage installations). However, some polyurethane formulations can be too rigid for effective low-frequency isolation. Hybrid designs using a polyurethane core with rubber contact layers provide the best of both materials.
Compression Set Resistance
Compression set—the permanent deformation that occurs when material remains compressed over time—determines long-term effectiveness. High-quality isolation materials should specify compression set values under 10% after 24 hours at 158°F (simulating conditions under a running dryer). Materials exceeding 15% compression set will gradually lose their vibration-dampening capability, transferring more energy to your floor as they age. This specification is rarely advertised but can be obtained through manufacturer technical sheets.
Protecting Your Floor’s Integrity
Beyond vibration and weight, everyday operation creates unique threats to LVP surfaces. Comprehensive protection addresses mechanical, thermal, and chemical stressors that accumulate over thousands of laundry cycles.
Scratch and Dent Prevention Strategies
Appliance feet can develop burrs or sharp edges that act like chisels on LVP wear layers. Even with protective pads, microscopic grit trapped underneath creates an abrasive grinding surface. The most robust solutions incorporate non-marring bases with Shore A hardness ratings below the floor’s wear layer hardness (typically 85-90 Shore A for quality LVP). Some advanced platforms feature replaceable felt or microfiber pads on the underside that can be cleaned or replaced annually, preventing the buildup of damaging debris.
Point Load vs. Distributed Load Solutions
The physics is unambiguous: distributed loads reduce pressure by increasing contact area. A typical stackable unit’s four feet create pressure points of 60+ PSI. A quality distribution platform can reduce this to under 5 PSI by spreading the load across 800+ square inches. This 90% pressure reduction doesn’t just prevent denting—it eliminates the shear forces that cause plank separation at the click-lock joints. For maximum protection, the platform should extend at least 2 inches beyond the appliance footprint on all sides.
Thermal Expansion Accommodation
Washers and dryers generate significant heat, with dryer bases reaching 120-140°F during operation. This heat transfers to the LVP, causing localized expansion. If the hardware restricts this movement, it creates buckling stress. Effective solutions incorporate low-friction surfaces or slight flex that allows the floor to expand microscopically without lifting. Look for materials with thermal expansion coefficients similar to vinyl (approximately 0.00006 in/in/°F) to ensure the hardware moves with the floor rather than against it.
Moisture Management Fundamentals
Water damage remains the silent killer of flooring installations, and laundry areas present multiple moisture sources that hardware must address proactively. A multi-layered defense strategy proves far more effective than single-point solutions.
Washer Leak Protection Systems
Even minor, undetected leaks can saturate the subfloor beneath LVP, leading to mold growth and structural damage. Hardware with integrated containment basins—typically 1/2" deep reservoirs with sealed edges—can capture up to 2 gallons of water from a burst hose or seal failure. These basins should include drainage ports that direct water to a floor drain or alert system. For second-floor installations, consider hardware with moisture sensors that trigger automatic shutoff valves, preventing catastrophic water damage to lower levels.
Condensation Control
Cold water supply lines and cool metal appliance bases create condensation in humid environments, especially during summer months. This moisture becomes trapped between the appliance and floor, creating a persistent damp zone. Hardware with ventilated designs—featuring raised ribs or dimpled surfaces—creates airflow that evaporates condensation before it can pool. Some systems incorporate passive wicking materials that draw moisture away from the floor surface and toward evaporation zones at the platform edges.
Subfloor Moisture Considerations
Your LVP’s waterproof nature can mask subfloor moisture issues that originate from below, particularly in basements or slab-on-grade installations. Hardware with integrated vapor barriers—consisting of polyethylene layers with perm ratings below 0.1—blocks ground moisture from becoming trapped under heavy appliances where it can’t evaporate. This is crucial because the compression from stackables can force subfloor moisture into adjacent floor areas, causing edge swelling and joint failure in surrounding planks.
Installation Best Practices
Proper installation technique matters as much as hardware selection. Even premium solutions fail when installed incorrectly, and the floating nature of LVP demands specific protocols that differ from traditional flooring.
Pre-Installation Floor Assessment
Before placing any hardware, conduct a 48-hour floor conditioning period where the room maintains normal operating temperature and humidity. Clean the installation area with a pH-neutral cleaner to remove manufacturing residues that affect adhesion or grip. Use a straightedge to identify any floor irregularities exceeding 1/8" over 3 feet—these require leveling compound before hardware installation, as even minor voids create stress concentration points under heavy loads.
Proper Positioning Techniques
Never slide appliances across LVP, even with protective hardware installed. The lateral shear force can break click-lock connections. Instead, use appliance glides or furniture sliders under the hardware itself, removing them once the unit is positioned. Position the appliance at least 1/4" from walls to accommodate floor expansion, and ensure hardware doesn’t span expansion joints or transition strips. For stackables, always place the distribution platform first, then lower the dryer onto the washer using a qualified appliance dolly—never assemble the stack on top of the platform.
Securing Without Permanent Fastening
Since LVP cannot be nailed or screwed, hardware must rely on friction, weight, and mechanical interlocking. Some platforms feature perimeter lips that contain the appliance feet, preventing walking during operation. Others use high-friction base materials that grip the floor without adhesive. For maximum stability, consider hardware with optional anchoring kits that attach to wall studs rather than the floor, satisfying anti-tip requirements without penetrating the LVP. This approach maintains floor warranty compliance while ensuring safety.
Common Pitfalls and How to Avoid Them
The most expensive mistakes often seem like logical shortcuts during installation. Understanding these frequent errors helps you recognize when “simple” solutions create complex problems.
The “Set It and Forget It” Mindset
Hardware performance degrades over time, especially under continuous compression. Rubber compounds harden, polyurethane can develop microscopic cracks, and floor settling changes weight distribution. Schedule quarterly inspections during the first year, checking for compression set, moisture accumulation, and floor changes around the appliance. Tighten leveling adjustments seasonally as temperature fluctuations cause floor expansion and contraction. This proactive approach catches issues before they become floor damage.
Ignoring Manufacturer Specifications
Appliance manufacturers specify installation requirements that supersede generic hardware recommendations. Some front-load washers require a perfectly level surface within 1/4" tolerance to prevent excessive vibration. Others specify maximum height additions due to door swing geometry or drain pump capacity. Flooring manufacturers similarly detail weight limits and installation restrictions. The intersection of these specifications—not just one set—defines your true installation parameters. Document both appliance and floor warranties, and select hardware that explicitly states compliance with both.
Over-tightening and Floor Damage
When leveling appliances, there’s a temptation to crank adjustment feet until they’re “tight.” Over-tightening creates extreme point loads that can crack LVP wear layers or compress the core beyond recovery. The correct technique: tighten until the appliance is stable and level, then back off 1/4 turn to allow for micro-movement. Use a torque wrench if specifications are available—many require only 15-20 ft-lbs on leveling feet. This prevents “cupping” damage where the floor deforms around the foot, creating permanent indentations visible from across the room.
Professional vs. DIY Installation: Making the Right Choice
While many homeowners successfully install stackables on LVP, certain scenarios demand professional expertise. An honest assessment of your situation prevents costly do-overs and warranty disputes.
When to Call a Professional
Consider professional installation if your floor has more than 3/16" variation across the appliance footprint, if you’re installing on an upper floor with weight concerns, or if local codes require licensed professionals for gas dryer connections. Professional installers possess specialized equipment like appliance lifts that can place stackables without dragging, and they carry insurance that covers floor damage during installation. The cost—typically $150-300—often pays for itself by preserving flooring warranties that require “professional installation” for coverage.
Essential Tools for DIY Success
If you proceed DIY, invest in an electronic laser level with 1/16" accuracy, a 500-lb capacity appliance dolly with stair climbers, and furniture glides rated for your appliance weight. A moisture meter helps verify subfloor conditions before installation. Most importantly, acquire a “go/no-go” feeler gauge set to verify uniform contact between hardware and floor—any gap larger than 1/16" indicates insufficient support that will cause rocking and eventual damage.
Cost-Benefit Analysis
DIY installation saves labor costs but risks floor damage valued at $3-8 per square foot for replacement, plus potential appliance warranty voidance if installation errors cause vibration-related failures. Professional installation includes liability coverage and often comes with a workmanship warranty. Calculate your risk: if your laundry area exceeds 100 square feet of premium LVP, professional installation represents 2-5% of your total flooring investment—a reasonable insurance policy against catastrophic failure.
Warranty and Insurance Implications
Hardware decisions directly impact warranty coverage across multiple products. Understanding these relationships helps you document decisions and maintain protection.
Flooring Warranty Protection
Most LVP warranties explicitly require that heavy appliances use “load distribution devices” and prohibit installations that create “point loads exceeding manufacturer specifications.” Save all hardware documentation, including weight capacity ratings and floor compatibility statements. Photograph the hardware installation before placing appliances, creating timestamped evidence of compliance. Some flooring manufacturers maintain approved hardware lists—contact them directly if your warranty documentation is ambiguous, and obtain written approval for your selected solution.
Appliance Warranty Considerations
Appliance warranties often exclude vibration-related damage if the unit wasn’t installed on a “solid, level surface.” Using improper hardware that allows excessive movement can void coverage for drum bearings, motor mounts, and electronic control boards. Retain hardware specifications that demonstrate compliance with appliance leveling requirements. If you experience vibration issues, document them immediately—continued operation after discovering problems can be construed as negligence, voiding warranty claims.
Homeowner’s Insurance Factors
Water damage from appliance leaks is a leading cause of insurance claims. Some policies offer discounts for installations with leak detection and automatic shutoff systems. Conversely, using unapproved installation methods can result in claim denial if damage occurs. Inform your insurance agent of any significant appliance installation, particularly on upper floors. They may require specific hardware features like integrated drip pans with drain connections to maintain full coverage.
Long-Term Maintenance and Monitoring
Effective hardware requires ongoing attention to maintain performance. Establishing a maintenance routine extends both floor and appliance life while preventing minor issues from escalating.
Routine Inspection Schedules
Mark your calendar for quarterly inspections during the first year, then semi-annually thereafter. Check for hardware compression, moisture accumulation, and floor changes. Run the washer’s spin cycle while observing the unit—any rocking indicates compromised support. Use a carpenter’s level to verify the appliance remains within tolerance; even minor settling can create imbalance that accelerates wear. Document each inspection with photos to track changes over time.
Signs of Trouble to Watch For
Early warning signs include new clicking sounds from the floor during appliance operation, slight appliance movement visible when doors open/close, or difficulty sliding laundry baskets across the floor near the appliances (indicating floor elevation changes). Discoloration around the appliance base suggests moisture issues. Gaps appearing in floor joints, especially parallel to appliance orientation, indicate excessive stress. Address any of these signs within days, not weeks, to prevent irreversible damage.
Seasonal Adjustments
LVP expands in summer humidity and contracts in winter dryness—a movement pattern that can loosen hardware grip or create gaps. Each season, verify that hardware maintains full contact with the floor and that leveling feet haven’t shifted. In dry climates, consider placing a small humidifier in the laundry room during winter to minimize extreme contraction. In humid climates, ensure your HVAC system maintains consistent humidity levels year-round, as rapid changes stress both floor and hardware interfaces.
Budget Planning and Cost Factors
Quality hardware represents a fraction of your total appliance and flooring investment, but price ranges vary dramatically. Understanding cost drivers helps you allocate budget effectively without overspending on unnecessary features.
Price vs. Performance Trade-offs
Entry-level anti-vibration pads ($20-40) provide minimal protection suitable for lightweight top-load washers on concrete subfloors. Mid-range platforms ($80-150) offer adequate load distribution for most vinyl plank installations. Premium systems ($200-400) include integrated moisture management, leveling adjustments, and materials engineered for specific appliance frequencies. The sweet spot for most homeowners lies in the $120-180 range, where you get professional-grade materials without specialized features needed only for extreme situations.
Hidden Costs to Anticipate
Factor in potential floor leveling compound ($30-50), additional delivery fees for heavy platforms, and possible plumbing modifications if the added height affects drain line slope. Some installations require electrical outlet relocation if the raised appliance position stretches cord lengths. If hiring professionals, ask whether their quote includes hardware or if you’ll purchase separately. DIY installations might need specialized tools like appliance lifts ($100-200 rental) that aren’t immediately obvious when planning.
Value Engineering Your Solution
In multi-story homes, prioritize moisture protection on upper floors where leak damage is catastrophic. For basement installations on concrete, focus on vibration isolation and rust prevention. If your appliances are already mid-cycle loud, invest more in frequency-specific damping. For quiet, modern units, emphasize load distribution. Never compromise on weight capacity—undersized hardware fails catastrophically rather than gradually, making it the worst place to save money.
Special Considerations for Different Vinyl Plank Types
Not all LVP is created equal, and hardware effectiveness varies significantly across different product constructions. Matching hardware to your specific flooring type optimizes protection.
Rigid Core vs. Flexible LVP
Rigid core products (SPC - Stone Plastic Composite) withstand higher point loads but transmit more vibration due to their density. They benefit most from isolation pads that absorb energy before it enters the floor system. Flexible LVP (WPC - Wood Plastic Composite) offers better inherent vibration damping but compresses more easily under weight, requiring robust load distribution plates that prevent core crushing. Rigid core installations can tolerate slightly smaller distribution platforms, while flexible LVP needs maximum footprint coverage.
Thickness and Wear Layer Factors
Thicker planks (8mm+) with robust wear layers (20 mil+) handle compression better than thinner economy products. If your LVP is under 6mm thick, you must use full-size platforms—pads alone will eventually telegraph through to the subfloor. Wear layer thickness determines scratch resistance if hardware shifts; thinner wear layers (6-12 mil) require hardware with softer base materials (below 70 Shore A) to prevent abrasive damage during micro-movements.
Attached Underlayment Impact
Many modern LVP products include pre-attached underlayment, typically 1-2mm thick. While this improves comfort and sound absorption, it reduces the effective stiffness of the floor system. Hardware on these floors requires larger contact areas to prevent “punch-through” where the appliance base compresses through the underlayment into the core. Avoid hardware with narrow support beams or feet that concentrate loads—these can sever the underlayment’s continuity, creating thermal bridges and sound transmission paths.
Safety and Code Compliance
Hardware decisions intersect with building codes and safety standards that protect your home and family. Overlooking these requirements creates liability and endangers occupants.
Anti-Tip Hardware Requirements
Building codes universally require anti-tip brackets for stackable units, especially in homes with children. These brackets must anchor to wall studs, not floor surfaces, to maintain LVP warranty compliance. The hardware should allow for 1/2" of floor movement without transferring stress to the bracket. Some integrated platforms include anti-tip mounting points that position the bracket at the correct height for stacked units, eliminating guesswork during installation.
Electrical and Plumbing Clearances
Raising appliances with platforms or pads changes clearances for electrical outlets, water supply lines, and drain connections. NEC code requires appliances not to place strain on electrical connections—if your raised height pulls the cord taut, you must relocate the outlet. Plumbing codes specify minimum drain line slopes (typically 1/4" per foot)—added height can flatten these slopes, causing drainage issues and sewer gas backup. Always verify that hardware height doesn’t compromise these critical clearances.
Building Code Adherence
Local codes may specify requirements for laundry room floor drains, water shutoff accessibility, or seismic restraints in earthquake zones. In multifamily buildings, HOA rules often dictate installation methods to prevent noise transmission to lower units. Contact your local building department before purchasing hardware—they can provide specific code sections applicable to your situation. Keeping email records of these consultations provides documentation if disputes arise later.
Frequently Asked Questions
Will using installation hardware void my LVP warranty?
Properly selected and installed hardware actually protects your warranty by preventing damage from point loads and vibration. Most LVP manufacturers require load distribution devices for appliances over 150 pounds. Keep documentation showing your hardware meets weight capacity and compatibility requirements. The key is using hardware specifically designed for floating floors, not improvised solutions like plywood scraps or generic furniture pads.
How much height will hardware add to my stackable unit?
Height addition varies by solution type: anti-vibration pads typically add 1/2" to 1", while full platforms add 1" to 3". Premium systems with integrated moisture barriers and leveling adjustments tend toward the higher end. Always measure your space from the finished floor to any overhead cabinets or ducts, then subtract the hardware height to verify your appliances will fit. Remember to account for the slight compression that occurs once weight is applied.
Can I install hardware after my appliances are already in place?
It’s extremely difficult and risky. Attempting to lift a stacked unit to slide hardware underneath creates lateral forces that can shear click-lock joints. The correct sequence is: install hardware, verify it’s level, then place appliances. If you must retrofit, unstack the units first, install hardware under each piece separately, then restack. Never try to tip or rock a stacked unit to wedge pads underneath—this voids warranties and risks personal injury.
Do I need different hardware for concrete vs. wood subfloors?
Yes. Concrete subfloors benefit from hardware with moisture-blocking properties to prevent slab moisture wicking into appliance bases. Wood subfloors require hardware that distributes loads across multiple joists, not just between them. For wood subfloors, choose platforms that span at least 24" to bridge typical 16" joist spacing. Concrete installations can use smaller footprints but need thicker vibration-damping materials since concrete transmits vibration efficiently.
How often should I replace installation hardware?
Quality hardware lasts 5-10 years, but inspect it annually. Replace immediately if you notice cracking, permanent compression marks exceeding 1/8", or loss of vibration dampening effectiveness. Rubber components degrade faster in high-humidity environments or when exposed to laundry chemicals. Polyurethane lasts longer but can develop fatigue cracks. Mark your calendar for a 5-year replacement evaluation, even if no visible issues exist.
Will hardware eliminate all vibration and noise?
No solution eliminates 100% of vibration, but proper hardware reduces transmitted energy by 70-90%. You’ll still hear some operational sounds, but the floor-shaking, picture-rattling vibrations should disappear. If significant vibration remains after installation, it indicates an imbalance issue with the appliance itself or an uneven floor requiring leveling compound. Hardware complements but doesn’t replace proper appliance maintenance and installation.
Can I use the same hardware for a washer and separate dryer (non-stacked)?
Yes, but with modifications. Individual units each need their own hardware, and you lose the stability benefits of a stacked configuration. For side-by-side installations, consider a continuous platform spanning both appliances, which distributes loads across a larger area and creates a unified, stable base. Ensure the platform doesn’t obstruct ventilation requirements for the dryer, typically requiring 1" clearance on sides and rear.
What if my floor isn’t perfectly level?
Minor variations under 1/4" across the appliance footprint can be accommodated by hardware with integrated leveling adjustments. For variations exceeding 1/4", apply floor leveling compound before hardware installation. Never use hardware as a “bridge” over significant dips—it will eventually crack or compress unevenly, transferring stress to the LVP. Self-leveling underlayment designed for LVP installations provides the flat surface necessary for long-term success.
Are there any LVP brands that don’t require hardware for stackables?
No major LVP manufacturer approves direct installation of stackable appliances without load distribution. Some commercial-grade rigid core products with 40+ mil wear layers and enhanced density can tolerate point loads better, but they still benefit from vibration isolation. Always check your specific product’s installation guidelines—search for “appliance installation” or “point load” in the warranty documentation. Assuming your floor is an exception is a costly gamble.
Can installation hardware help with dryer venting issues?
Raising your dryer 1-3 inches with a platform can improve venting geometry by reducing sharp bends in the transition duct. However, ensure the added height doesn’t create new problems, like stretching the duct to its limit or creating upward slopes that trap lint. Some platforms include integrated vent spacers or allow easier access for cleaning. The height change may also affect your ability to access the rear vent for maintenance—verify you can still reach connections for annual cleaning.