When winter transforms your roof into a snow-covered landscape, your attic ventilation system becomes the unsung hero protecting your home from costly damage. While most homeowners focus on insulation and heating systems, the humble roof vent cap plays a pivotal role in preventing ice dams, moisture buildup, and structural deterioration. In snowy climates, standard vent caps simply won’t cut it—they’re prone to clogging, freezing shut, or even collapsing under the weight of accumulated snow. The right snow-resistant vent cap isn’t just an accessory; it’s a critical defense mechanism that ensures your home can breathe properly even when temperatures plummet and snow piles high.
Understanding what makes a vent cap truly effective in winter conditions requires more than a quick trip to the hardware store. From material science to aerodynamic design, snow country demands specialized features that can handle freeze-thaw cycles, heavy snow loads, and persistent moisture without compromising airflow. This guide dives deep into the engineering principles, selection criteria, and installation strategies that separate subpar vent caps from those built to survive decades of harsh winters.
Top 10 Roof Vent Caps for Snowy Climates
Detailed Product Reviews
1. Broan-NuTone 636 Steel Roof Vent Cap for 3" and 4" Round Duct, For Bathroom Ventilation Fans, Black

Overview: The Broan-NuTone 636 is a robust steel roof vent cap designed specifically for bathroom ventilation systems. Engineered to accommodate both 3-inch and 4-inch round ducts, this versatile cap ensures optimal air extraction while maintaining the aesthetic integrity of your roofline. Its black powder-coated finish provides a clean, professional appearance that blends seamlessly with most roofing materials.
What Makes It Stand Out: Unlike plastic alternatives that crack under UV exposure, this steel construction delivers exceptional durability and weather resistance. The integrated backdraft damper prevents cold air infiltration and heat loss during inactive periods, while the built-in bird screen blocks nesting animals without restricting airflow. The dual-size compatibility eliminates guesswork during installation, making it a flexible solution for various fan configurations.
Value for Money: At $21.00, this vent cap sits in the mid-range price bracket, offering professional-grade materials at a DIY-friendly price point. While cheaper plastic caps exist at $10-15, they typically require replacement every 3-5 years. The steel construction extends lifespan to 15+ years, making it more economical long-term. The included damper and screen also save $5-10 in separate component costs.
Strengths and Weaknesses: Strengths include superior steel durability, dual duct compatibility, integrated damper and bird screen, and professional finish. Weaknesses involve slightly higher upfront cost than basic plastic models and potential rust issues if the powder coating gets compromised. Installation on steep roofs may require additional flashing.
Bottom Line: Ideal for homeowners seeking a permanent, low-maintenance ventilation solution. The Broan-NuTone 636 justifies its modest premium through longevity and performance, making it a smart investment for any bathroom exhaust system.
2. 3" Radon Vent Cap for Schedule 40, 3 inch PVC Vent Cap, 76001 Roof Vent Cover, for Radon Fan Pipe/Flue Pipe/Roof Pipe, Protects Radon Fan Motor and Pipe, Protects from Rain, Snow, Leaves and Animals

Overview: This specialized radon vent cap provides essential protection for radon mitigation systems, shielding PVC vent pipes from environmental hazards while allowing harmful gases to escape safely. Designed exclusively for 3-inch Schedule 40 PVC pipes, the 76001 model creates a weatherproof barrier against rain, snow, and debris that could compromise system efficiency or damage fan motors.
What Makes It Stand Out: The one-piece seamless PVC construction eliminates failure points common in bolted or welded designs, ensuring reliable long-term performance. The innovative snap-in installation requires no tools, reducing installation time to under a minute. Its integrated mesh screen specifically targets animal intrusion from birds to insects, a critical feature often overlooked in generic vent caps.
Value for Money: Priced at $15.99, this cap offers exceptional value for radon system owners. Alternative solutions often require multiple components costing $25-35. The maintenance-free design eliminates periodic tightening or replacement of corroded hardware, saving considerable expense over the system’s 10-15 year lifespan. The UV-stabilized PVC withstands sunlight degradation better than standard plumbing fittings.
Strengths and Weaknesses: Strengths include tool-free snap installation, seamless one-piece durability, targeted animal protection, and radon-specific engineering. Weaknesses are limited to 3-inch Schedule 40 pipes only, lacking compatibility with other sizes or materials. The PVC construction may become brittle in extreme cold climates after extended exposure.
Bottom Line: An essential upgrade for any radon mitigation system. The 76001 cap delivers specialized protection at a competitive price, making it a must-have for homeowners prioritizing safety and system longevity.
3. Wonderjune 2pack PVC Furnace Flue Pipe Vent Cap for 1.5" 2" 3" Pipe Hemispherical Flue Roof Vent Cap Keep Small Animals Out of Exterior Exhaust Cover (Black)

Overview: Wonderjune’s dual-pack vent caps offer versatile protection for high-efficiency furnace flues, water heaters, and radon systems. The hemispherical design fits three common PVC pipe diameters—1.5, 2, and 3 inches—making these caps adaptable across multiple applications. Constructed from weather-resistant ASA resin, they maintain structural integrity and appearance despite constant UV exposure and temperature fluctuations.
What Makes It Stand Out: The triple-size compatibility in a single product eliminates inventory confusion for contractors and DIYers alike. Unlike flat caps that can trap debris, the dome shape promotes natural shedding of leaves and snow while improving airflow dynamics. The ASA resin formulation provides superior UV resistance compared to standard PVC, preventing the chalking and cracking that typically occurs after 2-3 years of sun exposure.
Value for Money: At $21.99 for two units, each cap costs approximately $11—competitive with single-size alternatives. The multi-diameter flexibility means one purchase covers various home systems, saving multiple trips to the hardware store. ASA resin’s extended lifespan (8-10 years vs. 3-5 for standard PVC) provides excellent return on investment, particularly for homeowners maintaining multiple exhaust systems.
Strengths and Weaknesses: Strengths include versatile sizing, aerodynamic dome design, superior ASA resin durability, and two-pack convenience. Weaknesses involve requiring PVC glue for installation (unlike snap-fit models) and the black color absorbing more heat in sunny climates. The universal fit may leave slight gaps on 1.5-inch pipes if not glued properly.
Bottom Line: Perfect for homeowners with multiple PVC venting systems. The Wonderjune caps deliver professional-grade versatility and durability at an attractive per-unit price, making them a smart bulk purchase.
4. JUMBO 3 inch/4 inch ABS Mushroom Vent Cap

Overview: The JUMBO mushroom vent cap provides economical protection for drain waste vent (DWV) stacks, preventing debris and animal intrusion while allowing proper system ventilation. Designed for both 3-inch and 4-inch pipes, this ABS thermoplastic cap serves as a straightforward solution for plumbing vent termination points on residential roofs.
What Makes It Stand Out: With 46 years in the market, JUMBO’s longevity speaks to product reliability and plumber trust. The mushroom profile offers a classic silhouette that sheds water effectively while providing ample internal space for airflow. The three-bolt mounting system creates a secure mechanical attachment without requiring adhesives, enabling easy removal for pipe inspection or maintenance.
Value for Money: At $9.99, this represents one of the most budget-friendly vent caps available. While basic models start around $7-8, the dual-size compatibility and proven brand heritage justify the slight premium. For rental properties or budget-conscious projects, it delivers essential protection without unnecessary frills. However, the ABS material typically lasts 5-7 years before requiring replacement, making long-term costs higher than metal alternatives.
Strengths and Weaknesses: Strengths include proven brand reputation, dual size compatibility, tool-removable design, and exceptional affordability. Weaknesses involve ABS plastic’s limited UV resistance, basic aesthetic appearance, and lack of integrated damper. The three-bolt system, while secure, creates potential leak points if not properly sealed with roofing cement.
Bottom Line: Best suited for cost-sensitive applications where basic functionality trumps longevity. The JUMBO cap delivers reliable short-term protection for DWV systems, making it ideal for rental properties, flips, or temporary installations.
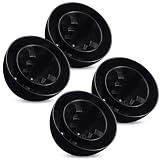
5. Safoner Aluminum RV Roof Sewer Plumbing Vent Cap Kit- Metal Replacement for Plastic Covers, Exterior Accessories for Trailers, Campers, and Motorhomes - White (1 Pack)

Overview: Engineered specifically for recreational vehicles, the Safoner vent cap replaces fragile plastic OEM covers with a rugged aluminum alternative. Designed to protect RV sewer plumbing vents from road debris, weather, and UV damage, this kit includes all necessary installation materials for a complete rooftop upgrade. The white powder-coated finish matches most RV exteriors while reflecting sunlight to reduce heat buildup.
What Makes It Stand Out: The all-aluminum construction withstands the unique stresses of mobile life, including highway speeds, tree branch impacts, and constant vibration that quickly destroy standard plastic caps. The comprehensive installation kit—featuring stainless steel screws and butyl sealing tape—eliminates additional hardware store trips, a significant convenience for RV owners working in campgrounds or remote locations.
Value for Money: At $16.99, this kit costs slightly more than basic plastic replacements ($8-12) but delivers substantially longer service life. The included butyl tape ($5-7 value alone) and stainless hardware prevent the common failure points of cracked seals and rusted fasteners that plague OEM installations. For full-time RVers, the durability translates to years of leak-free performance versus annual plastic cap replacements.
Strengths and Weaknesses: Strengths include aircraft-grade aluminum durability, complete installation kit, vibration-resistant design, and UV-reflective white finish. Weaknesses involve specific RV sizing that may not suit residential applications, and the single-pack quantity limits bulk savings. The 3.8-inch base diameter may require adapter plates for some RV models.
Bottom Line: An essential upgrade for any RV owner tired of replacing cracked vent caps. The Safoner kit provides professional-grade durability and convenience, making it worth every penny for mobile lifestyles.
6. Wonderjune 4pack PVC Furnace Flue Pipe Vent Cap for 1.5" 2" 3" Pipe Hemispherical Flue Roof Vent Cap Keep Small Animals Out of Exterior Exhaust Cover (Black)
Overview: The Wonderjune 4-pack PVC vent caps offer a comprehensive solution for protecting furnace flue pipes from animal intrusion and debris. Designed to fit 1.5-inch, 2-inch, and 3-inch PVC pipes, these hemispherical covers install quickly using standard PVC glue for both vertical and horizontal applications. The package provides excellent value for homeowners with multiple HVAC systems, high-efficiency water heaters, or radon mitigation setups requiring simultaneous protection.
What Makes It Stand Out: Unlike single-size alternatives, these caps feature universal compatibility across three common pipe diameters, eliminating guesswork during purchase. The ASA resin construction provides superior weather resistance against UV radiation, extreme temperatures, and precipitation while maintaining an attractive glossy appearance. The design actively improves ventilation efficiency by optimizing airflow dynamics around the protected vent, a notable upgrade from basic cap designs that can restrict exhaust flow.
Value for Money: At $39.99 for four units, each cap costs approximately $10—competitive with individual vent caps while offering bulk convenience. Professional contractors benefit from having compatible caps on hand for various installations, while DIY homeowners servicing multiple properties realize significant savings compared to purchasing separately. The durable ASA resin ensures longevity, reducing replacement frequency and long-term costs.
Strengths and Weaknesses: Strengths include versatile multi-size compatibility, robust weather-resistant ASA resin, easy PVC glue installation, and improved airflow design. The four-pack quantity suits multiple-unit properties. Weaknesses involve requiring PVC cement and primer for proper installation, potential incompatibility with non-standard pipe sizes, and the hemispherical shape may not suit all aesthetic preferences. Users must carefully verify pipe dimensions before purchasing.
Bottom Line: This 4-pack delivers exceptional value for contractors and homeowners managing multiple high-efficiency PVC vent systems. The versatile sizing, durable construction, and performance-enhancing design make it a smart investment for comprehensive HVAC protection.
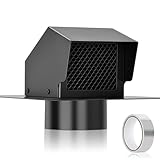
7. Roof Cap, 10 in. Fits Duct Size, Aluminum

Overview: This 10-inch roof cap provides robust ventilation termination for large duct systems, featuring integrated bird screening and a built-in backdraft damper. Constructed from steel with a protective finish, it mounts to roofs with a substantial 14.25" x 18.75" flange. The 6.5-inch cap height offers adequate clearance while the integrated damper prevents unwanted air infiltration when systems are inactive, making it ideal for range hoods, dryers, and bathroom exhausts requiring larger ductwork.
What Makes It Stand Out: The combination of a built-in backdraft damper and bird screen in a single unit simplifies installation and eliminates separate component purchases. Its 10-inch capacity serves high-CFM applications where standard 4-6 inch caps prove inadequate. The steel construction provides durability surpassing plastic alternatives, while the generous flange dimensions ensure secure roof mounting with ample sealing surface area for weatherproofing.
Value for Money: Priced at $33.82, this cap offers professional-grade features at a consumer-friendly price point. Comparable commercial-grade caps often exceed $50, making this an attractive option for serious DIYers. The integrated design reduces additional hardware costs, while steel construction ensures longevity that justifies the investment over cheaper plastic models requiring earlier replacement.
Strengths and Weaknesses: Strengths include large 10-inch capacity, integrated damper and bird screen, sturdy steel construction, and generous mounting flange. The built-in backdraft prevention enhances energy efficiency. Weaknesses involve the title-material discrepancy (listed as aluminum but described as steel), substantial roof penetration size requiring careful flashing, and weight considerations for some roof types. The 6.5-inch height may be insufficient in extreme snow load areas.
Bottom Line: An excellent choice for high-capacity ventilation needs, this roof cap delivers professional features and durable construction at a reasonable price. Verify material specifications before ordering and ensure proper roof flashing for long-term performance.
8. Trivd Frol 4 Inch Roof Vent Cap, Heavy Duty Galvanized Steel Removable Roof Exhaust Vents for Houses, Home Ventilation System with Damper, Black
Overview: The Trivd Frol 4-inch roof vent cap combines heavy-duty galvanized steel construction with a high-performance backdraft damper, delivering up to 75% airflow efficiency. The black powder-coated finish provides exceptional corrosion resistance for long-term durability. Designed for bathroom fans, kitchen range hoods, and attic ventilation, this cap includes precision mesh to block debris while the removable design facilitates cleaning and maintenance. Four mounting holes and a pipe extension simplify duct connection.
What Makes It Stand Out: The claimed 75% airflow capacity significantly exceeds typical market offerings, reducing strain on ventilation fans and improving overall system performance. The removable design is a practical feature rarely found in budget caps, allowing homeowners to clean accumulated debris without full replacement. The high-performance polyester powder coating provides superior corrosion protection compared to standard paint finishes, ensuring the cap withstands harsh weather conditions.
Value for Money: At $32.99, this cap positions itself in the mid-range while offering premium features like superior airflow design, removable construction, and enhanced coating. The included waterproof tape adds value, while the durable galvanized steel construction ensures a longer lifespan than plastic alternatives. For homeowners prioritizing ventilation efficiency and maintenance accessibility, the price represents solid long-term value.
Strengths and Weaknesses: Strengths include exceptional airflow capacity, removable design for easy cleaning, sturdy galvanized steel with premium coating, precision mesh protection, and included installation accessories. The damper prevents backdraft effectively. Weaknesses involve the 4-inch limitation for larger systems, potential noise from the damper in high winds, and the need for clamp adjustment on non-standard duct sizes. The black finish may fade over time in intense UV exposure.
Bottom Line: This vent cap excels in airflow performance and maintenance convenience, making it ideal for homeowners seeking efficient, long-lasting ventilation solutions. The removable design and superior construction justify the moderate price premium.
9. Wonderjune 2pack PVC Furnace Flue Pipe Vent Cap for 1.5" 2" 3" Pipe Hemispherical Flue Roof Vent Cap Keep Small Animals Out of Exterior Exhaust Cover (White)

Overview: This Wonderjune 2-pack provides the same versatile PVC vent protection as its 4-pack counterpart, offering multi-size compatibility for 1.5-inch, 2-inch, and 3-inch PVC pipes in a clean white finish. Designed for high-efficiency furnace exhaust, intake, radon vents, and tankless water heater applications, these caps install easily with standard PVC glue. The white ASA resin construction matches lighter exterior trim while providing the same durable, weather-resistant performance as the black version.
What Makes It Stand Out: The two-pack quantity perfectly suits single-home applications where homeowners need to protect both intake and exhaust vents simultaneously. The white color option provides aesthetic flexibility for homes with lighter-colored siding or trim. Like the 4-pack, these caps improve ventilation efficiency through optimized airflow dynamics, a feature uncommon in basic vent covers. The ASA resin maintains its glossy appearance and structural integrity despite prolonged UV exposure.
Value for Money: At $19.99 for two units, pricing remains consistent at approximately $10 per cap—competitive with individual alternatives while providing matched aesthetics for paired installations. This 2-pack eliminates waste for homeowners not requiring four units, offering appropriate scale for residential applications. The durable ASA resin construction ensures the investment protects expensive HVAC equipment from animal damage and debris infiltration.
Strengths and Weaknesses: Strengths include versatile three-size compatibility, durable ASA resin construction, easy PVC glue installation, improved airflow design, and color choice. The two-pack suits most residential HVAC configurations. Weaknesses mirror the 4-pack: requiring PVC cement, potential fit issues with non-standard pipes, and hemispherical design may not complement all architectural styles. White color may show dirt more readily than black.
Bottom Line: An excellent scaled-down option for residential users, this 2-pack delivers the same performance and quality as the larger set. Ideal for protecting paired intake/exhaust systems on single homes with lighter exterior aesthetics.
10. 4 Inch Roofing Rain Cap - Galvanized Steel Round Roof Vent Cover - All Weather HVAC Exhaust Chimney Cap (4" / 100mm)

Overview: This 4-inch galvanized steel rain cap offers straightforward, reliable protection for HVAC exhaust systems with a no-frills design emphasizing durability. The round vent cover features a 7.48-inch top diameter providing ample overhang for weather protection, while the 1.18-inch insertion depth ensures secure duct connection. Constructed from quality galvanized steel without moving parts, this cap eliminates mechanical failure points common with damper-equipped models, making it ideal for applications where simplicity and longevity outweigh airflow control needs.
What Makes It Stand Out: The absence of moving parts fundamentally enhances reliability and lifespan—no dampers to stick, hinges to corrode, or springs to fail. The generous top diameter provides superior rain protection compared to flush-mounted designs. Its versatility across HVAC, dryer, and chimney applications makes it a flexible solution for various exhaust needs. The straightforward installation and removal process simplifies maintenance and cleaning compared to more complex assemblies.
Value for Money: At $37.97, this cap commands a premium over basic models but justifies the cost through robust construction and universal reliability. The galvanized steel ensures years of service without replacement, while the simple design reduces maintenance requirements. For DIYers and professionals prioritizing long-term durability over advanced features, the price reflects quality materials and thoughtful engineering.
Strengths and Weaknesses: Strengths include exceptional reliability due to no moving parts, sturdy galvanized steel construction, generous rain-shedding design, easy installation/removal, and broad HVAC compatibility. The simple design suits harsh environments. Weaknesses involve lack of backdraft prevention, lower airflow efficiency compared to damper-equipped models, and potential for pest entry without additional screening. The price point may exceed budget-conscious buyers’ expectations.
Bottom Line: Perfect for applications where reliability trumps advanced features, this rain cap delivers durable, maintenance-free performance. Ideal for exhaust systems not requiring backdraft control and users prioritizing longevity over maximum airflow efficiency.
Why Roof Vent Caps Are Critical in Snowy Climates
The Hidden Dangers of Inadequate Ventilation
In regions where snow blankets roofs for months, proper attic ventilation becomes a non-negotiable safeguard against catastrophic damage. Without effective vent caps, warm air from your living space becomes trapped in the attic, melting snow on your roof deck from underneath. This meltwater runs down to the eaves, refreezes, and forms ice dams—those destructive ridges that can back up water under shingles, saturate insulation, and cause interior leaks. But the problems don’t stop there. Excess moisture in a poorly ventilated attic condenses on cold surfaces, creating the perfect breeding ground for mold, wood rot, and compromised structural integrity. Snow-resistant vent caps maintain a continuous exchange of air, keeping your attic temperature consistently cold and preventing the temperature differential that triggers ice dam formation.
How Snow and Ice Compromise Standard Vent Caps
Generic vent caps found on many homes are engineered for moderate climates and quickly fail when faced with winter’s fury. Snow can pack into open louvers, blocking airflow entirely and creating a suffocated attic space. Ice can form around moving parts in turbine vents, seizing them in place and rendering them useless. Worse, the weight of accumulated snow and ice can crush low-profile caps, creating gaps that allow water intrusion while still blocking air movement. Freeze-thaw cycles cause cheap plastics to become brittle and crack, while standard flashing details fail as ice expands and contracts around them. These failures often go unnoticed until spring thaws reveal water damage or energy bills spike from trapped moisture reducing insulation effectiveness.
Key Features to Look for in Snow-Resistant Vent Caps
Material Selection for Extreme Cold
The material composition of your vent cap determines its longevity and performance in sub-zero conditions. High-impact polypropylene with UV stabilizers offers superior cold-weather flexibility compared to standard PVC, which becomes brittle and fractures under stress. Powder-coated aluminum provides exceptional strength-to-weight ratio and resists corrosion from road salt and ice-melt chemicals that get aerosolized in winter air. For coastal snow regions, marine-grade stainless steel stands up to both salt spray and heavy snow loads, though it commands a premium price. The critical specification to verify is the material’s cold crack rating—quality manufacturers test their products to withstand temperatures of -40°F without structural failure. Avoid any vent cap that doesn’t publish specific low-temperature performance data.
Design Elements That Defeat Snow Intrusion
Engineering details make the difference between a vent cap that works and one that becomes a snow trap. Look for models with downward-facing louvers positioned at a minimum 45-degree angle, which use gravity to shed snow before it can accumulate. Internal baffle systems create a tortuous path for wind-driven snow, forcing it to drop out before entering your attic while maintaining airflow. The best designs incorporate a curved hood that extends at least three inches beyond the louver openings, acting like a snow visor that deflects precipitation while capturing rising warm air. Some advanced models feature self-regulating dampers that close during heavy snow events and reopen when conditions clear, though these add mechanical complexity that may introduce new failure points.
Mesh and Screening Considerations
Insect screening that works fine in summer can become a frozen barrier in winter. Standard fiberglass mesh holds moisture and freezes solid, blocking airflow completely. Opt for vent caps with stainless steel wire mesh featuring a minimum 1/4-inch grid pattern—large enough to prevent ice bridging but small enough to keep out rodents and larger insects. Some premium designs eliminate external mesh entirely, using internal baffles and centrifugal force to keep pests out while preventing snow infiltration. If your region experiences heavy, wet snow, consider removable mesh screens that can be taken down during winter months, though this requires seasonal maintenance commitment.
Understanding Snow Load Ratings and Certifications
Roof vent caps must withstand vertical snow loads that can exceed 50 pounds per square foot in extreme snow belts. Reputable manufacturers provide certified load ratings based on testing to ASTM E330 standards, which simulate sustained snow weight and wind uplift simultaneously. A snow load rating of 75 psf or higher indicates a product engineered for heavy snow country. Look for additional certifications like Florida Building Code approval, which despite the name, includes rigorous testing for wind-driven rain and impact resistance that translates well to snow performance. The International Code Council Evaluation Service (ICC-ES) mark ensures the product meets established performance criteria for structural integrity under load. Never install a vent cap that lacks published load test data—in snow country, this is as critical as your roof’s structural rating.
Types of Roof Vent Caps for Winter Weather
Static Vent Caps with Snow Baffles
Static vents remain the gold standard for reliability in extreme cold because they contain no moving parts to freeze or fail. Snow-resistant static models feature oversized bases that distribute weight across roof decking, preventing point loading that can crush standard caps. The most effective designs incorporate a double-wall construction with an inner baffle system that creates a thermal break, reducing the chance of condensation forming on cold exterior surfaces and freezing louvers shut. These vents work continuously regardless of wind conditions and excel in regions with predictable, heavy snowfalls. Their simplicity translates to decades of maintenance-free service when properly installed with appropriate flashing.
Turbine Vents: Friend or Foe in Snow Country?
Turbine vents generate powerful airflow using wind energy, but their moving parts present unique challenges in winter. High-quality snow-country turbines feature sealed bearings rated for arctic conditions and grease that remains fluid at -30°F. The turbine head should sit at least 12 inches above the roof plane, with a rotating mechanism that sheds snow through centrifugal force. However, during calm, cold periods with heavy snow accumulation, turbines can freeze in place and become ineffective. Some homeowners install hybrid systems—turbines for summer cooling that can be manually locked and covered with insulated caps during winter, switching to static vents for cold-weather ventilation. This approach maximizes year-round performance but increases initial investment.
Ridge Vents in Heavy Snow Regions
Continuous ridge vents offer superior airflow distribution compared to individual pot vents, but require careful installation in snowy climates. Snow-resistant ridge vent systems use an external baffle design that creates negative pressure, actively pulling air out even when covered by several inches of light, fluffy snow. The key is selecting a model with an internal weather filter made from non-woven fabric that remains permeable when wet, unlike foam filters that freeze solid. Installation must include a minimum 1-inch air gap along the ridge board, with the vent positioned to sit above the snow line on your specific roof pitch. In areas receiving wet, heavy snow, pair ridge vents with strategically placed static vents near the ridge to ensure ventilation continues if the ridge vent becomes completely buried.
Power Vent Caps with Cold Weather Modifications
Electric-powered attic fans with thermostatic and humidistatic controls can provide precise ventilation management, but standard models fail quickly in freezing conditions. Snow-country power vents require sealed, moisture-resistant housings rated NEMA 4X for water ingress protection. The thermostat must have a wide operating range down to 35°F, preventing operation that could create negative pressure and draw warm house air into the attic. Look for models with insulated dampers that seal tightly when the fan isn’t running, preventing heat loss and snow infiltration. Solar-powered options eliminate electrical concerns but produce less airflow during short winter days and may not generate enough power to overcome ice buildup on the housing.
Installation Strategies for Maximum Snow Protection
Optimal Placement on Your Roof
Location determines performance more than any other installation factor. In snowy climates, position exhaust vents in the upper third of the roof but below the absolute peak where wind scours snow clear. Avoid valleys and areas near roof intersections where snow drifts accumulate deeply. Maintain a minimum horizontal distance of 3 feet from any ridge line to prevent wind-driven snow from being funneled directly into the vent. For roofs with multiple vent caps, space them evenly and avoid placing them directly above heat sources like chimneys or bathroom exhaust fans, which can create melt zones that refreeze and block vents. The “cold roof” principle dictates that vents work best when installed on north-facing slopes that receive less sun and maintain more consistent snow cover.
Flashing Techniques That Withstand Freeze-Thaw Cycles
Standard step flashing fails in snow country because ice dams form at the vulnerable joint between the vent and roof deck. Instead, use a continuous pan-flashing system that extends at least 12 inches up-slope from the vent base, with the upper edge tucked under the roofing membrane but over the underlayment. This creates a water-tight barrier that directs meltwater around the vent rather than under it. Seal all penetrations with polyurethane caulk rated for -50°F to 200°F temperature swings, and avoid asphalt-based sealants that become brittle in extreme cold. Install an ice and water shield membrane extending at least 24 inches beyond the vent base in all directions, creating a secondary moisture barrier when ice dams inevitably form around the vent penetration.
Pitch and Orientation Considerations
The angle of your roof dramatically affects vent cap performance. On steep pitches above 8:12, snow slides off quickly but wind uplift forces increase, requiring vents with robust fastening systems and aerodynamic profiles. Low-slope roofs between 2:12 and 4:12 present the greatest challenge—snow accumulates and melts slowly, requiring vents with higher profiles to stay above the snowpack. For these applications, choose vent caps with minimum 6-inch standpipes and consider installing them on raised curbs. Orientation matters too: position vents perpendicular to prevailing winter winds to minimize direct snow impact, and on east-west ridges, favor the west side where afternoon sun creates slight melting that prevents permanent ice formation.
The Science of Airflow in Sub-Freezing Temperatures
Preventing Condensation and Ice Dams
Effective ventilation in winter relies on maintaining a delicate balance—enough airflow to remove moisture but not so much that it creates drafts or removes needed heat. The goal is to keep attic air within 10-15 degrees of outdoor temperature. Snow-resistant vent caps facilitate this by using the stack effect: warm, moist air rises naturally and exits through exhaust vents while cooler, drier air enters through soffit vents. In freezing conditions, the temperature differential between attic air and outside air drives this exchange more powerfully than in summer. However, if vent caps become blocked, moisture accumulates and condenses on the underside of the roof deck, where it can freeze into frost that later melts and mimics leak symptoms. Quality vent caps maintain consistent airflow even when partially obscured by snow, preventing this damaging cycle.
Balancing Intake and Exhaust Vents
Snow country ventilation systems require meticulous balancing. Building codes typically require 1 square foot of ventilation per 300 square feet of attic floor space, but in snowy climates, increase this to 1:150 for optimal performance. More importantly, maintain a 50/50 balance between intake (soffit) and exhaust (roof) ventilation. If exhaust vents outpace intake, negative pressure draws warm, humid air from your living space into the attic through ceiling penetrations, accelerating ice dam formation. In winter, check that soffit vents remain clear of insulation and that baffles maintain clear air channels. Some homeowners install powered intake vents with snow hoods to ensure adequate make-up air when deep snow covers soffit vents, though this adds electrical complexity.
Maintenance and Winterization Protocols
Pre-Season Inspection Checklist
Every fall, before the first snow flies, conduct a thorough inspection of all roof vent caps. Check for cracked housings, loose fasteners, and degraded sealant—materials that may have passed summer inspections can show weaknesses as temperatures drop. Remove any accumulated debris from summer storms that could trap moisture and freeze. Test turbine vents for free rotation and lubricate bearings with low-temperature grease. Verify that all screens are secure and intact. Inspect the attic side of each vent for signs of past moisture infiltration, which appears as water stains or frost formation on the vent housing. Document the condition with photos to compare against spring inspections. This proactive approach identifies vulnerabilities before they’re buried under two feet of snow.
Dealing with Snow Accumulation and Ice Formation
Despite best efforts, snow will accumulate on vent caps. The key is preventing it from turning into immovable ice. After heavy snowfalls, use a roof rake with a soft foam edge to gently clear snow from around vent caps, being careful not to damage the housing or flashing. Never chip away ice with metal tools—this destroys the vent and voids warranties. Instead, apply calcium chloride ice melt in mesh bags placed near (but not directly on) frozen vents to create localized melting. For persistent ice problems, install heat trace cables on a thermostat-controlled switch that activates only when temperatures drop below freezing and moisture is present. These cables wrap around the vent base and prevent ice formation without wasting electricity during dry cold snaps.
Common Failure Points and How to Avoid Them
Seal Degradation in Extreme Cold
The most common failure mode in snowy climates isn’t structural collapse but sealant failure. Standard silicone and asphalt sealants lose elasticity below 20°F, creating hairline cracks that allow water infiltration during thaws. These cracks then expand as water freezes, rapidly accelerating damage. Use only sealants specifically rated for “arctic” or “cryogenic” applications, which maintain flexibility to -60°F. Apply sealant in a continuous bead with no gaps, and consider using sealant tape as a backup barrier beneath the primary seal. Inspect seals mid-winter with binoculars from the ground, looking for gaps or separation. The small investment in proper sealant prevents the major expense of replacing rotted roof decking around failed vents.
Structural Collapse Under Snow Load
Even vents rated for high snow loads can fail if installed incorrectly. The weakest point is typically the attachment to roof decking—standard roofing nails pull through when subjected to sustained heavy loads. Use stainless steel screws with neoprene washers, driven into rafters or blocking, not just sheathing. For extreme snow zones, install a plywood reinforcement plate beneath the roof deck that distributes the load across multiple rafters. Avoid vents with large, flat horizontal surfaces where snow can accumulate; instead choose designs with peaked or curved tops that shed snow naturally. In areas with annual snowfall exceeding 100 inches, consider installing vents on the leeward side of roof peaks where wind naturally scours snow away, reducing the load by up to 70%.
Cost-Benefit Analysis: Investing in Quality Vent Caps
The price difference between standard and snow-resistant vent caps typically ranges from $15 to $60 per unit, which feels significant until you calculate the cost of failure. A single ice dam incident can cause $5,000 to $20,000 in water damage, mold remediation, and insulation replacement. Premium vent caps with 50-year warranties effectively eliminate this risk when properly installed. Factor in energy savings from maintaining proper insulation performance—trapped moisture can reduce R-value by 40%—and quality vents pay for themselves within 5-7 years in harsh climates. Additionally, many insurance companies offer discounts of 5-10% on premiums for homes with certified snow-resistant ventilation systems. When budgeting, allocate 30% more for installation than the vent cost itself; proper flashing and sealing labor is what ensures performance, not just the hardware.
Building Codes and Warranty Implications
Navigating Local Regulations
Snow country building codes vary dramatically. In Minnesota, the state building code requires vents rated for minimum 50 psf snow loads and specific ice dam prevention details. Colorado’s high-altitude codes add wind uplift requirements that affect vent selection. Always check with your local building department for amendments to the International Residential Code that address snow and ice. Many jurisdictions now require a building permit for vent replacement, with inspections focusing on flashing details and load ratings. Failure to comply can void your homeowners insurance coverage for ice dam damage. Keep all product specification sheets and installation documentation—if a vent fails and causes damage, you’ll need this paperwork to pursue manufacturer warranty claims or insurance coverage.
Manufacturer Warranty Fine Print
Read vent cap warranties carefully, as many exclude snow and ice damage or require specific installation methods to remain valid. Most warranties cover manufacturing defects but not failure due to “excessive snow loads” unless the product was specifically rated for those loads. Document the installation with photos showing proper flashing and sealant application. Some premium manufacturers offer “snow country warranties” that explicitly cover damage from ice dams and snow load if installed by certified contractors. These extended warranties often cost extra but provide peace of mind worth the investment. Keep in mind that using non-approved sealants or modifying the vent voids the warranty immediately, so follow installation instructions precisely.
Professional Installation vs. DIY in Snowy Regions
When to Call the Experts
While handy homeowners can install standard vent caps, snow country applications demand professional expertise for several scenarios. If your roof pitch exceeds 7:12, the safety risks of working on a snow-slick surface warrant hiring insured contractors. Complex roof designs with multiple intersecting planes require sophisticated flashing details that take years to master. Any installation involving electrical components like powered vents should be performed by licensed professionals to maintain code compliance and safety. Perhaps most importantly, manufacturers often require professional installation to honor warranties in snow load applications. The cost of professional installation—typically $200-$400 per vent—pales compared to the expense of water damage from a failed DIY installation. If you do tackle the project yourself, have your work inspected by a qualified roofer before the first snowfall.
Climate-Specific Considerations
Lake-Effect Snow Zones
Homes near the Great Lakes face unique challenges with lake-effect snow that falls as light, fluffy accumulations reaching depths of 200+ inches annually. This low-density snow actually poses less structural load risk but easily infiltrates vent openings. In these regions, prioritize vents with fine-mesh internal screens and wind deflectors that prevent snow from being blown directly into the attic. The constant freeze-thaw cycle near lake shores also demands premium sealants and corrosion-resistant fasteners, as moisture levels remain high throughout winter.
High Altitude Challenges
At elevations above 5,000 feet, the combination of increased UV exposure, extreme temperature swings, and high winds requires specialized vent caps. UV radiation degrades standard plastics in as little as three years, making metal or UV-stabilized composites essential. The thin air reduces convective cooling, so vents must be larger to achieve the same airflow as sea-level equivalents. High-altitude building codes often require enhanced wind ratings—look for vents tested to 170 mph wind uplift resistance. The intense sun at altitude also creates rapid daily freeze-thaw cycles, making flexible sealants and proper flashing more critical than in lower elevations with more stable temperatures.
Integrating Vent Caps with Whole-House Ventilation
Heat Recovery Ventilators (HRVs) and ERVs
In modern, air-sealed homes, roof vent caps work as part of a comprehensive ventilation strategy that includes HRVs or ERVs. These systems require dedicated exhaust vents that can handle continuous operation in winter without freezing shut. Choose vent caps with large-diameter openings (minimum 6 inches) that resist ice formation through constant air movement. The exhaust air from HRVs is humid, so the vent must have excellent condensation management to prevent internal icing. Install these vents on south-facing slopes when possible, where afternoon sun provides passive thawing. The synergy between mechanical ventilation and properly designed roof caps creates a system that maintains indoor air quality while protecting the building envelope from moisture damage.
Troubleshooting Winter Ventilation Problems
Signs Your Vent Caps Are Failing
Detecting vent cap failure mid-winter requires vigilance. Inside the attic, look for frost accumulation on the underside of the roof deck, particularly near vent locations—this indicates moist air isn’t escaping. Check for water stains on insulation directly beneath vents, suggesting snow infiltration. From outside, use binoculars to spot vents completely buried in ice while surrounding roof areas are clear, a sign of internal condensation freezing at the vent opening. Inexplicably high heating bills can indicate warm air is being drawn into a poorly ventilated attic. Musty odors in upstairs rooms signal moisture accumulation. If you notice any of these symptoms, address them immediately during the next thaw; waiting until spring allows damage to compound.
Frequently Asked Questions
How do I know if my current vent caps are suitable for heavy snow?
Check for a manufacturer’s snow load rating stamped on the housing or in the original documentation. If you can’t find this information, assume they’re inadequate. Suitable vents for snow country will have a peaked or curved design, be made of metal or heavy-duty plastic, and sit at least 4 inches above the roof plane. If your vents are flat-topped, made of thin plastic, or have frozen shut during past winters, they need replacement. A professional roof inspection can assess their condition and load-bearing capacity.
Can snow-resistant vent caps completely prevent ice dams?
No single component prevents ice dams—they result from multiple factors including insulation, air sealing, and ventilation. However, properly functioning snow-resistant vent caps are essential to any ice dam prevention strategy. They maintain the cold roof deck temperatures that stop snow melt at the source. Pair them with adequate insulation (minimum R-49 in snow country), air sealing of ceiling penetrations, and properly sized intake vents for a comprehensive solution. Even the best vent caps can’t overcome insufficient insulation or massive air leaks from the living space.
Should I cover my roof vents in winter to keep snow out?
Never cover attic ventilation exhaust vents in winter. This traps moisture and creates the exact conditions that cause ice dams and rot. Snow-resistant vents are specifically designed to handle snow infiltration while maintaining airflow. Covering them is like plugging your home’s lungs—counterproductive and dangerous. If you’re experiencing snow infiltration, the solution is upgrading to properly designed snow-resistant vents with baffles and screens, not blocking ventilation. The only exception is temporarily covering turbine vents that have seized, but only if you have alternative static vents providing adequate airflow.
How often should I inspect my roof vent caps in snowy climates?
Perform ground-level visual inspections monthly during winter, checking for ice buildup or snow burial. Conduct a thorough attic inspection twice per winter, looking for frost or moisture around vent openings. Schedule a comprehensive roof inspection every fall before snow season and every spring after melt to assess any damage. After any extreme weather event with heavy snow or ice, do a quick visual check as soon as it’s safe. Regular monitoring catches problems early when they’re inexpensive to fix.
What’s the ideal roof pitch for vent performance in snow country?
Moderate pitches between 4:12 and 7:12 offer the best balance for vent performance. Steeper pitches shed snow quickly but increase wind uplift forces requiring more robust vent fastening. Low slopes below 3:12 hold snow longer, requiring taller vent profiles to remain above the snowpack. If you have a very steep roof, install vents on the leeward side and consider wind deflectors. For low-slope applications, use raised curbs and static vents with minimum 8-inch standpipes to ensure they stay clear.
Do turbine vents work when covered in snow?
Turbine vents can function with light snow accumulation—the spinning action throws snow outward through centrifugal force. However, they fail when ice forms in the bearings or when heavy, wet snow packs into the turbine head. In regions with frequent freeze-thaw cycles, ice can seize the turbine completely. If you choose turbines, select models with sealed, permanently lubricated bearings rated for arctic conditions, and plan to manually clear them after ice storms. Many snow country homeowners prefer static vents for winter reliability and turbines for summer cooling, using removable caps to switch between systems.
How do I calculate how many vent caps my home needs for snowy climate ventilation?
Start with the 1:150 rule—one square foot of ventilation for every 150 square feet of attic floor space. Then increase capacity by 20% for snowy climates to account for partial snow blockage. Divide this total ventilation area equally between intake (soffit) and exhaust (roof) vents. Each standard static vent provides about 50 square inches of net free area, though this varies by model. For example, a 1,500 square foot attic needs 10 square feet total ventilation, or 5 square feet of exhaust. At 50 square inches per vent, that’s approximately 14-15 roof vents. Always check manufacturer specifications for exact net free area ratings.
Can I install snow-resistant vent caps myself, or should I hire a professional?
If you’re comfortable working on your roof and your pitch is 6:12 or less, DIY installation is feasible with proper safety equipment and attention to flashing details. However, professional installation ensures correct flashing for snow loads, proper sealant application, and warranty compliance. Many manufacturers require certified installation for snow load ratings to be valid. If your roof is steep, complex, or you’re installing more than two vents, the risk and complexity favor hiring a professional. The cost of fixing a leaking DIY installation far exceeds the savings.
What maintenance do snow-resistant vent caps require?
Fortunately, quality snow-resistant vents need minimal maintenance. Annually, clear debris from screens, check for loose fasteners, and inspect sealant condition. Every 3-5 years, apply a fresh bead of low-temperature sealant around the base as preventative maintenance. After severe hail or wind storms, check for physical damage. Keep nearby tree branches trimmed to prevent impact damage and leaf accumulation. Unlike standard vents, snow-resistant models shouldn’t need seasonal covering or removal. The main maintenance task is monitoring attic-side performance for signs of blockage or infiltration.
Will upgrading my vent caps lower my heating bills?
Properly functioning vent caps indirectly reduce heating costs by maintaining insulation effectiveness. Wet insulation from condensation can lose 40% of its R-value, forcing your heating system to work harder. By preventing moisture accumulation, good vent caps preserve insulation performance. They also prevent ice dams that can cause expensive water damage and heat loss. While the vents themselves don’t save energy directly, they protect the energy-saving components of your building envelope. Most homeowners see a 5-10% reduction in winter heating costs after upgrading a failing ventilation system, with the greatest savings in homes with previously moisture-compromised insulation.