Transforming your laundry room from a cluttered catch-all into a streamlined, efficient space often comes down to one critical decision: how to safely and securely stack your front-loading appliances. While the idea of gaining precious square footage is exciting, the hardware that makes it possible is anything but glamorous—yet it’s absolutely non-negotiable. Stack kit hardware packs are the unsung heroes of modern laundry design, and choosing the wrong one can lead to catastrophic appliance damage, voided warranties, or even dangerous accidents.
Whether you’re downsizing to a city apartment, optimizing a compact home, or simply reclaiming floor space for storage, understanding the nuances of stack kit hardware will save you time, money, and frustration. This comprehensive guide cuts through the marketing jargon and retailer upsells to give you the expert knowledge you need to make a confident, informed decision—without getting overwhelmed by technical specifications or brand-specific part numbers.
Top 10 Stack Kit Hardware Packs
Detailed Product Reviews
1. Bonost 2300 Pieces Hardware Assortment Kit - Metric & SAE Machine Screw Assortment Kit with Assorted Nuts, Bolts, and Washers (3 Trays)

Overview: The Bonost 2300-piece hardware kit delivers an extensive collection of SAE and metric fasteners in a three-tray organizer. With 21 SAE sizes, 22 metric variations, plus sheet metal and wood screws, it targets DIY enthusiasts and homeowners. Carbon steel construction with zinc coating ensures corrosion resistance for indoor and light outdoor use.
What Makes It Stand Out: This kit’s dual measurement coverage eliminates separate purchases. The upgraded stackable case features a fastener guide for quick identification, while individual packaging prevents transit mixing. Including Phillips, hex, and Torx drives adds versatility. The thoughtful organization system transforms a simple hardware collection into a workspace solution.
Value for Money: At $37.99, you’re paying roughly 1.6 cents per piece—dramatically cheaper than individual hardware store purchases. The zinc coating extends lifespan, reducing replacement frequency. For homeowners needing occasional repairs, this single investment eliminates multiple store trips. The included storage case adds another $10-15 value compared to buying organizers separately.
Strengths and Weaknesses: Pros: exceptional variety across measurement systems, organized compartmentalization, corrosion-resistant coating, and clear labeling. The stackable design saves valuable workspace. Cons: casual users may never utilize many sizes, the plastic case could crack under heavy impact, and thread consistency varies slightly across mass-produced assortments.
Bottom Line: An outstanding starter kit covering 95% of household fastening needs. While professionals might prefer higher-grade fasteners for critical applications, the organization, variety, and price make this ideal for new homeowners, renters, and hobbyists who value convenience and comprehensive coverage.
2. Haespot 2600 Piece Bolt and Nut Hardware Assortment Kit with Diverse Bolts, Screws, Washers & Nuts–DIY-Friendly, 3-Tier Storage for Home Projects

Overview: The Haespot kit ups the ante with 2,600 pieces across 64 hardware sizes, organized in a sophisticated three-tier system. It includes 800 SAE pieces, 1,050 metric fasteners, and 750 screws for wood and metal applications. The high-quality carbon steel undergoes environmentally-friendly trivalent electro-galvanizing and heat treatment for enhanced durability.
What Makes It Stand Out: The removable partition design prevents mixing while allowing custom compartment sizing. The groove-and-buckle stacking system creates a sturdy, portable workshop tower. This eco-conscious galvanizing process offers superior corrosion resistance without environmental concerns. The sheer size variety—64 options—ensures you’ll rarely need additional hardware store runs.
Value for Money: At $42.99 (1.65 cents per piece), it’s competitively priced against similar kits despite offering 300 more fasteners. The advanced case design alone justifies the modest premium. Heat-treated bolts withstand greater tensile forces, making this suitable for more demanding applications where failure isn’t an option.
Strengths and Weaknesses: Pros: largest assortment size, superior partition customization, eco-friendly coating, heat-treated strength, and robust stacking mechanism. The multi-layer design is genuinely innovative. Cons: higher price may deter casual users, overwhelming for simple projects, and the plastic construction, while sturdy, isn’t industrial-grade.
Bottom Line: Perfect for serious DIYers, property managers, or semi-professionals who need maximum variety and superior organization. The innovative case design and heat-treated fasteners make it worth the modest premium over basic kits. If you’ll use it monthly, this is your best value.
3. binifiMux Baby Bed Crib Screws Hardware Replacement Kit, 100pcs 1/4-20" Crib Hardware Screws Barrel Nuts Replacement Kit for Cot Chairs Furniture

Overview: This specialized kit provides 100 pieces of 1/4-20" furniture hardware specifically designed for crib and furniture repair. The set includes 50 bolts, 50 barrel nuts, a 4.0mm hex key wrench, and a storage box. Made from metal with Phillips drive nuts and hex drive bolts, it targets parents and furniture restorers dealing with stripped or missing fasteners on cribs, chairs, cabinets, and headboards.
What Makes It Stand Out: Unlike general assortments, this kit solves a specific, common problem with precise sizing. The included wrench ensures immediate installation without hunting for tools. The barrel nut design is crucial for furniture assembly where traditional nuts won’t fit. At 1/2" nut height, these accommodate standard furniture panel thicknesses perfectly.
Value for Money: At $11.99 for 100 pieces, you’re paying 12 cents per fastener—reasonable for specialized hardware. Buying these individually at hardware stores costs 25-40 cents each. For anyone repairing a single crib or chair, this kit costs less than one coffee and eliminates frustration from mismatched threads.
Strengths and Weaknesses: Pros: perfectly sized for furniture repair, includes essential wrench, compact storage, eliminates guesswork, and saves hardware store trips. The specific focus is its strength. Cons: extremely limited application range, no variety in sizes, and the quality, while adequate for furniture, isn’t suitable for structural loads.
Bottom Line: An essential purchase for parents, furniture restorers, or anyone assembling flat-pack furniture. This isn’t a general-purpose kit—it’s a problem-solver. Keep one in your toolbox; you’ll be surprised how often 1/4-20 barrel nuts are exactly what you need for wobbly chairs or loose headboards.
4. DEWALT Hog Ring Pliers Kit, Includes Pliers and 1000 Ring Pack (P7DW)
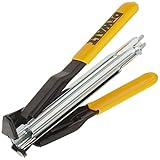
Overview: DEWALT’s professional-grade hog ring pliers kit includes spring-loaded magazine-fed pliers and 1,000 11/16-inch hog rings. Designed for upholstery, fencing, and wire mesh applications, these pliers feature case-hardened steel components and rubber grips. The automatic feed system enables one-handed operation, significantly boosting productivity for repetitive fastening tasks.
What Makes It Stand Out: The spring-loaded magazine feed is a game-changer, eliminating manual ring loading between each crimp. Case-hardened steel ensures the tool survives daily job site abuse. DEWALT’s reputation for durability backs the design. The one-hand operation frees your other hand to hold material, transforming a two-person job into solo work.
Value for Money: At $26.99, this professional tool costs less than two hours of labor. The 1,000 included rings ($15-20 value) make the pliers essentially $7-12. For contractors or serious DIYers doing upholstery or fencing, the time savings pays for itself in one project. The durability ensures years of reliable service.
Strengths and Weaknesses: Pros: automatic feed dramatically increases speed, case-hardened steel withstands professional use, ergonomic rubber grips reduce fatigue, and the included ring supply is generous. Cons: highly specialized tool with limited applications, occasional jamming with low-quality replacement rings, and the learning curve for loading the magazine.
Bottom Line: A must-have for upholstery professionals, fence installers, or serious hobbyists. Casual users should rent or borrow, but if you’re installing more than 50 rings annually, this tool’s efficiency justifies the investment. DEWALT quality ensures it won’t become a disposable tool.
5. Door Alignment Kit – Project Pack with Hinge Shims and Strike Plate Shims – Fix Sagging Doors, Latch Issues, and Misalignment Without Removing The Door (White, 3.5-Inch Kit)
Overview: This door alignment kit offers a simple solution for common door problems using PETG plastic shims. The pack includes stackable hinge shims (1mm, 2mm, 3mm) and strike plate shims (2mm, 3mm, 4mm) in white. Designed to fix sagging, latch misalignment, and rubbing without door removal, it targets homeowners battling seasonal settling or installation issues.
What Makes It Stand Out: The no-removal installation is revolutionary for DIYers intimidated by door hinge work. Stackable design allows precise incremental adjustments. PETG plastic resists cracking better than standard PVC and maintains shape under hinge pressure. The kit addresses both hinge and strike plate issues—common problems rarely solved together in one package.
Value for Money: At $6.99, this solves a $150+ service call for minor door adjustments. The ability to reuse shims during trial-and-error fitting adds value. Compared to makeshift cardboard or wood shims, these professional-looking inserts won’t compress or deteriorate. One successful fix pays for the kit ten times over.
Strengths and Weaknesses: Pros: incredibly easy installation, precise thickness options, durable PETG construction, solves two problems simultaneously, and costs less than lunch. Cons: limited to minor alignment issues, plastic may not match all door aesthetics, and extreme misalignment requires professional intervention beyond shim capabilities.
Bottom Line: Every homeowner should own this kit. Door sagging is inevitable, and this provides an instant, tool-free fix. While not suitable for major structural issues, it handles 90% of common door problems effortlessly. Keep it in your junk drawer—it’s cheaper than a service call and saves hours of frustration.
6. Door Alignment Kit – Project Pack with Hinge Shims and Strike Plate Shims – Fix Sagging Doors, Latch Issues, and Misalignment Without Removing The Door (White, 4-Inch Kit)
Overview: This door alignment kit offers a straightforward solution for homeowners battling sagging doors, misaligned latches, and frustrating fit issues. The package includes precision-engineered PETG plastic shims for both hinge plates and strike plates, allowing you to make incremental adjustments without the hassle of door removal. Designed for 4-inch hinges, the kit provides multiple thickness options to diagnose and correct common door problems that develop over time as houses settle.
What Makes It Stand Out: The semi-flexible PETG construction sets this kit apart from traditional cardboard or wood shims, delivering superior durability and shape retention under pressure. The stackable design enables fine-tuning through layered adjustments, while the availability in both white and black ensures aesthetic compatibility with most door hardware. Most impressively, the no-removal installation process transforms a two-person job into a simple solo project that takes minutes rather than hours.
Value for Money: At $6.99, this kit costs less than a fast-food meal while potentially saving hundreds in professional handyman fees. Individual shim packs at hardware stores typically run $3-5 each, making this comprehensive set an exceptional bargain. The reusable PETG material extends its value further, allowing repeated adjustments as your home continues to settle.
Strengths and Weaknesses: Strengths include the durable PETG construction that won’t compress or crumble, the comprehensive range of thicknesses for precise adjustment, and the ingenious no-removal installation design. Weaknesses involve the plastic material potentially lacking the rigidity of metal shims for severely heavy doors, and the fixed size options may not accommodate all hinge configurations.
Bottom Line: Perfect for DIY enthusiasts and rental property owners, this kit delivers professional-grade results with amateur-friendly simplicity. Keep one in your toolbox for quick fixes that restore door function and security.
7. MUSISALY 150pcs Stainless Steel Spring Split Cotter for Mechanical Hitch Weight Stack Kit

Overview: This extensive collection of 150 stainless steel cotter pins provides essential fastening security for mechanical assemblies, trailer hitches, weight stack machines, and various automotive applications. Despite a vague product description, the kit delivers versatile split-pin fasteners designed to prevent nut loosening and secure clevis pins. The stainless steel construction ensures reliable performance in both indoor equipment and outdoor environments where corrosion resistance matters.
What Makes It Stand Out: The sheer quantity alone distinguishes this kit, offering a lifetime supply for most DIYers and ample inventory for small repair shops. The stainless steel material provides superior rust prevention compared to standard zinc-plated pins, crucial for outdoor or high-humidity applications. While size specifications remain unclear in the listing, the “variety of sizes” mention suggests adaptability across multiple bolt diameters and equipment types.
Value for Money: At $16.29 for 150 pieces, each cotter pin costs approximately eleven cents—dramatically cheaper than hardware store prices that often exceed $0.50 per pin. This bulk pricing model delivers exceptional value for maintenance departments, farmers, and fitness equipment owners who regularly service weight stacks and hitch assemblies. The durability of stainless steel further enhances long-term value.
Strengths and Weaknesses: Strengths include excellent corrosion resistance, substantial quantity, and versatility across mechanical applications. The primary weakness is the severely lacking product description that fails to specify exact sizes, making it a gamble for buyers needing particular dimensions. Additionally, the kit may contain excessive quantities of uncommon sizes while skimping on popular ones.
Bottom Line: Ideal for experienced mechanics and maintenance professionals who can identify sizes by sight, this kit offers unbeatable bulk value. Novices should verify their required dimensions elsewhere before purchasing.
8. BangQiao 2 Pack Large Fixed 4 Grids Clear Plastic Organizer Sorting Tray for Hardware, Craft, Sewing Kit, Office Supplies, Small Parts

Overview: This twin-pack of clear plastic organizer trays brings order to chaotic collections of small parts across multiple settings. Each tray features four generously sized fixed compartments measuring 6.50" x 4.20" x 1.85", providing ample space for hardware, craft supplies, sewing notions, or office essentials. The transparent construction enables instant inventory assessment from any angle, while the open-top design facilitates quick retrieval during active projects.
What Makes It Stand Out: The intentionally lidless design represents a deliberate choice for accessibility rather than a cost-cutting measure, making these trays perfect for workbench and desktop organization where frequent access trumps dust protection. The clear PET plastic offers durability while maintaining visibility, and the rectangular shape with square corners maximizes storage density when arranged in drawers or shelves. The substantial compartment size accommodates bulky items that smaller organizers cannot.
Value for Money: At $14.99 for two trays, each compartment costs under $1.90—a competitive price point compared to adjustable drawer organizers that often cost twice as much. The multi-purpose design eliminates the need for separate storage systems across different hobbies, consolidating your investment into one versatile solution. Their durability ensures years of reuse across evolving organizational needs.
Strengths and Weaknesses: Strengths include excellent visibility, generous compartment dimensions, stable fixed-grid design that won’t shift, and versatile applications. Weaknesses involve the lack of lids allowing dust accumulation, non-adjustable compartments limiting customization, and plastic construction that may crack under heavy impact. The 2-inch height may not fit all drawer types.
Bottom Line: These trays excel in active workspaces where accessibility matters most. Perfect for craft rooms, garage workbenches, and office supply storage, though consider lidded alternatives for long-term archival needs.
9. Cisco Catalyst 3650 Stack Module Spare C3650-STACK-KIT

Overview: This genuine Cisco spare stacking module enables Catalyst 3650 series switches to operate as a single logical unit, providing redundancy and simplified management for enterprise networks. As an official Cisco spare part, it ensures seamless integration and maintains warranty compliance for critical infrastructure. The module facilitates high-speed communication between stacked switches, essential for businesses requiring maximum uptime and streamlined administration.
What Makes It Stand Out: Authenticity defines this product—being a genuine Cisco component guarantees compatibility and reliability that third-party alternatives cannot match. For IT departments managing warranty-sensitive environments, using official spares prevents compliance issues during support calls. The hot-swappable nature of these modules (typical for Catalyst series) allows replacement without network disruption, a crucial feature for 24/7 operations.
Value for Money: At $93.10, this spare commands a premium over unbranded alternatives, but enterprise networks demand Cisco-certified components. The cost pales compared to potential downtime from stacking failures or warranty disputes during critical outages. For organizations with Smart Net contracts, maintaining inventory of genuine spares accelerates mean-time-to-repair metrics.
Strengths and Weaknesses: Strengths include guaranteed Cisco compatibility, warranty preservation, and enterprise-grade reliability. The primary weakness is the minimal product description lacking technical specifications, forcing buyers to cross-reference Cisco documentation. The high cost relative to generic modules and single-unit packaging (versus multi-packs) may strain smaller IT budgets.
Bottom Line: Mandatory purchase for enterprise IT departments supporting Catalyst 3650 stacks. Small businesses should verify compatibility needs, while everyone should insist on genuine Cisco parts for production environments where support contracts apply.
10. Sign Standoff 1/2" x 3/4", Solid Aluminum Sign Standoff Screws Mounting Hardware for Glass Panel, Acrylic Panel,Pack of 4

Overview: These solid aluminum sign standoffs provide a sleek, professional mounting solution for displaying panels up to 1/2-inch thick. The four-pack includes all necessary hardware—screws, anchors, and rubber spacers—creating a floating effect for signs, artwork, or glass tabletops. Engineered for versatility, they accommodate various substrates including acrylic, wood, aluminum, and glass, making them ideal for both commercial signage and contemporary home displays.
What Makes It Stand Out: The complete hardware kit eliminates separate purchasing headaches, while the rubber spacers protect delicate panels from metal-on-glass contact. The solid aluminum body offers superior strength over hollow alternatives, and the brushed finish provides a professional appearance suitable for high-end installations. The clearly specified 22-pound load capacity (per standoff on concrete) enables confident engineering decisions for safety-critical applications.
Value for Money: At $9.99 for four units ($2.50 each), these standoffs cost significantly less than commercial signage suppliers who charge $5-10 per piece. The included mounting hardware adds another $3-5 in value, while the aluminum construction ensures longevity that plastic alternatives cannot match. For DIY installers, this represents professional-grade hardware at consumer pricing.
Strengths and Weaknesses: Strengths include durable solid aluminum construction, comprehensive hardware inclusion, protective rubber spacers, and clear load capacity specifications. Weaknesses involve drastically reduced weight limits on drywall versus concrete, the precise hole size requirement (between 1/3" and 1/2") limiting installation flexibility, and the four-piece count potentially insufficient for larger panels requiring more support points.
Bottom Line: Excellent choice for creating floating sign displays and mounting glass tabletops on sturdy substrates. Verify your wall type and panel weight before installation, and purchase additional packs for oversized projects requiring more than four mounting points.
What Exactly Are Stack Kit Hardware Packs?
Stack kit hardware packs are engineered mounting systems designed to create a secure, stable connection between two appliances—typically a front-load washer and dryer. Unlike basic brackets you might find at a hardware store, these specialized kits account for the unique stresses of laundry appliances: constant vibration, significant weight shifts, moisture exposure, and thermal expansion. They distribute loads across reinforced points, isolate vibration between units, and maintain precise alignment that prevents drum damage and premature bearing failure.
Think of them as the foundation of a house rather than just a few screws holding things together. Quality kits include multiple components: heavy-gauge steel brackets, vibration-dampening pads or bushings, specialized fasteners with thread-locking features, and often a slide-out shelf or drawer mechanism. The engineering behind these packs considers dynamic loads (the movement during spin cycles) rather than just static weight, which is why using improvised solutions or generic brackets voids warranties and creates safety hazards.
Why You Can’t Afford to Skip the Stack Kit
The temptation to “just stack them carefully” or use a few L-brackets from your garage is dangerously misguided. Modern front-load washers can spin at speeds exceeding 1,200 RPM, generating forces that can shift an unsecured dryer by inches per cycle. This movement compounds over time, stressing electrical connections, gas lines, and vent hoses. More critically, it creates a tipping hazard—an unsecured stack can topple forward when you open the dryer door, especially if the load is heavy with wet clothes.
Beyond physical safety, manufacturers explicitly require approved stack kits to maintain warranty coverage. If your washer’s drum bearings fail and a service technician discovers you used an unapproved stacking method, your $400 repair becomes an out-of-pocket expense. Insurance claims for water damage from a shifted appliance may also be denied if improper stacking contributed to the failure. The minimal investment in proper hardware protects thousands of dollars in appliances and prevents potentially catastrophic property damage.
Decoding the Different Types of Stack Kits
Universal vs. Manufacturer-Specific Kits
Manufacturer-specific kits are engineered for precise model compatibility, ensuring bolt patterns align perfectly with reinforced mounting points built into your appliances. They account for specific center-of-gravity calculations and vibration frequencies unique to each machine’s design. Universal kits offer broader compatibility across brands but require more careful measurement and often include adjustable brackets that can introduce weak points if not properly tightened.
While universal kits seem convenient for mixed-brand setups, they typically carry lower weight ratings and may not account for proprietary features like Samsung’s anti-vibration technology or LG’s TrueBalance systems. The trade-off is flexibility versus optimization—manufacturer-specific kits perform better but lock you into replacement constraints if one appliance fails.
Front-Load vs. Top-Load Considerations
Front-load configurations dominate the stack kit market because their door designs and weight distribution naturally accommodate vertical arrangements. Top-load washers present unique challenges: their lids require clearance space, and their higher centers of gravity make them unsuitable as base units in most stacking scenarios. However, specialized kits exist for stacking a compact dryer above a top-load washer, typically requiring a custom platform and reinforced lateral bracing.
If you’re attempting a top-load configuration, you’ll need kits with significantly higher weight capacity ratings and anti-tip brackets that anchor to wall studs. These setups also demand precise leveling and often professional installation to ensure the washer’s suspension system isn’t compromised by the added top weight.
Adjustable vs. Fixed-Height Designs
Adjustable stack kits include telescoping brackets or multiple mounting positions, allowing you to fine-tune the space between appliances. This flexibility proves invaluable when integrating older models with newer replacements or when you need extra clearance for thick venting hoses. However, adjustable designs introduce more potential failure points—each adjustment mechanism is a stress concentrator that can loosen over time.
Fixed-height kits offer superior rigidity and are generally recommended for matched appliance sets installed simultaneously. They use single-piece brackets with no moving parts, reducing maintenance requirements and eliminating the risk of gradual height creep caused by vibration. Your choice depends on whether you prioritize future flexibility or maximum stability.
Critical Compatibility Factors You Must Verify
Model Number Matching: Your First Step
Never rely on visual similarity or brand matching alone. The model number contains critical information about mounting point locations, weight distribution, and chassis reinforcement. Even within the same brand, a washer from 2018 may have different mounting geometry than a 2023 model due to design revisions. Locate the model number plate (typically inside the door frame or on the back panel) and cross-reference it with the stack kit’s compatibility list.
Manufacturers update compatibility databases quarterly, so check the most recent documentation on their official websites. Retailer listings often lag behind these updates, potentially selling you a kit that’s been retroactively decertified due to discovered issues. When in doubt, call the manufacturer’s technical support line with both appliance model numbers—they can confirm compatibility and often provide installation tips specific to your combination.
Weight Capacity Ratings Explained
Stack kits list two critical numbers: static load capacity and dynamic load capacity. Static capacity refers to the stationary weight the kit can support—essentially the dryer’s weight plus a safety margin. Dynamic capacity accounts for the additional forces generated during operation, particularly the washer’s spin cycle, which can multiply effective weight by 2-3 times momentarily.
A typical dryer weighs 125-150 pounds, but the dynamic forces during a high-speed spin can exceed 400 pounds of equivalent load. Quality kits specify both ratings clearly, with dynamic capacity being the more important figure. Be wary of kits that only list static capacity; this often indicates inadequate engineering for real-world conditions. Always calculate your total load using the heavier of your two appliances as the top unit, then add 25% for safety margin.
Dimensional Requirements and Clearances
Beyond weight, stack kits require specific minimum and maximum dimensions between appliances. The gap must accommodate venting hoses (typically 4-inch diameter), electrical cords, and gas lines without kinking or strain. Most kits require 1-2 inches of clearance between the washer’s top and the dryer’s bottom, but this varies significantly.
Measure your available vertical space from floor to ceiling, accounting for any bulkheads or cabinets. Remember that you’ll need access to shutoff valves and electrical outlets, which may be located behind the appliances. Some kits include recessed mounting brackets that allow appliances to sit closer to the wall, saving 2-3 inches of depth—critical in narrow laundry closets. Always verify that your chosen kit doesn’t position the dryer so high that you can’t comfortably reach the controls or door handle.
Key Features That Separate Good from Great
Vibration Dampening Technology
Premium stack kits incorporate multi-stage vibration isolation that goes beyond simple rubber pads. Look for kits featuring compression-molded elastomer bushings that absorb high-frequency vibrations while maintaining structural rigidity. Some advanced designs use tuned-mass dampers—small weighted components that oscillate out of phase with the washer’s vibrations, actively canceling resonance.
The placement of dampening material matters as much as the material itself. Kits that isolate both lateral and vertical vibration vectors perform significantly better than those focusing only on up-and-down movement. This becomes especially important if your laundry room sits above living spaces or near bedrooms, where transmitted vibration creates noise pollution throughout your home.
Material Quality and Durability
Hardware packs should use powder-coated or galvanized steel with minimum 14-gauge thickness for primary brackets. Thinner metal fatigues over time, especially at bend points where stress concentrates. Fasteners must be Grade 5 or higher bolts with nylon-insert lock nuts—never rely on standard hex nuts that can vibrate loose. Stainless steel hardware is worth the premium in humid environments or coastal areas where corrosion accelerates failure.
Examine the bracket design for reinforcement features: gusseted corners, rolled edges that increase stiffness without adding weight, and strategic cutouts that reduce material stress. Quality kits feel substantial when handled and show no flexing when you apply pressure to the brackets. Cheap kits often use spot-welded joints that can crack under cyclic loading; look for continuous welds or single-piece stamped construction.
Easy-Access Design Elements
The best stack kits consider maintenance access in their design. Features like hinged access panels for reaching plumbing connections, quick-release dryer mounting tabs for solo installation, and integrated cable management clips distinguish thoughtful engineering from basic functionality. Some kits include a slide-out work surface between appliances—a game-changer for folding clothes or treating stains without bending over.
Consider how you’ll service the appliances in the future. Can you disconnect the dryer without dismantling the entire stack? Are shutoff valves reachable? Kits that lock the dryer in place but allow it to pivot forward on a hinge provide the best compromise between security and accessibility. This design lets you tilt the dryer for vent cleaning or repairs while maintaining the stack’s structural integrity.
Installation Essentials: What to Know Before You Start
DIY vs. Professional Installation
While many stack kits advertise “easy DIY installation,” the reality depends on your skill level and the specific appliances. Matched sets from the same manufacturer with a manufacturer-specific kit often take 30-45 minutes for a competent DIYer. Mixed-brand combinations using universal kits, however, frequently require custom modifications and precise leveling that justify professional installation.
Consider professional help if: your appliances have significant weight differences (over 50 pounds), you’re working in a tight closet with limited access, gas lines need disconnection/reconnection, or your floor isn’t perfectly level. The cost ($150-$300) is minimal compared to the risk of dropping a dryer or creating a slow leak in a water line. Many retailers offer installation bundles that include haul-away of old appliances—a value that extends beyond just the stacking service.
Tools You’ll Need for Success
Beyond the basic screwdriver and wrench, successful installation requires a 24-inch level (minimum), a torque wrench for properly tensioning fasteners, and a stud finder if you’re adding anti-tip brackets. A furniture dolly or appliance glides are essential for positioning the washer without damaging floors. Consider renting an appliance lift for heavy dryers—trying to muscle a 150-pound machine onto a stack is how injuries and dents happen.
Keep a magnetic pickup tool handy for retrieving dropped fasteners in tight spaces. A telescoping inspection mirror helps you see mounting points behind appliances. For installations on uneven floors, a set of composite shims (never wood, which compresses over time) ensures stable weight distribution. Some kits require a drill for pilot holes; verify whether your specific model needs self-tapping screws or pre-threaded mounts.
Common Installation Pitfalls
The number one mistake is failing to level the washer completely before adding the dryer. Even a 1-degree tilt compounds when you add 150 pounds on top, creating uneven load distribution that destroys bearings. Use a four-foot level on both the front-to-back and side-to-side axes, adjusting legs until the bubble centers perfectly. Run a test spin cycle empty, then re-check level—it often shifts under load.
Another critical error is over-tightening fasteners. Stack kit bolts should be torqued to manufacturer specifications (usually 15-25 ft-lbs), not cranked until they won’t turn further. Over-tightening warps brackets and can crack appliance housings. Under-tightening, conversely, allows gradual loosening from vibration. Use a torque wrench, and after the first five laundry cycles, retorque all fasteners to account for initial settling.
Safety Standards and Certifications
Legitimate stack kits carry UL (Underwriters Laboratories) or ETL (Intertek) certification, indicating they’ve passed rigorous testing for structural integrity under dynamic loads. These certifications verify that the kit can withstand specified forces without deformation or fastener failure. Be suspicious of generic kits lacking these marks—they may use substandard materials or inadequate safety margins.
For gas dryer installations, the kit must comply with NFPA 54 (National Fuel Gas Code) regarding appliance securing and clearance. This includes maintaining proper vent alignment to prevent gas buildup and ensuring the stack cannot shift in a way that stresses gas line connections. In multi-family dwellings, building codes may require seismic restraints that go beyond standard stack kits, typically involving steel strapping anchored to wall studs.
The True Cost of Stack Kit Hardware
Budgeting Beyond the Initial Purchase
The sticker price of a stack kit ($30-$150) represents only a fraction of the total investment. Factor in potential delivery fees ($10-$25), installation tools you may need to purchase ($40-$100), and professional installation if required ($150-$300). Some kits require additional accessories like anti-tip brackets ($15-$30) or vibration pads ($20-$40) that aren’t included in the base package.
Consider the long-term cost implications of choosing a cheaper kit. A $30 universal kit might save money initially, but if it leads to premature appliance failure or requires replacement in two years, you’ve lost any savings. Premium kits ($100-$150) often include 10-year warranties and are built from materials that outlast the appliances themselves. Calculate cost-per-year over your expected appliance lifespan (10-15 years) rather than focusing on upfront expense.
Warranty Implications
Using an unapproved stack kit instantly voids most appliance warranties. Manufacturers maintain approved kit lists for a reason—their actuarial data shows clear correlations between improper stacking and specific failure modes. Some brands extend warranty coverage when you use their branded stack kit and have it professionally installed, viewing this as risk mitigation.
Read the fine print: some warranties require registration of the stack kit installation within 30 days, including uploading photos of the installed configuration. Keep all documentation, including receipts and model numbers, in a dedicated folder. If you move and take the appliances, the stack kit warranty may not transfer, requiring purchase of a new kit for insurance purposes even if the hardware is still functional.
Maintenance and Longevity Best Practices
Inspect your stack kit quarterly, checking for loose fasteners, rust formation, or deformation of brackets. Pay special attention to vibration dampeners, which can harden or crack over time, losing their effectiveness. A simple test: run the washer’s spin cycle and place a hand on the dryer—excessive vibration indicates deteriorated isolation.
Clean around the mounting points during routine appliance maintenance. Lint accumulation can trap moisture against metal surfaces, accelerating corrosion. If you notice any movement between the appliances when you gently push the dryer, stop using the stack immediately and retorque all connections. Keep a maintenance log with dates and observations—this documentation proves invaluable for warranty claims or when diagnosing appliance issues.
Troubleshooting Common Stack Kit Issues
Excessive noise often stems from metal-on-metal contact where vibration isolation has failed. Check that all rubber gaskets and bushings are intact and properly positioned. If the dryer shifts during cycles, verify that the floor is level and that the washer’s feet are locked in place—many have locking nuts that can loosen. Persistent wobbling despite proper installation usually indicates an incompatibility issue; the kit may not be rated for your appliance’s specific vibration profile.
If you notice the dryer door becoming harder to close, the stack may be settling unevenly, causing frame distortion. Measure the gap between appliances at all four corners—differences greater than 1/8-inch require immediate attention. For gas dryers, any smell of gas requires immediate shutdown and professional inspection; even slight shifts can stress connection points.
Space Optimization Strategies
Stack kits enable creative laundry room layouts beyond simple floor space savings. Consider raising the entire stack on a reinforced platform with storage drawers underneath, bringing the dryer to a more ergonomic height. Some platforms integrate the stack kit mounting points, creating a unified system that adds functionality while maintaining safety.
In closets, pair your stack kit with sliding or bi-fold doors that don’t encroach on the appliances’ depth. Measure door swing carefully—dryer doors typically need 21-24 inches of clearance. Consider the “reach factor”: can you comfortably access the top appliance’s controls and door? If not, look for kits with integrated step stools or plan to install a fold-down step platform on the side wall.
Alternative Solutions When Stacking Isn’t Ideal
Sometimes stacking creates more problems than it solves. If your washer vibrates excessively despite proper leveling, or if ceiling height makes the dryer unreachable, consider side-by-side configurations with a countertop above. This arrangement provides a large folding surface and keeps controls accessible while still saving space through vertical storage above the appliances.
For extremely tight spaces, all-in-one washer-dryer combos eliminate stacking entirely, though they have capacity and performance trade-offs. Another option: wall-mounted drying cabinets that pair with a single washer, using no floor space for the dryer. These alternatives require different hardware considerations but solve the same space constraints that drive stacking decisions.
Future Innovations in Laundry Stacking Technology
The next generation of stack kits integrates smart sensors that monitor vibration, alignment, and load balance in real-time, sending alerts to your phone if issues develop. Prototypes exist for motorized alignment systems that automatically adjust for uneven loads, potentially eliminating the need for perfect manual leveling. Materials science advances are producing carbon-fiber reinforced brackets that are stronger and lighter than steel, reducing shipping costs and installation difficulty.
Modular designs are emerging that allow you to add components like folding shelves or storage modules that lock into the stack kit framework, creating integrated laundry furniture rather than just a mounting system. As appliances become more connected, expect stack kits with NFC chips that automatically register installation with manufacturers and download optimized vibration profiles for specific wash cycles.
Frequently Asked Questions
1. Can I stack any front-load washer and dryer together? No—compatibility depends on specific model numbers, weight ratios, and mounting point configurations. Even within the same brand, different model years may have incompatible dimensions. Always verify with manufacturer compatibility tools before purchasing any stack kit.
2. How much weight can a typical stack kit support? Quality kits support 350-500 pounds dynamic load, which covers most residential dryers. However, you must calculate based on your dryer’s weight plus a 25% safety margin. Commercial-grade kits rated for 600+ pounds are available for heavy-duty appliances.
3. Will stacking my appliances make them louder? Properly installed stack kits with good vibration isolation actually reduce noise transmission compared to side-by-side installations. The key is quality dampening materials and perfect leveling. Poor kits or improper installation will amplify vibrations and create rattling.
4. Can I install a stack kit by myself? While possible for lightweight dryers (under 100 pounds) with manufacturer-specific kits, most installations require two people due to the weight and precision needed. Attempting solo installation risks injury and appliance damage. At minimum, use an appliance lift or seek help for the lifting portion.
5. Do stack kits work with ventless dryers? Yes, ventless (heat pump) dryers often work better in stacks because they’re lighter and produce less vibration. However, ensure the kit provides adequate clearance for air intake and exhaust ports, which are typically located on the dryer’s front or sides rather than the back.
6. How often should I check my stack kit’s tightness? Inspect fasteners after the first five wash cycles, then quarterly thereafter. The initial settling period often causes slight loosening. After the first year, semi-annual checks are sufficient unless you notice performance changes or move the appliances.
7. Can I use a stack kit on a second-floor laundry room? Absolutely, but invest in premium vibration isolation. Second-floor installations transmit more vibration to living spaces. Consider adding anti-vibration pads beneath the washer in addition to the stack kit’s built-in dampening, and verify your floor joists can support the concentrated load.
8. What if my appliances are different brands? Universal kits can bridge different brands, but success depends on dimensional compatibility and weight ratios. The heavier appliance must always be on bottom. Contact both manufacturers to confirm they don’t prohibit cross-brand stacking, which can affect warranties.
9. Do stack kits need replacement when I buy new appliances? Usually yes, unless you’re buying an identical replacement model. Mounting points and weight distributions change between models. However, some premium kits are designed for compatibility across entire product lines—check the kit’s documentation for “future-proofing” claims.
10. Are there building code requirements for stacking appliances? Most residential codes don’t specifically address stack kits but require anti-tip devices for appliances over 48 inches tall. In seismic zones, additional strapping to wall studs is mandatory. Multi-family buildings often have stricter rules—check with your property manager or local building department before installation.