If your electricity bill has been creeping upward despite owning one of the most energy-efficient appliances on the market, your heat-pump dryer might be crying out for attention. These marvels of modern engineering can use up to 50% less energy than conventional vented dryers—but only when they’re properly maintained. Neglect the routine care they demand, and that premium efficiency rating quickly becomes just another sticker on the door.
The relationship between maintenance and kilowatt-hour savings isn’t just incremental; it’s exponential. A well-maintained heat-pump dryer doesn’t just perform better—it fundamentally transforms how your household consumes energy. This guide dives deep into the mechanical heart of these machines, revealing exactly how each maintenance task directly impacts your energy consumption and giving you a battle-tested roadmap to maximize every watt of savings.
Top 10 Heat-Pump Dryers for Peak kWh Savings
Detailed Product Reviews
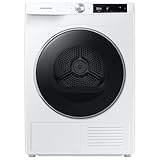
1. Samsung 4.0 Cu Ft Heat Pump Dryer, Compact Clothes Drying Machine, Stackable for Small Spaces w/Sensor Dry, 12 Preset Cycles, 40 Minute Express Dry, DV25B6900HW/A2, White
Overview:
The Samsung DV25B6900HW/A2 brings heat pump efficiency to compact living spaces. This 4.0 cubic foot ventless dryer uses refrigerant-based heating to recycle air, cutting energy consumption by up to 50% compared to conventional models. Designed for apartments and small homes, its stackable configuration pairs perfectly with matching washers. The Sensor Dry system continuously monitors moisture levels, automatically adjusting time and temperature to prevent over-drying and heat damage.
What Makes It Stand Out:
The 40-minute Express Cycle delivers dry clothes in record time for small 2-pound loads—perfect for refreshing a work outfit or gym clothes. Smart Care diagnostics integrate with your smartphone for instant troubleshooting, potentially saving hundreds in service calls. The 12 preset cycles cover everything from heavy-duty towels to delicate lingerie, while the heat pump technology operates at lower temperatures, significantly extending garment lifespan.
Value for Money:
At $1,169, this dryer commands a premium over traditional vented models but pays dividends through energy savings. Heat pump dryers typically cost $100-200 more upfront but reduce electricity bills by $50-100 annually. For eco-conscious consumers or those without venting options, it’s competitively priced against similar compact heat pump models.
Strengths and Weaknesses:
Pros include outstanding energy efficiency, gentle fabric care, quiet 62dB operation, space-saving design, and genuinely useful smart features. The stainless steel drum resists odors and static. Cons include limited capacity for families, longer cycle times for full loads, mandatory condensation tank emptying, and the express cycle’s 2-pound restriction. Ventless installation requires planning.
Bottom Line:
Ideal for singles, couples, or small families in apartments, this Samsung delivers premium efficiency and fabric protection. If you prioritize energy savings and gentle care over raw capacity and speed, it’s a worthwhile investment that justifies its price through utility savings and garment longevity.
2. Summit 3.88 cu.ft. Heat Pump Dryer, ENERGY STAR Certified, 208-240V, Slim 24” Width, White - SLD242W

Overview:
The Summit SLD242W packs 3.88 cubic feet of capacity into a slender 24-inch frame, making it a space-efficient heat pump solution for tight laundry rooms. This ENERGY STAR certified dryer handles up to 17.6 pounds per load in its durable stainless steel drum. Operating on 208-240V power, it uses advanced heat pump technology to achieve remarkable efficiency while offering 14 specialized drying programs for everything from woolens to activewear.
What Makes It Stand Out:
The unique start/stop pause function lets you add or remove items mid-cycle—a practical feature rarely found in dryers. ECOEYE technology displays real-time energy consumption, empowering users to make environmentally conscious decisions. The anti-crease and half-load functions demonstrate thoughtful engineering, while the 1400 RPM maximum speed ensures efficient moisture extraction. A pull-out condensation tank simplifies maintenance.
Value for Money:
Priced at $1,138.04, it undercuts major brands while delivering more cycle options and comparable efficiency. The stainless steel drum adds durability value, and ENERGY STAR certification guarantees ongoing utility savings. Compared to conventional compact dryers, the 30-40% energy reduction pays back the premium within 2-3 years for average users.
Strengths and Weaknesses:
Pros include exceptional cycle variety, durable construction, user-pause functionality, excellent energy efficiency, and competitive pricing. The ECOEYE feature promotes mindful usage. Cons require emptying the condensation tank every two cycles, limited brand recognition, potentially confusing interface for non-tech-savvy users, and longer drying times than vented alternatives. The 24-inch width may still prove too deep for some truly tiny spaces.
Bottom Line:
Perfect for environmentally aware users wanting maximum control without premium brand pricing. If you value innovative features like mid-cycle access and energy monitoring over mainstream badge appeal, the Summit SLD242W delivers outstanding functionality and efficiency at a compelling price point.
Why Heat-Pump Dryer Maintenance Directly Impacts Your kWh Consumption
Every component in a heat-pump dryer operates within a delicate balance. When lint clogs a filter or calcium builds up on the heat exchanger, the system compensates by running longer cycles and working harder—translating directly into higher kWh consumption. A clean, well-calibrated machine achieves target moisture levels in 45 minutes; a neglected one might take 90 minutes for the same load, effectively doubling your energy use per cycle. The difference isn’t theoretical—it shows up on your smart meter in real-time.
Understanding the Closed-Loop System: Your Efficiency Foundation
The Refrigeration Cycle Explained
Heat-pump dryers recycle air in a sealed system, using refrigerant to extract moisture and reheating the same air repeatedly. This closed-loop design is what makes them extraordinarily efficient. The evaporator coils pull moisture from laundry, the condenser reheats the dry air, and a compressor drives the entire process. When any part of this cycle becomes compromised by debris or wear, the compressor runs longer and the heating elements overcompensate—destroying the precise energy balance that makes these appliances worth the investment.
Why Conventional Dryer Wisdom Doesn’t Apply
Unlike vented dryers that blast moisture outside and waste heated air, heat-pump models preserve every degree of temperature. You can’t apply the same maintenance logic. Cleaning a vent hose matters little here; instead, your focus must shift to internal airflow pathways, refrigerant efficiency, and sensor accuracy. Misunderstanding this fundamental difference leads to 90% of efficiency losses in household settings.
The Hidden Energy Costs of Neglected Maintenance
A clogged lint filter alone can increase cycle time by 15-20 minutes, adding approximately 0.4 kWh per load. For a family running 300 loads annually, that’s an extra 120 kWh—roughly $18-30 depending on your electricity rates. Scale that across a decade, and you’re looking at $180-300 in wasted energy from a single overlooked component. Add a dirty heat exchanger, miscalibrated moisture sensors, and restricted airflow, and your “efficient” dryer can consume more power than a conventional model.
Daily Habits That Slash kWh Consumption Without Tools
Perfect Your Loading Technique
Stop overloading. Heat-pump dryers rely on tumbling action to expose all fabric surfaces to warm air. When you cram 15 pounds of laundry into a 10-pound capacity drum, you create cold, damp pockets that trick moisture sensors into extending cycles. The sweet spot is filling the drum to 75% capacity—enough for economical batches but loose enough for proper airflow. This single habit can reduce cycle time by 10-15%.
Maximize Your Washing Machine’s Spin Cycle
Every additional 100 RPM on your washing machine’s spin cycle removes approximately 1% more moisture. That translates to 3-5 minutes shaved off drying time. Set your washer to its highest spin speed appropriate for the fabric type. The mechanical energy from spinning costs a fraction of what thermal energy costs, making this a brilliant energy arbitrage that most households ignore.
Remove Laundry Immediately
Letting clothes sit in the drum after the cycle ends creates a microclimate of residual moisture. When you finally empty it hours later, the next load faces a damp environment, forcing the dryer to work harder to establish optimal conditions. Make it a rule: empty within 5 minutes. The internal sensors reset faster, and the subsequent cycle starts from a true baseline.
Weekly Maintenance: The Five-Minute Efficiency Ritual
Lint Filter Deep-Clean (Not Just Emptying)
Pull the filter after every load, but once a week, wash it under hot running water with a soft brush. Fabric softener residue creates an invisible film that traps fine lint and restricts airflow. Hold it to the light—you should see through the mesh clearly. If it looks cloudy, it’s costing you kWh. Let it air-dry completely before reinserting; a damp filter breeds mold that contaminates sensors.
Door Seal Inspection Wipe
The rubber gasket around the door collects lint, hair, and debris that break the airtight seal. Run a damp microfiber cloth around the entire perimeter weekly. A compromised seal allows humid air to escape, forcing the system to replenish heat and maintain pressure. This invisible leak can increase energy use by 5-8% over a month.
Drum Wipe-Down
Run a dry microfiber cloth around the drum interior to collect stray lint and fibers. Pay special attention to the back wall where sensors reside. A buildup here insulates sensors, making them less responsive to actual moisture levels. The result? Extended dry times and wasted kilowatt-hours.
Monthly Deep-Cleaning: Restoring Factory Efficiency
Heat Exchanger Cleaning Protocol
The heat exchanger is your machine’s engine. Access it (usually behind a bottom panel) and remove the caked-on lint and dust. Use a soft brush attachment on your vacuum cleaner first, then rinse with lukewarm water if manufacturer instructions allow. Never use harsh chemicals or high-pressure water—they damage the delicate aluminum fins. A clean exchanger can improve heat transfer efficiency by 30-40%, directly reducing compressor runtime.
Moisture Sensor Bar Maintenance
Those two metal strips inside the drum are conductivity sensors that measure dampness. Wipe them monthly with white vinegar on a cotton swab to remove fabric softener and detergent residue. When these sensors can’t accurately read moisture, they default to maximum cycle times as a safety measure. Proper cleaning can reduce over-drying by 10-15 minutes per cycle.
Condensate Pump and Reservoir Check
If your model has a removable reservoir, clean it with a mixture of water and distilled white vinegar to prevent bacterial growth and mineral scaling. For plumbed models, check the drain hose for kinks and ensure the pump filter is clear. A sluggish pump forces the drying cycle to pause longer between phases, increasing total runtime.
Quarterly Maintenance: The 30-Minute Efficiency Overhaul
Full Condenser Unit Deep Clean
Remove the condenser unit (usually a twist-out component) and flush it thoroughly with warm water from the backside out. This reverses the normal airflow and dislodges deep-set lint that weekly cleaning misses. Let it dry completely in a well-ventilated area for 24 hours. A quarterly clean prevents the 15-20% efficiency drop that occurs when internal passages become restricted.
Air Intake and Exhaust Grille Vacuum
The external grilles on your dryer’s front and back need quarterly attention. Use a vacuum with a crevice tool to remove dust and pet hair that restrict fresh air intake and warm air exhaust. Restricted airflow makes the compressor work harder to maintain pressure differentials, increasing energy draw by 0.2-0.3 kWh per load.
Leveling and Stability Check
An unlevel dryer causes uneven tumbling and pooling of condensate in the wrong chambers. Place a spirit level on top—both side-to-side and front-to-back. Adjust the feet with a wrench until perfectly level. This simple check prevents strain on the motor and ensures optimal contact between laundry and airflow, cutting cycle times by 5-7%.
Annual Professional Servicing: The Non-Negotiable kWh Investment
What a Technician Actually Does
A qualified technician performs tasks you simply can’t: refrigerant pressure testing, compressor efficiency analysis, and deep sensor calibration. They’ll measure the superheat and subcooling values to ensure the refrigerant charge is optimal. Even a 10% refrigerant loss—undetectable in daily operation—can increase energy consumption by 25%. The $100-150 service cost pays for itself in 12-18 months through direct kWh savings.
Sealed System Integrity Check
Micro-leaks in the refrigerant lines develop over time. Technicians use electronic leak detectors to find them before they become critical. They also check the compressor’s amp draw against manufacturer specs. A compressor drawing even 1 amp over specification signals impending failure and massive energy waste. Catching this early prevents a $400-600 repair and months of inflated bills.
Deep Internal Cleaning and Lubrication
Technicians disassemble access panels you shouldn’t touch, vacuum internal electronics, and lubricate motor bearings. This prevents friction losses and ensures all components operate at designed specifications. The cumulative effect of these micro-optimizations often restores 8-12% of lost efficiency.
Filter Maintenance: Your First Line of Defense
The Multi-Filter Reality
Most owners don’t realize their heat-pump dryer has 2-3 distinct filters: a lint filter, a coarse filter, and sometimes a fine-mesh filter before the heat exchanger. Each serves a specific purpose. The lint filter captures large fibers, but the fine-mesh filter protects the heat exchanger from micro-particles. Neglecting the secondary filters is like changing your car’s oil but never the air filter.
Cleaning vs. Replacement Indicators
Hold filters up to a 100-watt bulb. If light doesn’t pass uniformly, cleaning won’t restore full airflow—it’s time for replacement. Most filters last 2-3 years with proper care, but pet owners might need annual replacement. A new filter costs $15-30 but saves that amount in electricity within 6-8 months when the old one is clogged.
Heat Exchanger Care: The Heart of Heat Transfer
Accessing Without Voiding Warranty
Check your manual for the approved access method. Most models have a release latch or twist panel. Never force access or use tools not specified by the manufacturer. Document the process with photos as you disassemble—this ensures proper reassembly and maintains warranty coverage. A single misaligned seal post-cleaning can leak warm air and cost more kWh than a dirty exchanger.
Chemical-Free Cleaning Philosophy
Never use descaling agents, bleach, or abrasive cleaners on aluminum heat exchanger fins. These chemicals cause micro-corrosion that reduces surface area permanently. Lukewarm water and gentle brushing are sufficient. For mineral buildup in hard water areas, a 50/50 mix of water and white vinegar applied with a spray bottle and immediately rinsed is the only safe chemical intervention.
Condenser Unit Cleaning: Preventing the Invisible Energy Drain
The Backflush Technique
The condenser’s internal structure is designed for one-way airflow. Cleaning from the “wrong” direction (backflush) dislodges compacted lint that forward-flow cleaning can’t reach. Remove the unit, seal one end with a plastic bag and rubber band, fill with warm water, shake vigorously, then drain. Repeat until water runs clear. This method removes 40% more debris than simple rinsing.
Drying Time: The Critical Waiting Period
Reinstalling even a slightly damp condenser introduces moisture into a system designed to be dry. This forces the dryer to waste energy evaporating residual water for the first 10-15 minutes of the next cycle. Always allow 24 hours of air-drying in a warm, dry location. Place it near a dehumidifier if you’re in a humid climate.
Drum and Interior Cleaning: Beyond Visible Lint
Residue Buildup from Modern Detergents
HE detergents and fabric softeners leave polymer residues that attract lint and insulate sensors. Monthly, run an empty cycle with a specialized drum-cleaning solution or 2 cups of white vinegar in the reservoir. This breaks down residue without damaging stainless steel or plastic components. The first load after cleaning will show 5-10% faster drying times.
Sensor Window Clarity
The small glass window covering optical sensors (if present) must remain crystal clear. A film of dryer sheet residue diffuses the infrared beam, causing false moisture readings. Clean with isopropyl alcohol and a lint-free cloth monthly. This 30-second task prevents the dryer from adding an unnecessary 10-minute “safety dry” phase.
Ventilation and Airflow Optimization
Room Ventilation Requirements
Heat-pump dryers don’t vent outdoors, but they do need fresh air intake. Operating in a closet without ventilation forces the dryer to reprocess the same humid air, dramatically reducing efficiency. Ensure at least 3 square feet of passive air exchange in the room. A louvered door or vent grille is ideal. In tight spaces, a small, energy-efficient room fan on low setting can improve dryer efficiency by 10-12%.
Clearance Specifications
Maintain minimum 1-inch clearance on all sides and 4 inches behind the unit. This isn’t arbitrary—restricted airflow increases intake temperature, reducing the temperature differential the heat pump needs to operate efficiently. A dryer pushed against the wall can consume an extra 0.15 kWh per load due to thermal short-cycling.
Smart Sensor Maintenance: The Brain Behind Savings
Moisture Sensor Calibration Check
Every 6 months, run a test load of 3-4 identical cotton towels weighing exactly 5 pounds dry. Time the cycle. If it takes more than 10% longer than the manufacturer’s specified time for that load, your sensors are miscalibrated. Some models allow user recalibration through a button sequence; others require technician intervention. Uncalibrated sensors are the #1 cause of wasted kWh in otherwise clean dryers.
Temperature Sensor Accuracy
The thermistors monitoring air temperature can drift by 2-3°F over time. This seems negligible, but heat-pump efficiency is highly temperature-sensitive. A 2°F error can shift the operating point enough to increase cycle time by 7-8%. Technicians can test and recalibrate these sensors during annual service, restoring the precise thermal profile needed for peak efficiency.
Troubleshooting Common Efficiency Killers
The “Damp Clothes Despite Long Cycle” Problem
This classic symptom signals either a clogged heat exchanger or failing moisture sensors. First, clean the exchanger thoroughly. If the problem persists, test sensor calibration. Each additional 10 minutes of unnecessary drying adds 0.3 kWh to your bill. Over a year, that’s 45 kWh wasted on just one inefficient cycle per week.
Unusual Noise and Vibration
A grinding noise often indicates the blower fan is hitting lint buildup. A high-pitched whine suggests motor bearings need lubrication. Both conditions force the motor to draw more current—sometimes 20-30% more—directly increasing kWh consumption. Address mechanical noises within a week of first hearing them to prevent cascading efficiency losses.
Error Codes and Energy Waste
“F1,” “E3,” or similar codes often indicate sensor faults that trigger default maximum-energy modes. The dryer runs extra-long cycles to guarantee dryness regardless of actual conditions. Look up the code in your manual and address the root cause immediately. Running in error mode can triple energy consumption per load.
Seasonal Adjustments for Year-Round kWh Optimization
Summer Humidity Strategies
In high-humidity months, the evaporator works harder to condense moisture from already-saturated air. Pre-dry laundry in a room with air conditioning or a dehumidifier set to 50% relative humidity. This simple step reduces drying time by 15-20 minutes in July and August, saving 8-10 kWh monthly during peak cooling season when electricity rates are often highest.
Winter Cold-Air Intake Management
In winter, cold air entering the room lowers the dryer’s intake temperature, forcing the heat pump to work harder to reach operating temperature. If your dryer is in a cold basement, consider insulating the room or using a small space heater to maintain 65°F. The heater uses less energy than the dryer’s compressor would waste compensating for 50°F intake air.
The ROI of Proper Maintenance: Dollars and kWh
Calculating Your Personal Savings
Track your dryer’s kWh consumption for one month using a smart plug. Perform a full maintenance routine, then track the next month under similar usage conditions. Most households see a 20-35% reduction in consumption. At $0.15/kWh, that’s $45-75 annually for a typical family. The 2-3 hours spent on maintenance per year yields an hourly “wage” of $15-25 in saved electricity—tax-free.
Total Cost of Ownership Comparison
A neglected heat-pump dryer has a 10-year operating cost of $1,800-2,200 in electricity. A meticulously maintained unit costs $900-1,100 over the same period. The $700-1,100 difference exceeds the original purchase price premium over conventional dryers. Maintenance doesn’t just preserve efficiency; it fundamentally changes the financial equation of ownership.
Creating Your Personalized Maintenance Schedule
The Calendar Method
Create recurring digital calendar events: “Weekly Filter Clean” every Sunday evening, “Monthly Deep Clean” on the first Saturday, “Quarterly Overhaul” at season changes, and “Annual Service” 11 months from purchase date. Set alerts 2 days before to gather supplies. Consistency beats intensity—a 5-minute weekly clean prevents the need for a 2-hour emergency deep clean.
Tracking and Documentation
Keep a simple log: date, maintenance performed, cycle time for a standard load, and monthly kWh consumption. This data reveals patterns. If cycle times creep up despite maintenance, you know it’s time for professional service. Documentation also proves maintenance for warranty claims, protecting your investment.
Frequently Asked Questions
How much can I realistically save on my electric bill with proper heat-pump dryer maintenance?
Most households save 150-250 kWh annually, translating to $22-50 depending on local rates. Families doing 400+ loads per year often save 300+ kWh. The savings compound over the dryer’s lifespan, often exceeding $1,000 in total.
Can I use vinegar to clean all internal components?
White vinegar is safe for plastic reservoirs, sensor bars, and drum cleaning. Never use it on aluminum heat exchangers more concentrated than a 50/50 water mix, and never let it sit. Avoid vinegar on rubber seals more than monthly—it can accelerate aging.
Why does my heat-pump dryer take longer in winter even when clean?
Cold intake air reduces the heat pump’s coefficient of performance (COP). The system must work harder to achieve the same temperature lift. Maintaining a 65-70°F room temperature and ensuring 4 inches of clearance behind the unit helps mitigate this seasonal efficiency loss.
How do I know if my moisture sensors are failing versus just dirty?
Clean them thoroughly with vinegar first. If a test load of identical towels still takes 15%+ longer than spec, the sensors have likely lost calibration or conductivity. A technician can test resistance values—if they’re outside 5% of factory specs, replacement is necessary.
Is professional servicing really necessary if I’m diligent with DIY maintenance?
Yes. DIY care can’t address refrigerant charge, compressor efficiency, or internal sensor drift. Professional service restores the sealed system’s optimal operating parameters. Skipping annual service is like never changing your car’s transmission fluid—it runs until it doesn’t, then costs far more to fix.
Can I run my heat-pump dryer in a closed closet?
Only if the closet has active ventilation (louvered door or dedicated vent). Without air exchange, the dryer recirculates humid air, reducing efficiency by 30-40% and potentially causing mold. Minimum 3 square feet of passive ventilation is required for optimal kWh performance.
What’s the #1 maintenance mistake that kills efficiency?
Never backflushing or deep-cleaning the condenser unit. Surface cleaning removes visible lint, but compacted buildup in internal channels restricts airflow invisibly. This single oversight accounts for more efficiency loss than all other neglect combined after the first year of use.
How does hard water affect my heat-pump dryer?
Hard water minerals deposit on the heat exchanger and in the condensate system, acting as insulation. In hard water areas (>7 grains/gallon), use a water softener or add a teaspoon of citric acid to the reservoir monthly during a cleaning cycle. This prevents the 10-15% efficiency loss from scale buildup.
Should I leave the door open between loads?
Yes, for 15-20 minutes. This allows residual moisture to evaporate and sensors to reset properly. However, don’t leave it open indefinitely in damp basements—ambient humidity can corrode internal components. A brief airing period optimizes the next cycle’s starting conditions.
Can over-cleaning damage my dryer or reduce efficiency?
Improper cleaning techniques cause damage—harsh chemicals, high-pressure water, or aggressive brushing on delicate components. However, cleaning too frequently with correct methods only helps. The risk isn’t frequency; it’s using the wrong tools or chemicals that degrade surfaces and sensors.