Whether you’re rebuilding a classic lathe in your garage or maintaining industrial equipment in your small shop, nothing derails a project faster than mysterious vibrations, screaming bearings, or couplings that fail months too soon. Nine times out of ten, the culprit is misalignment—and it’s entirely preventable with the right tools and know-how. For DIY technicians, mastering motor and drum alignment isn’t about owning the most expensive equipment; it’s about understanding which tools match your workflow, budget, and precision requirements.
This guide cuts through the marketing jargon and technical manuals to give you a practical framework for selecting and using alignment tools that actually make sense for your situation. We’ll explore the fundamental principles, compare methodologies, and help you identify the features that separate reliable workhorses from expensive paperweights.
Top 10 Motor Alignment Tools for DIY Technicians
Detailed Product Reviews
1. Toplamper Upgraded Heavy Duty Wheel Alignment Tool Kit with Tape Measures, Stainless Steel Automotive Toe Alignment Tools Hub Stands Balancing Plates for Car Truck SUV (Patent Design)
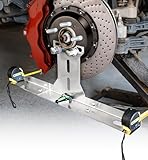
Overview: The Toplamper Heavy Duty Wheel Alignment Tool Kit delivers professional-grade toe measurement capabilities in a DIY-friendly package. Engineered for vehicles ranging from low-profile sports cars to trucks with oversized brake calipers, this stainless steel system provides ±0.1° reference accuracy. The kit includes anti-drop tape measures, leveling gauges, and hub stands—everything needed for precise front-end alignment without repeated shop visits.
What Makes It Stand Out: This tool’s patent design centers on its precision-machined grooves that lock tape measure heads securely, eliminating slippage during critical measurements. The high-grade stainless steel construction resists corrosion and deformation, ensuring lifetime durability even in harsh garage environments or salt-road regions. Integrated hanging points enable clean wall storage, while the broad compatibility handles non-standard brake systems that competitor kits often can’t accommodate.
Value for Money: At $39.99, this kit pays for itself after a single use compared to professional alignment services ($80-$150). The heavy-duty stainless steel plates won’t bend under high loads like aluminum alternatives, preventing measurement drift and replacement costs. For DIY enthusiasts and professional technicians alike, it’s an investment that eliminates recurring expenses while delivering shop-level accuracy.
Strengths and Weaknesses: Strengths include exceptional accuracy (±0.1°), durable stainless steel construction, anti-slip tape measure system, fast setup without calibration, and versatile vehicle compatibility. The integrated storage solution keeps workshops organized. Weaknesses: limited to toe alignment only (no camber/caster), requires perfectly level ground for best results, and beginners may need practice to achieve consistent measurements. The tape measures, while adequate, could be upgraded for enhanced longevity.
Bottom Line: This Toplamper kit is an outstanding choice for anyone serious about maintaining proper toe alignment at home. It combines professional accuracy, robust construction, and thoughtful design at a price point that delivers genuine long-term value.
2. Ziopetru Adjustable Magnetic Gauge Tool, Wheel Camber, Caster Pillar and Wheel Alignment Tools for Automotive Truck RV Tire Repair

Overview: The Ziopetru Adjustable Magnetic Gauge Tool offers an affordable entry point into precision camber and caster measurement for DIY mechanics. Constructed from high-quality PC plastic with a strong magnetic base, this compact device attaches directly to brake rotors or wheel hubs to measure alignment angles from -5 to 5 degrees. Its portability makes it ideal for on-the-go diagnostics and home garage adjustments.
What Makes It Stand Out: This tool’s horizontal adjustment knob simplifies zeroing the bubble level when measuring caster angles—a feature often missing in budget gauges. The powerful magnet ensures firm adhesion to metal surfaces, allowing hands-free operation during adjustments. Its compact 4.8 x 1.2-inch footprint fits easily in any toolbox, while the oxidation-resistant plastic construction withstands workshop conditions without rusting.
Value for Money: Priced at $11.95, this gauge represents exceptional value for occasional alignment checks. It eliminates the need for $100+ shop visits when adjusting suspension components or verifying camber after lowering a vehicle. While plastic construction limits professional durability, the cost savings for DIY users are substantial, making it a smart purchase for hobbyists and home mechanics.
Strengths and Weaknesses: Strengths include unbeatable affordability, strong magnetic mounting, wide vehicle compatibility (cars, trucks, motorcycles), compact portability, and straightforward bubble level operation. The large adjustment knob improves usability. Weaknesses: PC plastic lacks the durability of metal gauges, magnet strength may vary on curved surfaces, limited to -5° to 5° range, and provides no toe measurement capability. Accuracy depends heavily on proper zeroing technique.
Bottom Line: For budget-conscious DIYers needing basic camber and caster checks, the Ziopetru gauge delivers surprising functionality. It’s not professional-grade, but saves significant money and time for occasional suspension work.
3. Toplamper Upgraded Wheel Alignment Tool Kit Heavy Duty Stainless Steel Automotive Toe Alignment Tools with Tape Measures, Hub Stands Balancing Plates Front End for Cars Trucks SUVs (Patent Design)
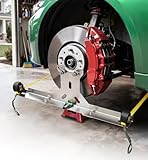
Overview: Achieving professional front-end alignment at home becomes straightforward with Toplamper’s upgraded stainless steel kit. This comprehensive system targets precise toe measurements for cars, trucks, and SUVs, helping reduce uneven tire wear and improve driving stability. The heavy-duty construction ensures consistent performance whether you’re a weekend warrior or seasoned mechanic seeking to bypass costly alignment appointments.
What Makes It Stand Out: The kit’s complete-in-one-box approach includes dual tape measures, toe plates, and a leveler—eliminating the need for additional purchases. Its fast-setup design requires zero complicated calibration; simply place plates against wheels, hook measures, and read results. The upgraded heavy-duty stainless steel resists bending and corrosion far better than aluminum alternatives, while the patent-pending anti-slip grooves deliver repeatable accuracy that builds user confidence.
Value for Money: At $39.99, this kit offers compelling ROI by saving $80-150 per professional alignment. The durable stainless steel construction prevents the warping common in cheaper kits, ensuring measurements remain accurate for years. For families with multiple vehicles or DIY enthusiasts performing regular suspension work, the tool pays for itself within two uses while delivering ongoing tire and fuel savings through proper alignment.
Strengths and Weaknesses: Strengths: comprehensive kit with all necessary components, rapid setup suitable for beginners, robust stainless steel build, improves tire life and fuel efficiency, and delivers professional-level toe accuracy. The included leveler enhances precision. Weaknesses: measures toe only (no camber/caster functionality), requires flat, level surface for optimal accuracy, and tape measures may need replacement after heavy use. Storage bag not included despite wall-mounting points.
Bottom Line: Toplamper’s kit excels for DIY toe alignment, offering professional accuracy and durability at a fraction of shop costs. It’s an essential investment for anyone serious about vehicle maintenance and long-term tire savings.
4. Sixzoo Wheel Alignment Tool, Universal Camber Alignment Tool, Adjustable Magnetic Gauge Tools, Alignments Tools Automotive, Caster Camber Gauge, Tire Repair Accessories for Most Cars Trucks RVs

Overview: The Sixzoo Wheel Alignment Tool provides ultra-budget camber measurement in a pocket-sized package. This adjustable magnetic gauge attaches to brake rotors to measure tilt angles from -5° to 5°, helping restore proper camber after suspension repairs. Made from premium PC plastic, it targets cost-conscious DIYers who need basic alignment verification without investing in professional equipment.
What Makes It Stand Out: At just $8.99, it’s the most affordable camber gauge available while still offering magnetic mounting and responsive adjustment knob functionality. The 1.9-inch magnetic base provides secure adhesion during measurements, and the compact 4.8 x 1.2-inch design stores effortlessly. The back-placed adjustment knob allows precise zeroing, a surprising feature for this price tier that improves measurement consistency.
Value for Money: This tool’s primary value proposition is its rock-bottom price. While it can’t match professional gauge accuracy, it allows DIY mechanics to verify camber settings before and after suspension work, potentially saving diagnostic fees. However, the plastic construction and basic bubble level limit its longevity and precision. It’s best viewed as a disposable tool for occasional use rather than a long-term investment.
Strengths and Weaknesses: Strengths: extremely low cost, compact portability, simple operation, magnetic base for hands-free use, and adequate for basic camber checks. The lightweight design suits mobile mechanics. Weaknesses: PC plastic degrades over time, magnet may slip on dirty or curved rotors, lacks caster measurement capability, no toe functionality, and accuracy is approximate rather than precise. Temperature fluctuations can affect readings.
Bottom Line: The Sixzoo gauge serves ultra-budget DIYers who need occasional camber verification. Accept its limitations and single-use nature, and it delivers marginal value. Serious enthusiasts should invest more for reliability.
5. PMD Products Magnetic Camber, Caster & KPI Alignment Gauge - Precision Wheel Alignment Tool for Accurate Steering Adjustment | Part 916
Overview: The PMD Products Part 916 represents professional-grade alignment technology for serious enthusiasts and technicians. This precision instrument measures camber (-5° to +5°) and caster (+11° to -3°) with fine graduations, while also providing KPI readings. The magnetic base secures firmly to wheel hubs for hands-free operation, and four bubble gauges enable straightforward angle adjustments in demanding shop environments.
What Makes It Stand Out: Unlike budget alternatives, this tool simultaneously measures camber and caster—critical for complete alignment diagnostics. The included alignment angle chart helps quickly identify steering and suspension issues, functioning as both measurement device and diagnostic aid. Its robust construction withstands daily shop use, while the powerful magnetic mounting system remains stable during adjustments, allowing technicians to work efficiently without readjustment.
Value for Money: At $111.99, this is a significant investment that targets advanced DIYers and professionals rather than casual users. However, it replaces multiple single-function gauges and eliminates $150+ alignment shop visits permanently. The durability ensures decade-long service life, while the diagnostic chart adds educational value. For shops or serious enthusiasts aligning multiple vehicles annually, the ROI becomes compelling within the first year.
Strengths and Weaknesses: Strengths: dual camber/caster measurement capability, high precision with fine graduations, secure magnetic mounting, durable shop-grade construction, hands-free operation, and helpful diagnostic reference chart. The extended caster range (+11° to -3°) handles modified vehicles. Weaknesses: premium price excludes casual users, steeper learning curve for beginners, no toe measurement capability, and requires careful handling to maintain accuracy. Overkill for simple camber checks.
Bottom Line: The PMD 916 is the professional’s choice for comprehensive alignment work. Its precision, durability, and dual-functionality justify the cost for serious users who demand accurate, repeatable results across diverse vehicles.
6. 2025 Upgraded Wheel Alignment Tool, 2 PCS Toe Alignment Tool Plates Without Removing Calipers, Wheel Alignment Kit with 2 Measuring Tapes, Compatible with Most Cars and SUVs

Overview: The 2025 Upgraded Wheel Alignment Tool offers DIY enthusiasts a streamlined solution for toe alignment without the hassle of brake caliper removal. This two-plate kit includes measuring tapes and extension pieces, making it compatible with most cars and SUVs for quick home adjustments that improve stability and reduce tire wear.
What Makes It Stand Out: The caliper-free design is a game-changer, eliminating a time-consuming step that traditional tools require. Reinforced thickness in core components provides exceptional durability and stability during use. The included 16.4-foot tape measures deliver precision to 1/32 inch, ensuring accurate readings. Its detachable design collapses to just 16 inches for compact storage, and a hanging hole allows flexible organization in any garage or toolbox.
Value for Money: At $39.99, this kit pays for itself after one avoided shop visit. The upgraded iron construction with corrosion-resistant finish ensures longevity, making it a smart long-term investment for regular maintenance and multiple vehicles.
Strengths and Weaknesses: Strengths include no caliper removal, durable build, precise measurements, compact storage, and broad vehicle compatibility including Jeeps and UTVs. Weaknesses involve potential fitment issues with some brake configurations and a learning curve for absolute beginners unfamiliar with alignment principles.
Bottom Line: For DIY mechanics seeking professional-quality toe alignment at home, this tool delivers exceptional convenience and accuracy. The time-saving design and robust construction make it a worthwhile addition to any garage, saving hundreds in professional fees over time.
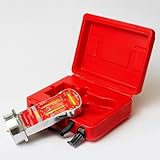
7. Philmore Anti-Static Radio TV Alignment Trimmer Tool Set Kit, 10 Pc Kit, 63-910 by Philmore

Overview: The Philmore Anti-Static Alignment Trimmer Tool Set is a specialized 10-piece kit designed for fine-tuning electronic components in radios, TVs, CBs, and HiFi equipment. These non-conductive tools allow safe adjustment of resistor trimmers and variable capacitors without risking damage to sensitive circuitry. Measuring 4.5 inches in length, they provide excellent control for delicate work.
What Makes It Stand Out: Manufactured from durable Celcon material, these tools prevent static discharge that could destroy sensitive electronics. The kit includes the most common square tips, flat screwdriver blades, and recessed flat blades, covering virtually any adjustment need you’ll encounter in consumer electronics. The anti-static property is critical when working with vintage equipment or modern circuit boards.
Value for Money: At just $9.99, this specialized toolkit is remarkably affordable. Professional-grade anti-static tools often cost three to four times more, making this an excellent value for hobbyists and technicians who need reliable, safe adjustment tools for occasional or regular use.
Strengths and Weaknesses: Strengths include anti-static protection, comprehensive tip variety, durable non-conductive construction, and compact size for storage. Weaknesses are limited to niche electronics use—not suitable for automotive or general mechanical work. Heavy professional use may eventually wear the tips faster than metal tools.
Bottom Line: An essential, cost-effective solution for anyone working with vintage or modern electronics. The anti-static design and comprehensive tip selection make it indispensable for precise component adjustments and repairs, offering peace of mind at an unbeatable price.
8. Zackman Scientific AutoSolo Magnetic Camber Caster Alignment Tool with Kingpin Inclination - Premium Wheel Alignment Tool Kit - Caster Camber Gauge for Your at Home Front End Alignment Tool Kit

Overview: The Zackman Scientific AutoSolo Magnetic Camber Caster Alignment Tool is a professional-grade 3-in-1 instrument designed for comprehensive wheel alignment measurements. It accurately gauges camber, caster, and kingpin inclination angles to optimize vehicle performance, improve handling, and extend tire lifespan. This premium tool serves as a complete solution for front-end geometry analysis.
What Makes It Stand Out: This tool offers exceptional versatility with multiple mounting options, attaching directly to hubs, brake discs, or pairing seamlessly with the AutoSolo Wheel Clamp using a magnetic adapter. The fixed graduation camber gauge spans +5° to -5°, while the adjustable caster gauge covers +11° to -3° for precise adjustments. The kingpin inclination gauge ranges from 0 to 14°, providing complete steering geometry analysis that most DIY tools simply don’t offer.
Value for Money: While pricing isn’t specified, the tool’s multi-functionality and precision engineering justify a premium investment. For serious enthusiasts and professional mechanics, it eliminates the need for multiple separate gauges, consolidating three critical measurements into one durable instrument that saves both money and workspace.
Strengths and Weaknesses: Strengths include comprehensive 3-in-1 measurement capability, magnetic mounting convenience, wide angle ranges, and professional-grade accuracy. Weaknesses include potentially high cost for casual DIYers and the need for proper training to interpret all three measurements correctly and make informed adjustments.
Bottom Line: Ideal for performance enthusiasts and professional technicians requiring detailed alignment data. The magnetic mounting and triple-measurement capability make it a top-tier choice for advanced alignment work and vehicle setup, delivering professional results in a single tool.
9. BESITA Adjustable Magnetic Gauge Tool Camber Alignment Tool Strut Wheel Alignment Tool for Truck Car RV Tire Repair(1pcs)
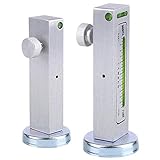
Overview: The BESITA Adjustable Magnetic Gauge Tool is a compact, budget-friendly camber alignment instrument designed for checking and resetting wheel alignment after suspension work. It measures camber and caster angles on wheel hubs or brake discs, making it suitable for cars, trucks, motorcycles, SUVs, and RVs. This simple tool helps protect tire life and ensures proper handling after repairs.
What Makes It Stand Out: This tool features a powerful magnetic mount that securely attaches to metal surfaces, offering hands-free operation during measurements. The adjustable gauge ranges from -5° to +5°, and the magnetic base can be released to function as a standard gradienter (level). The high-density aluminum body houses a precision level vial for accurate readings, and the simple leveling adjustment ensures reliable results.
Value for Money: At just $6.30, this is one of the most affordable alignment tools available. It provides essential camber measurement capabilities at a fraction of professional tool costs, making it accessible to budget-conscious DIYers who occasionally need to check alignment after suspension modifications.
Strengths and Weaknesses: Strengths include extremely low price, strong magnetic mount, simple operation, compact 4.5" size, and dual functionality as a level. Weaknesses include limited measurement range compared to professional tools, potential accuracy concerns at this price point, and lack of comprehensive alignment features like toe measurement.
Bottom Line: A worthwhile entry-level tool for basic camber checks and suspension work. While not a replacement for professional equipment, its magnetic convenience and unbeatable price make it a handy addition to any DIY mechanic’s toolbox for quick diagnostics and ensuring proper camber after installations.
10. Upgraded Wheel Alignment Tool Kit, Toe Alignment Tool Plates with Extension Arms, Heavy Duty Front End Alignment Tool for Cars, Fast Precise DIY Toe Alignment at Home, Fits Lower Calipers, Black

Overview: The Upgraded Wheel Alignment Tool Kit provides a heavy-duty solution for DIY toe alignment without removing brake calipers. Featuring innovative extension arms for improved compatibility, this steel-plate system works on a wide range of vehicles including cars, SUVs, trucks, sports cars with low chassis, and even golf carts. It delivers fast, precise alignment at home with minimal setup time.
What Makes It Stand Out: The extension arms solve fitment issues with lower chassis profiles and uniquely positioned calipers, expanding vehicle compatibility significantly beyond standard kits. Crafted from premium steel, the thickened plates ensure exceptional stability and precision during measurements. The tool sets up in just one minute with only two screws and includes tape measures for immediate use, streamlining the entire process.
Value for Money: At $38.90, this kit offers excellent value. The heavy-duty steel construction ensures longevity through frequent use, while the time-saving design eliminates costly professional alignment fees. It’s a durable, reusable solution for multiple vehicles that pays for itself after a single use and continues saving money over time.
Strengths and Weaknesses: Strengths include no caliper removal requirement, heavy-duty steel build, quick 1-minute setup, broad vehicle compatibility including low-profile cars, and included measuring tapes. Weaknesses include potential storage bulk compared to collapsible alternatives and limitation to toe alignment only without camber/caster capability.
Bottom Line: A robust, user-friendly option for DIY toe alignment. The extension arms and durable steel construction make it particularly valuable for those with lowered vehicles or unique brake setups, delivering professional results at home while saving time and money compared to shop visits.
Why Precision Alignment Matters for DIY Technicians
Misalignment isn’t just a minor inefficiency—it’s a silent destroyer of machinery. When motor shafts and drums run even slightly out of line, you introduce destructive forces that multiply exponentially with speed. For the DIY technician, this translates into bearings that fail in hundreds of hours instead of thousands, seals that leak prematurely, and power consumption that quietly spikes your electricity bill. The financial sting hits harder when you’re paying out-of-pocket for replacement parts and losing productive weekends to re-repairs. Proper alignment isn’t about perfectionism; it’s about engineering economics. A well-aligned system reduces mechanical stress by up to 80%, extends component life by 3-5 times, and delivers measurable performance gains you can feel in smoother operation and hear in reduced noise levels.
Understanding Motor and Drum Alignment Fundamentals
At its core, alignment means establishing a common centerline between two rotating shafts so they operate as if they were one continuous piece. This involves controlling both parallel offset (the distance between shaft centerlines) and angular misalignment (the difference in slope between shafts). Drum applications add complexity because you’re often dealing with heavy, cantilevered loads and thermal growth considerations that don’t exist in simple motor-to-pump setups. The key principle is that alignment is a relative measurement—you’re not measuring the motor’s position in space, but its position relative to the driven component. This relativity is why understanding your reference points and measurement planes becomes critical for repeatable results.
The Two-Plane Rule
Every alignment exists in both horizontal and vertical planes simultaneously. DIY technicians often make the mistake of correcting one plane while ignoring the other. Your tools must help you visualize and correct both planes in a systematic sequence—typically vertical first, then horizontal—to avoid chasing your tail during adjustments.
Common Types of Misalignment You’ll Encounter
Before buying tools, you need to recognize what you’re fighting. Parallel misalignment occurs when shafts are offset but remain parallel to each other—imagine two train tracks side-by-side but never meeting. Angular misalignment happens when shafts meet at an angle, like a V-shape. In practice, you’ll almost always face combination misalignment where both conditions exist. Drum-specific issues include soft foot (where mounting surfaces aren’t coplanar), thermal growth misalignment (where operating temperature changes the alignment), and dynamic misalignment caused by load deflection. Each type requires different measurement strategies and correction techniques that your tool selection must support.
Essential Alignment Tool Categories
DIY technicians have four primary tool categories to consider, each with distinct trade-offs between cost, complexity, and precision. Manual methods using straightedges and feeler gauges offer entry-level affordability but demand significant skill. Dial indicator systems provide excellent precision for the money but require methodical setup and calculation. Laser alignment systems deliver the fastest, most accurate measurements but carry higher upfront costs. Finally, indicator bracketing and fixture systems—often overlooked—determine whether your measurements reflect reality or just bracket flex. Your toolkit should align with your most frequent applications, not just your budget.
Dial Indicator Alignment Systems
Dial indicators remain the gold standard for DIY technicians who value precision without breaking the bank. These mechanical instruments measure shaft position to within thousandths of an inch, giving you the data needed for precise corrections. The classic rim-and-face method uses two indicators simultaneously—one measuring the rim of the coupling hub, another measuring the face—to calculate both parallel and angular misalignment. Reverse dial methods offer even better accuracy by eliminating bracket sag from your measurements. When evaluating dial systems, focus on indicator resolution (0.001" is standard), magnetic base strength, and the rigidity of your mounting posts. The real skill lies not in reading the dial, but in understanding how to interpret measurements at multiple rotation points and translate them into actionable shim adjustments.
Bracket Sag Compensation
The number one source of error in dial indicator work isn’t the instrument—it’s the bracket sagging under its own weight. Always perform a sag check by mounting your setup on a rigid pipe or calibration mandrel, zeroing the indicator at top-dead-center, then rotating 180 degrees to measure the droop. Subtract this sag value from your actual measurements, or better yet, design your fixture to minimize overhang and use lightweight aluminum posts where possible.
Laser Alignment Technology Explained
Laser systems have democratized high-precision alignment, putting industrial-grade accuracy within reach of serious DIYers. These tools project a laser beam from a transmitter on one shaft to a detector on the other, continuously measuring relative position as you rotate. The magic happens in the software, which instantly calculates shim values and horizontal corrections, eliminating manual math errors. For drum applications, look for systems with extended detector range and the ability to measure large diameters. While budget laser kits start around the cost of a quality dial indicator set, they pay dividends in speed and confidence. The learning curve is surprisingly gentle—most systems guide you through the process with on-screen prompts. However, ambient light interference and dirty reflectors can throw off readings, so environmental control matters.
Single vs. Dual Laser Configurations
Entry-level systems use a single laser and detector, requiring you to rotate both shafts together. Dual-laser systems measure each shaft independently, allowing you to correct one machine element while the other remains stationary—ideal for heavy drums that are difficult to rotate. For DIY shops, single-laser systems typically suffice, but consider your specific machinery before deciding.
Reverse Dial Indicator Method
The reverse dial method represents the pinnacle of mechanical alignment precision, using two indicators mounted on opposite shafts to eliminate bracket sag entirely. By taking readings at 12, 3, 6, and 9 o’clock positions and applying a straightforward graphical solution, you achieve accuracy rivaling laser systems at a fraction of the cost. The technique shines in cramped spaces where laser beams would be obstructed. Mastering this method requires understanding the “indicator on the move” principle—your readings reflect the relative motion of the opposite shaft, not the shaft where the indicator sits. While the math is simple addition and subtraction, the conceptual leap takes practice. This approach is perfect for DIY technicians who enjoy the craftsmanship of mechanical measurement and refuse to let budget limit their precision.
Rim and Face Alignment Technique
The rim-and-face method remains the most versatile for DIY applications because it works even when you can’t rotate both shafts together—common with heavy drums or equipment with attached piping. By mounting one indicator to read the rim (parallel offset) and another to read the face (angular misalignment), you capture both error types simultaneously. The technique demands careful bracket design to reach both measurement surfaces, and you must account for coupling hub runout that can skew face readings. For drum work, always verify the drum shell isn’t eccentric to the shaft; otherwise, your rim readings reflect drum warp rather than shaft position. This method teaches fundamental alignment thinking that makes you better with any tool system.
Dealing with Face Reading Complications
Face readings become unreliable when coupling hubs have significant axial runout or when thermal growth changes the face position relative to the shaft centerline. In these cases, take rim readings at multiple axial positions along the shaft or hub to verify your face data, or switch to a reverse dial setup that doesn’t depend on face measurements.
Straightedge and Feeler Gauge Basics
Don’t dismiss these humble tools—when used correctly, they can achieve surprisingly good results for low-speed applications under 1,200 RPM. The technique involves bridging a straightedge across coupling hubs and measuring gaps with feeler gauges at multiple points. Success depends on using a truly straight reference edge (check it against a surface plate) and feeler gauges that are clean and free of burrs. While you won’t achieve the precision required for high-speed motors or precision drums, this method is perfectly adequate for conveyors, slow-speed mixers, and initial rough alignment. The real value lies in developing your eye for what “good enough” looks like and understanding the mechanical relationships before moving to more complex instruments.
Key Features to Evaluate in Alignment Tools
When comparing alignment tools, look beyond marketing claims to practical specifications. Resolution tells you the smallest increment the tool displays, but accuracy tells you how close the reading is to the true value—both matter. Repeatability ensures you get the same measurement when you repeat the process, which is crucial for building confidence in your corrections. For laser systems, check the detector size and measurement range; small detectors limit your offset capacity. For dial indicators, look for AGD (American Gage Design) standard mounting and smooth, consistent plunger action. Consider how the tool handles thermal drift, battery life (for electronic systems), and whether it stores measurements for documentation. The best tool is the one you’ll actually use, so ergonomics and user interface matter as much as raw specifications.
Accuracy Specifications and What They Mean
Manufacturers love to quote impressive accuracy numbers, but context matters. A laser system might claim ±0.0005" accuracy, but that’s under ideal conditions—stable temperature, clean optics, and proper setup. In your shop, realistic accuracy is often ±0.001" to ±0.002", which is still excellent for most applications. For dial indicators, accuracy depends on the grade: Grade A indicators offer ±0.0005" over their full range, while Grade B provides ±0.001"—both are suitable for DIY work. The more important question is: what accuracy does your application actually need? High-speed motors (3,600+ RPM) and precision drums demand tighter tolerances (0.001" or better), while slower equipment can tolerate 0.003" without issue. Don’t pay for precision you can’t utilize.
Budget Considerations for DIYers
Smart tool buying means matching your investment to your usage frequency and consequence of failure. A basic dial indicator set with magnetic base runs $150-300 and handles 80% of DIY alignment needs. Mid-range laser systems start around $800-1,500 and justify their cost if you perform more than 10 alignments annually or work with expensive equipment where downtime is costly. Avoid the temptation to buy the cheapest laser systems under $500—they often lack critical features like bracket sag compensation or thermal drift correction, leading to frustrating inaccuracies. Consider the total cost: dial methods require more time (your labor), while lasers save time but need periodic calibration ($100-200 annually). For most DIY technicians, a quality dial indicator set plus a budget laser system for quick checks creates a versatile, cost-effective arsenal.
When to Rent vs. Buy
For one-off projects involving large machinery, renting a professional laser system ($200-300/day) makes more sense than buying. Use the rental as a learning opportunity—many suppliers offer basic training—and document your process for future reference. If you find yourself renting more than twice a year, it’s time to purchase.
Tool Durability and Build Quality
Your alignment tools will live in harsh environments—oil mist, metal chips, temperature swings, and occasional drops. Dial indicators with jeweled movements and IP-rated laser systems withstand shop life better than delicate instruments designed for inspection labs. Look for indicators with shock-proof movements and magnetic bases with on/off switches that don’t degrade over time. For laser systems, check the IP rating: IP54 handles dust and splashes, while IP65 survives direct water jets. Pay attention to cable quality on wired systems; reinforced connectors prevent the most common failure point. Remember, a $300 indicator that lasts 15 years costs less per alignment than a $100 indicator you replace every two years.
Ease of Use and Learning Curve
The best alignment tool is the one you’ll master quickly enough to use consistently. Dial indicator methods require learning measurement interpretation and graphical calculation—skills that take a weekend to learn but provide lifetime value. Laser systems offer gentler learning curves with guided workflows, but you must understand the underlying principles to recognize when the tool gives bad data. Consider your learning style: if you prefer hands-on mechanical understanding, start with dial indicators. If you’re comfortable with digital interfaces and trust technology, lasers will feel natural. Many manufacturers offer free online training videos—watch them before purchasing to gauge whether the workflow matches your thinking style.
Calibration and Maintenance Requirements
Every alignment tool drifts over time, and trusting uncalibrated instruments leads to perfect alignments that are actually wrong. Dial indicators should be checked annually against a gauge block set or sent out for calibration ($50-75). Laser systems require more formal calibration every 1-2 years, typically costing $150-250 and requiring factory service. However, you can perform interim verification checks using a calibration fixture or precision mandrel to confirm accuracy. Store indicators in their cases with the plunger released to prevent spring set, and keep laser optics clean with lens tissue—not shop rags that scratch. Budget both time and money for maintenance; it’s cheaper than replacing bearings.
DIY Calibration Verification
Create a simple verification standard by mounting a dial indicator on a surface plate and using gauge blocks to check linearity at 0.100" intervals. For lasers, a precision-ground mandrel of known straightness rotated in V-blocks can confirm measurement repeatability. These checks don’t replace professional calibration but catch major errors before they cause damage.
Safety Considerations During Alignment
Alignment work involves rotating machinery, heavy components, and pinch points that can cause serious injury. Always lock out and tag out equipment before starting work—removing power isn’t enough if stored energy can cause movement. When rotating shafts by hand for measurements, ensure all personnel are clear and use smooth, controlled motion. Heavy drums can shift suddenly when shims are removed; support them with jack screws or temporary blocks. Laser beams can cause eye damage; never look directly into the beam, even low-power Class 2 lasers. Magnetic bases can snap onto steel with surprising force—keep fingers clear and ensure they won’t interfere with rotating parts. Document your lockout procedure and have a second person verify it before work begins.
Step-by-Step Alignment Process Overview
Regardless of tool type, alignment follows a logical sequence that prevents wasted effort. Start with a rough alignment using straightedges or visual methods to get within 0.020". Next, address soft foot by checking and correcting all four mounting points—this is non-negotiable and often fixes 50% of vibration issues. Then perform your precision measurement using dial indicators or lasers, taking readings at 12, 3, 6, and 9 o’clock positions. Calculate corrections and add/remove shims at the motor feet only, never the driven equipment. Make horizontal moves using jack bolts or pry bars with controlled force. Re-measure and iterate until you’re within tolerance, typically requiring 2-3 cycles. Finally, torque all fasteners to specification in a star pattern and perform a hot check after the machine reaches operating temperature to verify thermal growth alignment.
The Importance of Soft Foot Correction
Soft foot—where one motor foot doesn’t sit flat—creates a twisting frame that destroys alignment the moment you tighten bolts. Use a feeler gauge or dial indicator at each foot to detect gaps, then add tapered shims or adjust mounting surfaces until all feet contact evenly within 0.002". This step takes 15 minutes but determines whether your alignment holds or fails.
Troubleshooting Common Alignment Challenges
Even with perfect tools, real-world conditions throw curveballs. Indicator readings that don’t make sense often reveal bracket sag or coupling runout—verify by rotating the indicator 360 degrees on a rigid surface. Laser systems that won’t calibrate usually suffer from dirty optics or vibration—clean lenses and stabilize the setup. When corrections don’t improve readings, you’re likely measuring the wrong thing; confirm you’re referencing the correct shafts and not a bent coupling hub. Thermal growth errors appear as good cold alignment that vibrates when hot—solve this by measuring hot alignment and adjusting cold settings to compensate. For drums that won’t rotate smoothly, check for bearing bind or uneven loading before blaming alignment. Keep a logbook of unusual conditions and solutions; it becomes your most valuable diagnostic tool over time.
Frequently Asked Questions
1. How do I know if my alignment is good enough without expensive tools?
Listen and feel. A well-aligned machine runs smoothly with minimal vibration transferred to the frame. Use a simple vibration app on your smartphone as a basic check—if vibration decreases after alignment, you’re moving in the right direction. For low-speed equipment under 1,200 RPM, straightedge and feeler gauge methods can achieve “good enough” results. However, anything over 1,800 RPM benefits from indicator or laser precision. The real test is bearing temperature after 30 minutes of operation—cool bearings indicate good alignment.
2. Can I use automotive feeler gauges for precision alignment work?
Automotive feeler gauges work for rough alignment but lack the precision and flatness needed for critical measurements. They tend to be thinner and more flexible, leading to inconsistent readings. Invest in a machinist’s feeler gauge set with thicker, more rigid blades and clearly marked thicknesses. For alignment, you’ll primarily use the 0.001" to 0.020" range, so ensure your set covers these increments precisely.
3. What’s the biggest mistake DIY technicians make with laser alignment?
Trusting the laser without understanding the fundamentals. Lasers can produce precise measurements of misaligned conditions—like measuring bracket sag as shaft misalignment or reading coupling runout as angular error. Always verify your setup by checking for soft foot first, ensuring brackets are mounted on clean surfaces, and confirming the shafts rotate without bind. The laser is a tool, not a substitute for thinking.
4. How often should I check alignment on my equipment?
Check alignment after any maintenance that involves moving the machine, replacing couplings, or changing foundations. For permanently installed equipment, perform a verification check annually or if you notice increased vibration, noise, or temperature. Mobile equipment or machines subject to thermal cycling need checks every 3-6 months. Drums with heavy loads or frequent start-stop cycles benefit from quarterly checks. Document each measurement to track drift patterns.
5. Is it worth buying a used dial indicator set?
Used dial indicators can be excellent values if you verify their condition. Check for smooth plunger action without sticking, a clear, uncracked crystal, and a bezel that rotates freely. Test repeatability by measuring the same point multiple times—readings should repeat within one increment. Avoid indicators with visible rust, bent pointers, or missing parts. Quality brands from decades ago often have better movements than new budget tools, making them smart purchases.
6. What’s the difference between coupling alignment and shaft alignment?
Coupling alignment measures the relationship between coupling hubs, while shaft alignment measures the actual shaft centerlines. This distinction matters because coupling hubs can be eccentric or mounted off-center on their shafts. Always aim for shaft alignment, not just coupling alignment. Use rim readings taken close to the shaft body rather than the coupling periphery, and verify hub concentricity before trusting face readings.
7. How do temperature changes affect my alignment measurements?
Temperature affects everything. Steel shafts grow approximately 0.0000065" per inch per degree Fahrenheit. A 100°F temperature rise on a 24" shaft means 0.015" of growth—enough to destroy alignment. Always measure alignment at the same temperature when comparing readings, and prefer “hot alignment” measurements when possible. For cold alignment, research the thermal growth specifications of your equipment and adjust accordingly—typically by setting the motor slightly low to compensate for growth.
8. Can I align equipment by myself, or do I need a helper?
Most alignment tasks are manageable solo with the right preparation. Use jack bolts to control horizontal movement precisely, and create a measurement routine where you can rotate the shafts and read indicators from one position. Laser systems with remote displays are ideal for single-person operation. The main challenge is rotating heavy drums alone—consider a strap wrench or pipe wrench on the drum shell for leverage. For safety, always have someone aware that you’re working on the equipment, even if they don’t assist directly.
9. Why do my alignment corrections seem to change after I tighten the bolts?
This classic problem stems from soft foot, bolt bind, or frame distortion. When you loosen bolts, the motor shifts to relieve internal stress; tightening forces it back. Always perform a “bolt-bound check” by loosening one foot at a time and measuring movement. If a foot moves more than 0.002" when loosened, you have soft foot to correct. Use jack bolts to hold alignment position while tightening, and always torque bolts in a star pattern to minimize distortion.
10. What’s the minimum tool investment to do alignment properly?
For under $300, you can acquire a quality dial indicator set with magnetic base, machinist’s feeler gauges, and precision shim stock—enough to handle most DIY alignment needs with excellent results. This mechanical approach teaches fundamental skills that transfer to any method. If your budget allows $1,000-1,500, add an entry-level laser system for speed and convenience. Avoid spending less than $150 on alignment tools; the compromises in accuracy and durability will cost more in failed components and frustration than the initial savings.