Tired of wrestling with floor coverings that refuse to stay put or demand a degree in engineering just to snap together? You’re not alone. Many homeowners and workshop enthusiasts face the frustrating reality of mats that curl at the edges, shift underfoot, or create hazardous tripping hazards the moment you step on them. The dream of a clean, protected, and instantly upgradeable space often dies at the hands of complicated installations and subpar materials. But what if transforming your garage, gym, or playroom floor could be as simple as putting together a puzzle? The right interlocking system turns that dream into a satisfyingly straightforward reality, offering durability without the DIY dread.
Easy installation isn’t just a convenience—it’s the cornerstone of a functional, long-lasting floor solution. When mats lock together seamlessly and stay firmly in place, you avoid the constant annoyance of repositioning, the safety risks of gaps or raised edges, and the wasted time that eats into your projects or relaxation. This guide cuts through the marketing noise to focus solely on the features and considerations that actually make interlocking floor mats effortless to install and reliable for years. Forget fleeting trends; we’re diving deep into the engineering, materials, and smart selection strategies that deliver true “snap-and-go” simplicity, empowering you to tackle your next flooring project with confidence and zero guesswork.
Top 10 Interlocking Floor Mats
Detailed Product Reviews
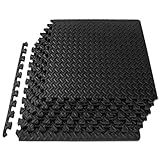
1. ProsourceFit Puzzle Exercise Mat ½ in, EVA Interlocking Foam Floor Tiles for Home Gym, Mat for Home Workout Equipment, Floor Padding for Kids, Black, 24 in x 24 in x ½ in, 48 Sq Ft - 12 Tiles

Overview:
This 48-square-foot ProsourceFit mat set provides essential floor protection for home gyms, featuring 12 interlocking 24"x24" EVA foam tiles in black. Designed to shield floors from equipment impact and moisture while offering cushioning for workouts or play areas, it suits diverse indoor spaces like garages and basements.
What Makes It Stand Out:
Its half-inch thickness delivers superior joint support compared to thinner mats, while the non-toxic, phthalate-free EVA foam ensures safety. The water-resistant, noise-dampening properties and included edge borders create a polished, professional finish. Easy snap-together assembly allows quick reconfiguration or storage.
Value for Money:
Priced competitively for 48 sq ft of high-density coverage, it outperforms cheaper rubber alternatives in comfort and durability. The longevity justifies the investment, especially for frequent gym users, though budget buyers might consider smaller sets initially.
Strengths and Weaknesses:
Strengths: Excellent cushioning; easy cleaning; versatile for kids/gym use; secure interlocks; non-slip surface.
Weaknesses: Foam may compress permanently under heavy static loads; minor texture variation between batches; requires flat surfaces for optimal stability.
Bottom Line:
An outstanding choice for serious home gym owners needing durable, spacious floor protection. Its balance of safety, comfort, and ease of use makes it a top-tier value for dedicated fitness spaces.
2. bemaxx Gym Mats Set - 18 pcs EVA Interlocking Foam Floor Tiles (12.6"x12.6"x0.4") 18sqft Protective Gym Flooring Sports Home Workout Exercise Mats Puzzle Garage Fitness Play-Room Pool Treadmill Bike

Overview:
The bemaxx 18-tile set covers 18 sq ft with compact 12.6"x12.6" puzzle pieces, ideal for targeted equipment protection. Its thinner 0.4-inch profile suits spaces under treadmills or bikes, emphasizing portability and flexible layout customization for renters or small areas.
What Makes It Stand Out:
The smaller tile size enables intricate configurations around obstacles, while BPA-free EVA foam offers eco-friendly safety. Noise reduction, sweat resistance, and included edge pieces enhance functionality. The standout 24/7 customer support provides unmatched peace of mind.
Value for Money:
This budget-friendly set excels for localized protection needs. While less cushioned than thicker mats, its expandable design and durability justify the cost for partial coverage, though larger spaces require multiple sets.
Strengths and Weaknesses:
Strengths: Highly adaptable layout; lightweight portability; easy maintenance; strong customer service; effective impact absorption for its size.
Weaknesses: Limited total coverage (18 sq ft); thinner foam reduces joint support; edges may loosen under heavy lateral movement.
Bottom Line:
Perfect for renters or those protecting specific equipment zones. Its flexibility and responsive support make it a smart buy for compact or evolving workout areas.
3. ProsourceFit Puzzle Exercise Mat ½ in, EVA Interlocking Foam Floor Tiles for Home Gym, Mat for Home Workout Equipment, Floor Padding for Kids, Black, 24 in x 24 in x ½ in, 24 Sq Ft - 6 Tiles
Overview:
This 24-square-foot ProsourceFit kit—half the size of Product 1—features six 24"x24" black EVA tiles. It delivers the same core protection in a more affordable, space-conscious package, ideal for apartments, small home gyms, or children’s play zones.
What Makes It Stand Out:
Retaining the full half-inch thickness and non-toxic foam of its larger sibling, it offers identical joint support and durability. The compact size simplifies storage and setup, while edge borders maintain a seamless appearance even in minimalist layouts.
Value for Money:
An excellent entry point for first-time buyers. You gain ProsourceFit’s premium build quality at a lower price, though expanding later may cost more per sq ft than buying the 48-sq-ft set upfront.
Strengths and Weaknesses:
Strengths: Consistent high-density cushioning; quick assembly; easy cleaning; versatile for multiple uses; reduced upfront cost.
Weaknesses: Insufficient for full-room coverage; same compression risk under heavy weights; minimal color/texture options.
Bottom Line:
Highly recommended for small spaces or trial use. It captures ProsourceFit’s core benefits affordably but consider the larger set if you anticipate needing more coverage soon.
4. ProsourceFit Puzzle Exercise Mat ½ in, EVA Interlocking Foam Floor Tiles for Home Gym, Mat for Home Workout Equipment, Floor Padding for Kids, Grey, 24 in x 24 in x ½ in, 48 Sq Ft - 12 Tiles

Overview:
Identical to Product 1 but in grey, this 48-sq-ft ProsourceFit set uses 12 interlocking 24"x24" tiles to protect floors while adding a modern aesthetic. It maintains all functional benefits for gyms, playrooms, or garages with a neutral color option.
What Makes It Stand Out:
The grey finish elevates decor compatibility, blending seamlessly with contemporary home styles. Beyond aesthetics, it shares the original’s half-inch thickness, phthalate-free foam, and robust noise/water resistance, making it functionally superior to basic mats.
Value for Money:
Priced similarly to the black version, the grey option offers design flexibility without compromising value. It remains a cost-effective solution for large areas compared to rubber mats, though color consistency may vary slightly.
Strengths and Weaknesses:
Strengths: Stylish neutral tone; premium cushioning; easy reconfiguration; durable for high-traffic use; includes edge trim.
Weaknesses: Foam compression under heavy equipment; potential batch-related color shifts; requires flat subfloor.
Bottom Line:
Choose this if aesthetics matter—its refined grey hue and identical performance make it the ideal pick for design-conscious home gyms needing full coverage.
5. Art3d Eva Puzzle Exercise Mats, 24"x24" x 1/2” Thick Foam Interlocking Tiles for Gyms, Flooring, Workout, Gym Equipments, Pack of 6

Overview:
Art3d’s 24-sq-ft set (six 24"x24" tiles) emphasizes joint protection and portability. Targeting home users, it balances cushioning with compact storage, fitting neatly in closets or under beds when not in use.
What Makes It Stand Out:
Its standout feature is optimized storage—tiles nest efficiently without warping. The half-inch thickness ensures solid support, while the non-slip surface and wipe-clean design prioritize safety and convenience for frequent movers.
Value for Money:
Competitively priced for its size, it’s ideal for temporary setups or travelers. Though lacking edge borders, the focus on stowability offers unique value for space-limited users over bulkier alternatives.
Strengths and Weaknesses:
Strengths: Exceptional portability; joint-friendly thickness; sweat-resistant; secure grip; simple maintenance.
Weaknesses: No border pieces for finished edges; limited coverage for full workouts; durability untested for heavy weights.
Bottom Line:
Best for minimalist or mobile fitness routines. If storage space is critical and you need reliable cushioning for small zones, this set delivers thoughtful design at a fair price.
6. SUPERJARE 0.56’’ Thick 12 Pcs 48 Sq Ft Rubber Top Exercise Equipment Mats, High Density EVA Foam Mats with Rubber Top, Interlocking Gym Flooring for Home Gym, Protective Workout Mat, Black/Grey

Overview:
This 48 sq ft gym flooring system features a dual-layer design with a high-density EVA foam base and durable EPDM rubber top layer. Targeted at home gym users, it aims to protect floors from heavy equipment while providing stability during intense workouts like deadlifts or HIIT sessions.
What Makes It Stand Out:
The upgraded rubber surface eliminates typical odors and delivers exceptional grip without sacrificing cushioning—critical for dynamic movements. Its noise-dampening foam layer significantly reduces impact vibrations, ideal for multi-story homes. The included detachable borders allow customizable layouts (square/rectangular), and the interlocking system handles heavy loads without tearing.
Value for Money:
Priced competitively for 48 sq ft of premium dual-layer protection, it outperforms single-layer EVA mats that compress under heavy weights. The rubber top extends longevity compared to budget alternatives, justifying the cost for serious lifters who prioritize floor safety and workout stability.
Strengths and Weaknesses:
Strengths: Superior traction; excellent noise reduction; odor-free rubber; easy reconfiguration; robust scratch protection. Weaknesses: Thinner (0.56") than some competitors, potentially less joint cushioning; rubber layer may require occasional cleaning to maintain grip.
Bottom Line:
A top-tier choice for home gyms demanding durability and safety. Its dual-layer innovation solves common pain points like slippage and noise, making it worth the investment for dedicated fitness enthusiasts.
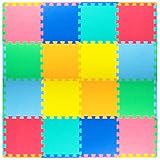
7. ProSource Foam Puzzle Floor Play Mat for Kids and Babies with Solid Colors, 36 or 16 Interlocking Tiles with Borders, Assorted
Overview:
This 16 sq ft play mat set includes 16 interlocking 12"x12" EVA foam tiles with 24 border pieces, designed for infants and toddlers. It prioritizes safety and developmental support on hard floors, featuring non-toxic materials and vibrant primary colors.
What Makes It Stand Out:
The phthalate-free, textured foam offers gentle cushioning for crawling and early walking, while bright colors stimulate visual development. Its simplicity shines: tiles snap together effortlessly, cover a 4’x4’ area, and can be scaled down for small spaces. The solid colors avoid overwhelming patterns, appealing to minimalist nurseries.
Value for Money:
An affordable entry-point for childproofing floors. While thinner (≈0.4") than gym mats, its focus on safety and portability justifies the price for parents needing temporary, reconfigurable play zones. Cheaper than custom flooring but more durable than disposable playmats.
Strengths and Weaknesses:
Strengths: Non-toxic and safe; promotes sensory development; ultra-portable; easy to clean; compact storage. Weaknesses: Limited thickness offers minimal impact protection for active toddlers; borders may detach if pulled; not suitable for heavy equipment.
Bottom Line:
Perfect for creating a safe, stimulating play area for babies and young children. Its balance of safety, simplicity, and developmental value makes it a smart buy for parents.
8. bemaxx Gym Mats Set - 18 pcs EVA Interlocking Foam Floor Tiles (12.6"x12.6"x0.4") 18sqft Protective Gym Flooring Sports Home Workout Exercise Mats Puzzle Garage Fitness Play-Room Pool Treadmill Bike

Overview:
This 18 sq ft set offers lightweight EVA foam tiles (0.4" thick) with anti-slip texture, targeting home gyms, garages, and playrooms. It emphasizes portability and floor protection under equipment like treadmills or bikes.
What Makes It Stand Out:
Its BPA-free, eco-friendly foam combines noise reduction with water resistance—a rarity in budget mats. The expandable puzzle design allows flexible layouts, while the 24/7 customer support addresses durability concerns. Ideal for renters needing temporary, non-damaging floor solutions.
Value for Money:
Competitively priced for 18 sq ft of multi-surface protection. Though thinner than premium gym mats, its versatility (garage/playroom/gym) and included edge pieces offer broad utility. Best for light-to-moderate use where extreme weight resistance isn’t critical.
Strengths and Weaknesses:
Strengths: Highly portable; easy assembly/cleaning; waterproof; strong customer support; non-toxic. Weaknesses: Thin profile (0.4") limits joint cushioning; may compress under heavy weights; edges can loosen over time.
Bottom Line:
A practical, adaptable mat for casual home workouts or play areas. Its eco-credentials and support network enhance value, though serious lifters should consider thicker options.
9. ProsourceFit Weaved Pattern Extra Thick Exercise Puzzle Mat ¾-inch, EVA Foam Interlocking Tiles for Protective, Cushioned Flooring for Home and Gym Equipment; Black, 24 SQ FT, 6 Tiles

Overview:
This 24 sq ft system features extra-thick (¾") 24"x24" EVA foam tiles with a distinctive weaved texture, designed for heavy gym use. Includes 6 tiles and 12 borders for a polished finish under weight racks or equipment.
What Makes It Stand Out:
The exceptional ¾" thickness provides superior shock absorption—rare in puzzle mats—reducing joint strain during high-impact exercises. The textured surface prevents slipping, while the large tile size minimizes seams. Phthalate-free foam ensures safety without compromising density.
Value for Money:
Priced higher than standard mats, but the thickness justifies cost for heavy equipment users. Covers more area per tile (24 sq ft vs. typical 16–18 sq ft sets), reducing assembly time. Outperforms thinner mats in longevity under barbells or kettlebells.
Strengths and Weaknesses:
Strengths: Industry-leading thickness; excellent cushioning; durable texture; clean aesthetic with borders; quiet operation. Weaknesses: Heavier and bulkier to store; surface may compress under extreme point loads; borders require precise alignment.
Bottom Line:
The gold standard for home gym flooring where cushioning and stability are paramount. Worth the premium for lifters prioritizing joint safety and equipment protection.
10. Interlocking Floor Mats - 8-Piece Nontoxic Exercise Mat or Play Mat for Toddlers, Babies or Kids - Foam Padding for Home Gym by Stalwart (Multicolor)

Overview:
An 8-tile multicolor set (12"x12"x0.4") targeting dual use: toddler play areas and light home gym setups. Made from non-toxic EVA foam with vibrant red, yellow, blue, and green tiles.
What Makes It Stand Out:
The bold colors double as visual stimulation for kids and gym zone markers. Marketed for indoor/outdoor versatility (e.g., camping tents), though EVA foam degrades in prolonged sun. The thin profile aids portability, and wipe-clean maintenance suits active households.
Value for Money:
Budget-friendly for small spaces (8 sq ft), but limited coverage restricts gym utility. Better suited as a play mat—its thinness (0.4") lacks cushioning for serious workouts. Multicolor design adds fun but may not match gym aesthetics.
Strengths and Weaknesses:
Strengths: Non-toxic and safe for kids; easy storage/cleaning; affordable; color-coded for play. Weaknesses: Too thin for gym equipment; outdoor claims are unrealistic; minimal impact protection; borders not included.
Bottom Line:
A decent toddler play mat, but inadequate for gym use. Save for nurseries or playrooms—not recommended for fitness equipment due to insufficient thickness and coverage.
Key Features That Make Installation Effortless
Understanding Interlock Design Mechanics
The heart of easy installation lies in the interlock mechanism itself. Not all connections are created equal. Some systems use a simple friction fit, which can loosen over time, especially with temperature changes or heavy use. Others employ more sophisticated tongue-and-groove or double-tongue designs that create a tighter, more secure bond between tiles. Look for systems where the interlocks engage smoothly with a distinct “snap” sound or feel, indicating a positive lock. This mechanical connection is crucial for preventing lateral movement and ensuring the entire mat surface remains stable and flat, even under rolling loads or heavy foot traffic. A well-engineered interlock minimizes the need for adhesives or anchors right from the start.
Evaluating Material Flexibility and Rigidity Balance
The material’s inherent properties dramatically impact how easy it is to assemble the floor. Mats need enough flexibility to allow the interlocks to snap together without excessive force, yet sufficient rigidity to maintain their shape and resist warping once installed. Overly stiff materials can be difficult to manipulate, especially in cooler temperatures, leading to broken tabs or frustrated installers. Conversely, mats that are too soft or flexible might buckle under pressure or fail to hold their interlocked position. The ideal material, often a specific grade of rubber or high-density foam, offers this perfect Goldilocks zone – pliable enough for easy connection but firm enough to stay put and provide a stable walking surface.
Assessing Edge Design for Seamless Integration
How the outer edges of the mats are designed significantly affects the overall appearance and functionality, especially around walls, obstacles, or transitions. Mats with beveled or tapered edges create a smoother, more finished look and reduce the chance of tripping on a slight lip. More importantly for installation ease, consistent edge profiles ensure that perimeter pieces lock together just as securely as interior ones. Avoid systems where the edge pieces require a completely different connection method or special cutters; seamless integration of all tiles, including borders, streamlines the entire process and prevents weak points along the room’s perimeter.
Material Science: Choosing for Performance and Simplicity
Rubber vs. Foam: Installation Implications
The core material choice fundamentally shapes the installation experience. Rubber mats (often EVA or recycled rubber) generally offer superior durability, weight, and resistance to oils and chemicals, making them ideal for garages or workshops. Their higher density usually means a more substantial, stable feel once locked, but they can be heavier to handle during setup. Foam mats (like polyethylene or PVC foam) are typically lighter, easier to carry and position, and often have more forgiving interlocks that snap together with less force. However, they might require more careful placement to avoid shifting and can be less stable under very heavy equipment. Consider your space’s primary use: prioritize rubber for heavy-duty, high-traffic areas where ultimate stability is key, and foam for lighter-use areas like playrooms or home gyms where ease of initial placement is paramount.
Density and Thickness: Impact on Stability and Handling
Thickness isn’t just about cushion; it directly influences installation ease and final stability. Thinner mats (under 1/4 inch) are generally the easiest to maneuver and connect but may feel less substantial and can be more prone to shifting on uneven subfloors. Thicker mats (1/2 inch and above) provide excellent cushioning and hide minor subfloor imperfections better, but their increased weight and stiffness can make the initial snapping together require more effort. Density plays a parallel role – high-density materials resist indentation but can be harder to flex for interlocking, while lower densities are easier to connect but might compress more over time. Aim for a thickness (typically 3/8" to 1/2") and density appropriate for your intended use that balances easy connection with the stability you need.
Surface Texture and Its Role in Traction During Setup
While primarily chosen for slip resistance after installation, the surface texture also matters during the build process. A very aggressive, deep-knurled texture can sometimes make it slightly harder to slide adjacent mats into perfect alignment before they lock. Conversely, an overly smooth surface might cause mats to slip too easily while you’re trying to position them. Look for a moderate, consistent texture that provides enough grip to hold mats in place during assembly without hindering the final snapping motion. This subtle feature reduces fiddling and helps achieve a perfectly aligned grid faster.
Environmental Resistance and Long-Term Installation Integrity
Consider how the material will interact with your specific environment over time, as this affects the longevity of the easy installation. Mats exposed to UV light (like in sunrooms or uncovered garages) need UV stabilization to prevent fading and brittleness, which can cause interlocks to crack and fail. In areas prone to moisture (basements, workshops), ensure the material is inherently mold and mildew resistant; trapped moisture degrading the mat edges will compromise the interlock. Oil and chemical resistance is non-negotiable for garage floors. Choosing a material resilient to your space’s conditions means the easy installation you experience on day one remains effective for years, not weeks.
Selecting the Right System for Your Space
Measuring Your Space Accurately: Avoiding Costly Mistakes
Accurate measurements are the absolute foundation of a smooth installation. Don’t just measure the length and width; account for every nook, cranny, pillar, drain, or permanent fixture. Sketch a simple diagram of the room, noting all dimensions and obstacles. Remember that interlocking mats require a small expansion gap (usually 1/4" to 1/2") around the entire perimeter to allow for material expansion due to temperature changes. Failing to measure precisely leads to buying too few mats (requiring a second order and potential shade variations) or too many (wasted money), and worst of all, forces excessive cutting, which is the single biggest hurdle to a truly easy installation. Measure twice, order once.
Navigating Subfloor Conditions: Smooth is Key
The success of any interlocking mat system hinges on the subfloor beneath it. These mats are designed to lie flat and lock securely, but they cannot magically level a severely uneven, cracked, or debris-covered surface. Before unboxing a single tile, thoroughly sweep and clean the subfloor. Address major cracks or height variations (more than 1/8") in concrete with a self-leveling compound. Remove any protruding nails, staples, or large debris. A relatively clean, level, and dry subfloor is essential. Trying to install over significant imperfections forces mats to flex unnaturally, stressing the interlocks, creating gaps, and making the entire floor feel unstable – the opposite of easy installation.
Considering Room Layout and Obstacle Integration
Complex room shapes with numerous corners, pillars, or built-in cabinets demand more strategic planning. Identify where full tiles will go and where you’ll inevitably need to cut pieces. While cutting is sometimes unavoidable, a good system minimizes it. Look for manufacturer-provided layout tools or apps that help visualize the pattern and calculate cuts. Consider if the system offers compatible ramp or threshold connectors for doorways – these specialized pieces integrate seamlessly and are far easier to install than trying to modify standard tiles for transitions. Planning the layout on paper first saves immense time and frustration during the actual build.
Evaluating Packaging and Organization for Hassle-Free Setup
Don’t underestimate how packaging impacts the installation experience. Mats shipped loose in a box can be a tangled nightmare. Systems that come pre-sorted in manageable bundles, with clear labeling of edge pieces or different tile types (if applicable), significantly speed up the process. Look for packaging that protects the interlocks from damage during shipping – dented or bent tabs are a major installation headache. Some premium systems even include basic layout chalk or alignment tools in the box. While not a core performance feature, thoughtful packaging organization directly translates to a smoother, less frustrating setup from the moment you open the box.
Mastering the Installation Process
Essential Tools: Keeping It Simple
One of the biggest appeals of interlocking mats is the minimal tool requirement. For most standard installations on a good subfloor, you truly only need a few basic items: a sharp utility knife and a straightedge (like a metal ruler or level) for any necessary cuts, a tape measure for final positioning checks, and possibly a rubber mallet to gently tap interlocks fully home if the fit is very tight (avoid excessive force). Forget complicated adhesives, heavy rollers, or specialized cutters – the beauty is in the simplicity. Having a clean broom and dustpan on hand to prep the subfloor is also wise. Keeping your tool list minimal reinforces the ease-of-installation promise.
Step-by-Step Layout Strategy for Perfection
Start by establishing a solid reference line. This is crucial for a straight, professional-looking installation, especially in rectangular rooms. Snap a chalk line parallel to the longest wall, set back by the width of one tile plus your expansion gap. Begin laying full tiles along this line, working away from the wall. Always connect mats in both directions (length and width) as you go to maintain alignment – don’t lay out a whole row before connecting the next. Periodically check alignment with your reference line and measure diagonally across sections (the “3-4-5” triangle method) to ensure squareness. This systematic approach prevents cumulative errors that lead to crooked floors and difficult cuts later.
Handling Cuts and Obstacles Like a Pro
When cuts are unavoidable (around pillars, drains, or complex corners), precision is key to maintaining the easy-install feel. Measure twice. Place the mat to be cut upside down on a scrap piece of wood or cardboard. Use your straightedge firmly against the mat edge and make multiple light scoring passes with the utility knife rather than one heavy cut. For curved cuts (like around pipes), drill a small starter hole just inside your marked line, then carefully cut along the curve with the knife. Remember to leave the recommended expansion gap around all fixed obstacles. Taking time for accurate cuts ensures these pieces lock securely with adjacent full tiles, preserving the overall integrity of the floor.
Final Checks and Long-Term Stability Assurance
Once the mats are fully interconnected, perform a thorough walkthrough. Apply firm pressure with your foot on seams and corners – listen and feel for any shifting, popping, or gaps. The entire surface should feel uniformly stable with no noticeable movement between tiles. Check the perimeter gap is consistent. If any sections feel loose, gently lift the affected area and ensure all interlocks are fully engaged; a light tap with a rubber mallet can help. Finally, clean the surface according to the manufacturer’s instructions. This initial quality check, combined with choosing a system designed for stability, ensures that the “easy installation” you enjoyed during setup translates into a floor that stays locked tight and performs reliably for the long haul.
Frequently Asked Questions
Frequently Asked Questions
How do I know if my subfloor is suitable for interlocking mats? Your subfloor needs to be clean, dry, structurally sound, and relatively level. Minor imperfections (less than 1/8" over 10 feet) are usually acceptable, but major cracks, significant slopes, or debris will cause installation problems and instability. Sweep thoroughly and address large holes or height differences before starting.
Can interlocking mats be installed over existing tile or vinyl flooring? Generally, yes, if the existing floor is flat, seamless, and in good condition. Grout lines can sometimes telegraph through thinner mats or create slight unevenness. Ensure the surface is clean and free of wax or residues that could prevent the mats from lying flat. Test a small section first.
What’s the best way to cut mats around pipes or irregular shapes? Drill a small hole just inside your marked cut line to insert the utility knife blade. Make multiple light scoring passes along the marked curve or shape, rotating the mat as needed. Use a sharp blade and replace it if it becomes dull to ensure clean cuts.
Do I really need to leave an expansion gap around the walls? Absolutely. This small gap (typically 1/4" to 1/2") is critical. It allows the mats to expand slightly in warmer temperatures or humidity without buckling or lifting at the edges. Cover this gap later with quarter-round molding or baseboard for a finished look.
How can I prevent mats from shifting after installation, especially in high-traffic areas? Proper interlock engagement during installation is the primary defense. Ensure seams are fully snapped together. For extra security on very smooth subfloors or in ultra-high-traffic zones, double-sided tape specifically designed for flooring (applied sparingly to perimeter tiles) can help, but it shouldn’t be necessary with a quality system on a suitable subfloor.
Can interlocking mats be used outdoors, like on a patio? Some UV-stabilized rubber mats are suitable for covered outdoor areas, but most standard interlocking systems are designed for indoor use. Direct, prolonged sun exposure will cause non-UV-stabilized mats to fade, become brittle, and fail. Check the manufacturer’s specifications explicitly for outdoor suitability.
How do I clean and maintain interlocking mats to keep them looking new? Regular sweeping or vacuuming removes debris. For deeper cleaning, use a mild soap (like dish soap) and water solution with a soft brush or mop. Avoid harsh chemicals, solvents, or abrasive cleaners which can degrade the material. Rinse well and allow to air dry. Address spills promptly.
What should I do if an interlock tab breaks during installation? Handle mats carefully, especially in cold weather when materials can be more brittle. If a tab breaks, the affected tile usually needs replacement. Contact the manufacturer – many offer individual tile replacements or small packs for repairs. Don’t try to force a broken interlock; it will compromise stability.
Are interlocking mats safe for underfloor heating systems? Many high-quality rubber and certain foam mats are compatible with hydronic (water-based) underfloor heating systems. However, always verify the specific temperature limits and compatibility with both your mat manufacturer and your heating system provider before installation. Avoid electric underfloor heating mats directly beneath interlocking tiles.
Can I install interlocking mats over radiant heating cables? Installing directly over electric radiant heating cables embedded in the subfloor is generally not recommended. The mats can insulate the cables, potentially causing overheating and damaging both the cables and the mats. Always consult both your mat manufacturer and heating system installer for specific compatibility and safety guidelines.